Book TOC · Previous · Chapter 4 of 8 · Next
Chapter 4: Managed Application Delivery: Cloud Load Balancing, Cloud CDN & Cloud DNS
Chapter Focus: External/Internal Application & Proxy/Passthrough Network Load Balancers, Cross-Region LB, Traffic Director, Cloud CDN cache modes/signed URLs, Cloud DNS peering/forwarding, Split-Horizon DNS, and DNSSEC.
Subsection 3.1: Configuring load balancing
The Big Picture
In cloud networking, treating a load balancer as a simple round-robin traffic splitter is one of the fastest ways to cause regional cascading outages, asymmetric return-path drops, and unexpected TLS termination bottlenecks. Google Cloud does not use a single monolithic load balancer appliance; instead, it splits load balancing across two fundamentally distinct software-defined data planes: Google Front Ends (GFEs) combined with Maglev at the global edge, and Andromeda virtual network virtualization (alongside managed Envoy proxies) inside the VPC. When architects confuse a passthrough Network Load Balancer with a proxy-based Application or Proxy Network Load Balancer, they routinely misconfigure firewall source IP ranges, fail to allocate regional proxy-only subnets, or break client IP preservation (X-Forwarded-For vs Proxy Protocol vs direct DSR packet delivery).
A second class of production failures occurs during backend scaling and hybrid or container integration. Standard VM-based load balancing routes traffic to node IPs and relies on kube-proxy iptables or IPVS rules to hop across nodes to reach the target Pod—introducing double NAT, hair-pinning latency, and connection drops when nodes scale down before conntrack entries expire. Similarly, mixing UTILIZATION and RATE balancing modes across heterogeneous backends or misconfiguring health check firewall rules (35.191.0.0/16 and 130.211.0.0/22) leads to healthy backends being marked UNHEALTHY, triggering global spillover or complete service blackholes.
Consideration 3.1a: Determining load balancer type
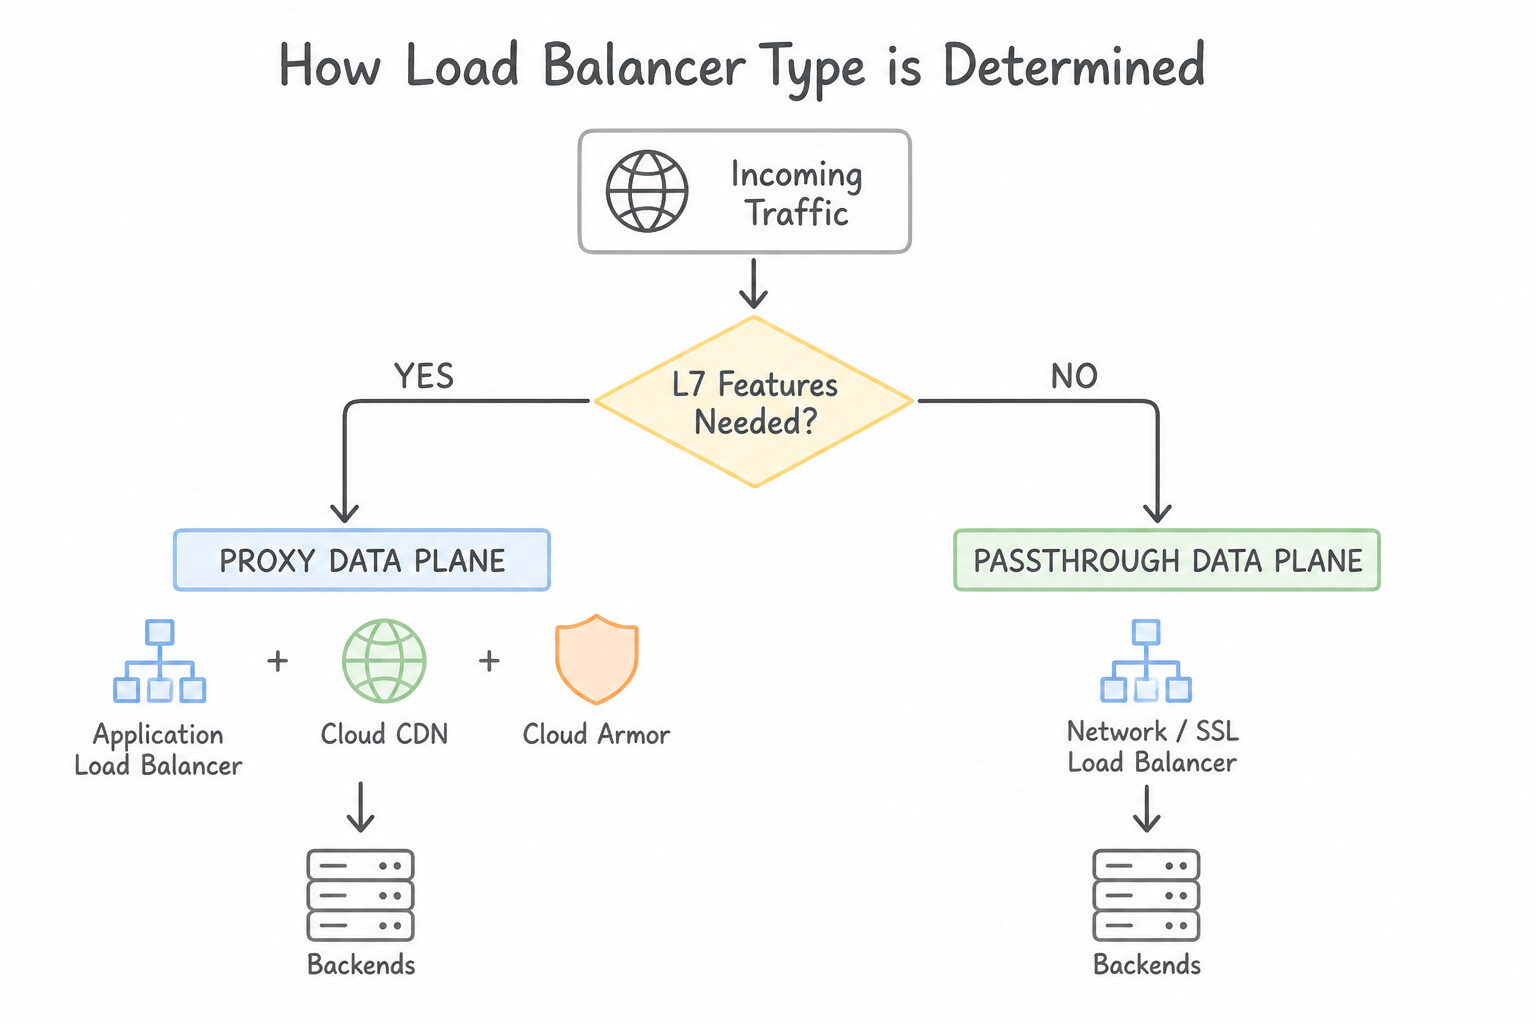
- Proxy vs. Passthrough Data Planes:
- Proxy Load Balancers (Application Load Balancers and Proxy Network Load Balancers) terminate the client TCP/TLS session at the Google Front End (GFE) or regional Envoy proxy and open a brand-new TCP connection to the backend. Backend VMs see the source IP of the GFE (
35.191.0.0/16,130.211.0.0/22) or the regional proxy-only subnet CIDR, never the raw client IP in the L3 packet header. - Passthrough Load Balancers (External Passthrough Network LB via Maglev and Internal Passthrough Network LB via Andromeda) do not terminate TCP connections or modify packet headers. packets arrive at the backend VM with the original client source IP and the load balancer's Virtual IP (VIP) as the destination IP (Direct Server Return / DSR semantics, programmed automatically by the guest agent
google-guest-agentas a local route on the VM). - Global vs. Regional & Classic vs. Envoy-Based Application Load Balancers:
- Global External Application Load Balancer (
EXTERNAL_MANAGED) uses the Envoy-based data plane with global anycast VIPs (Premium Network Service Tier required) to route users to the closest healthy backend region with available capacity, supporting advanced traffic management (traffic splitting, mirroring, header transformations). - Classic Application Load Balancer (
EXTERNAL) uses the legacy GFE stack and lacks advanced Envoy traffic policies like request mirroring, outlier detection, and regex URL rewrites. - Regional External (
EXTERNAL_MANAGED) and Regional Internal (INTERNAL_MANAGED) Application Load Balancers keep all proxy termination and traffic routing strictly within a single region for strict data residency or compliance requirements. - Protocol Support Matrix:
- If the workload requires UDP, ICMP, ESP, AH, GRE, or preserving raw client IP without Proxy Protocol or
X-Forwarded-For, you must choose an External or Internal Passthrough Network Load Balancer. - If the workload requires non-HTTP TCP traffic with global anycast routing or SSL/TLS termination before reaching TCP backends, choose a Global External Proxy Network Load Balancer (TCP Proxy or SSL Proxy).
- Internal Passthrough Network Load Balancer as a Next Hop:
- Because Internal Passthrough NLB operates inside Andromeda SDN without proxy termination, it supports
--ports=ALLand can serve as the next hop for a custom static route (enabling HA active-active NVA firewall clusters and NAT gateway appliances). Proxy-based load balancers can never be used as a custom route next hop.
Key Implementation Patterns
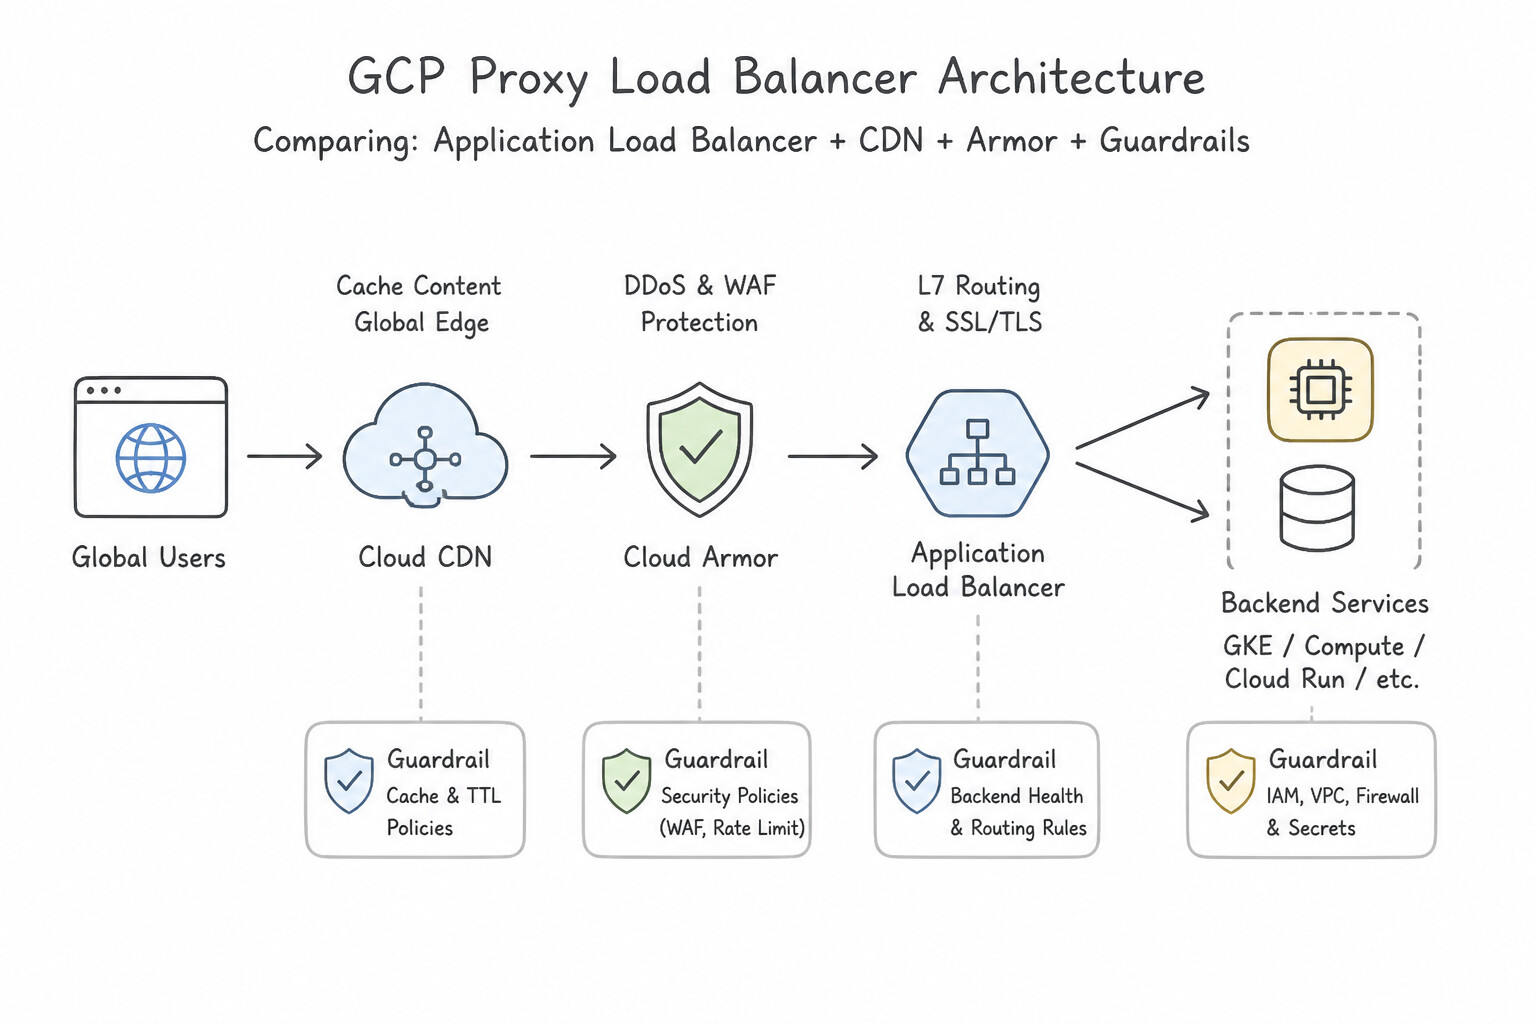
- Global Content Delivery with DDoS Protection: Use Configure a Global External Application Load Balancer. Global External Application Load Balancers support both Cloud CDN and Cloud Armor, making them ideal for secure global content delivery. (Avoid alternative: Regional External Application Load Balancers do not support Cloud CDN, which is required for caching content.)
- Regional UDP Traffic for Gaming: Use Configure an External Passthrough Network Load Balancer. External Passthrough Network Load Balancers support UDP traffic from the internet and offer the low latency required for gaming. (Avoid alternative: Internal load balancers are not accessible from the public internet.)
Key Takeaways (3.1a)
- Cloud CDN requires a Global External Application Load Balancer to function.
- Cloud Armor is primarily designed to protect Layer 7 (HTTP/S) endpoints exposed via Application Load Balancers.
- Always match the traffic type (HTTP vs. TCP/UDP) to the load balancer layer (L7 vs. L4).
- Global requirements typically necessitate Global Load Balancers rather than Regional ones.
Consideration 3.1b: Configuring backend services
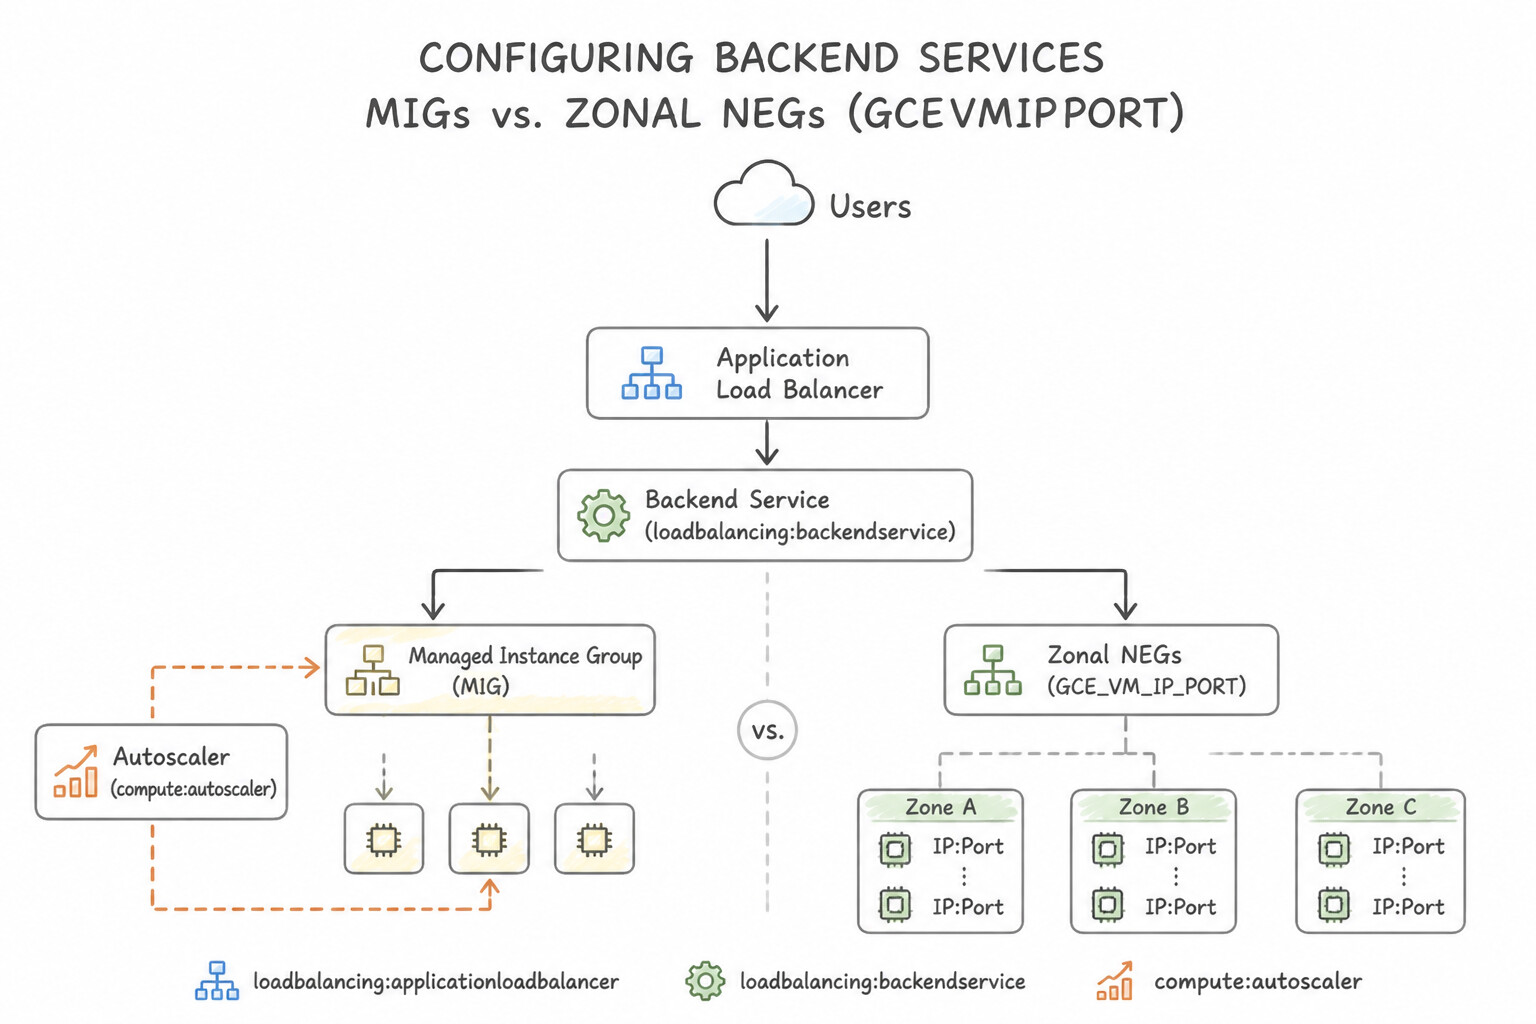
- Managed Instance Groups (MIGs) vs. Zonal NEGs (
GCE_VM_IP_PORT): - MIG backends distribute traffic at the VM instance level (primary internal IP in
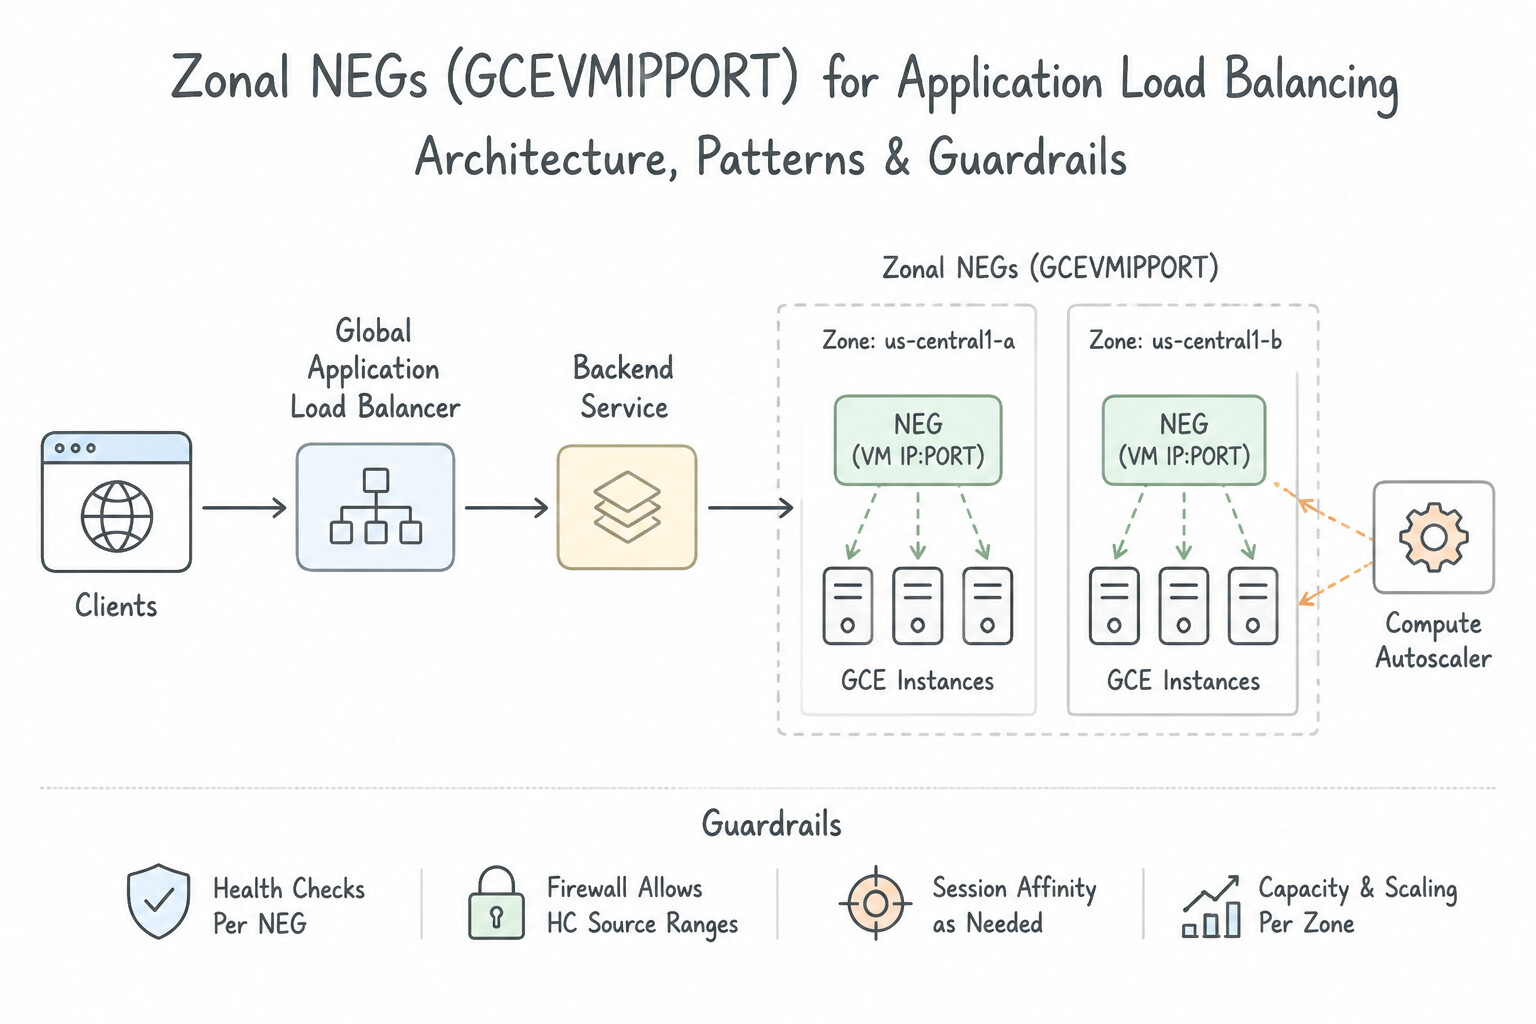
nic0). - Zonal NEGs (
GCE_VM_IP_PORT) allow fine-grained routing directly to individualIP:Portendpoints—most notably GKE Pod IPs (alias IP ranges) in Container-Native Load Balancing, eliminating the extra network hop throughkube-proxyiptables. - Serverless NEGs:
- Point to Cloud Run, App Engine, or Cloud Functions (2nd gen) services. Serverless NEGs do not use health checks and do not support balancing modes (
UTILIZATION/RATE). They allow serverless workloads to sit behind a Global External Application LB (for Cloud Armor, Cloud CDN, and custom domains) or an Internal Application LB. - Internet NEGs (
INTERNET_FQDN_PORT&INTERNET_IP_PORT): - Enable an External Application Load Balancer (or Cloud CDN) to route traffic to an external backend outside Google Cloud over the public internet.
- Global Internet NEGs can only be attached to Global External Application Load Balancers (
EXTERNALorEXTERNAL_MANAGED) where traffic egresses from Google edge PoPs over the public internet. - Regional Internet NEGs can be attached to Regional External or Regional Internal Application Load Balancers and egress through a Cloud NAT gateway (using custom
ENDPOINT_TYPES_MANAGED_PROXY_LB) to reach external endpoints with predictable source NAT IPs. - Hybrid Connectivity NEGs (
NON_GCP_PRIVATE_IP_PORT): - Route traffic from Envoy-based Application or Proxy Network Load Balancers to on-premises or multicloud private RFC 1918 IP:Port endpoints reachable over Cloud Interconnect or HA VPN. Requires specifying a Cloud Router region (
--cloud-router/--default-port) so Envoy proxies know which regional hybrid path to use. - Private Service Connect (PSC) NEGs (
PRIVATE_SERVICE_CONNECT): - Point a load balancer's backend service directly to a published PSC service attachment (in another VPC/project/organization) or to a regional Google API target, enabling L7 URL routing, Cloud Armor WAF inspection, or custom certificates in front of a producer service without managing VMs or health checks.
Key Implementation Patterns
- Session Persistence for Mobile Clients: Use Configure the backend service to use Generated Cookie session affinity. Generated Cookie affinity uses a browser cookie to track the session, which persists even if the client's IP address changes. (Avoid alternative: Client IP affinity relies on the IP address, which changes frequently for mobile users, causing session loss.)
- Optimizing utilization for CPU-light, high-request apps: Use Change the balancing mode of the backend service to Rate. Switching the balancing mode to Rate (RPS) aligns scaling triggers with the application's actual bottleneck (request volume) rather than CPU. (Avoid alternative: Raising the CPU target prevents the group from scaling out when it is needed, worsening the overload issue.)
- Long-running Reporting Queries: Use Increase the timeout setting on the backend service to 60 seconds. The default backend service timeout is 30 seconds; increasing it accommodates the 45-second processing time. (Avoid alternative: Health checks determine instance availability, not the duration a connection is kept open for processing.)
Key Takeaways (3.1b)
- Session Affinity ensures a user's requests stick to the same backend instance.
- Client IP Affinity is fragile for mobile users because their IP addresses change frequently.
- Generated Cookie Affinity is robust for HTTP(S) applications as it tracks the session via the browser, not the network layer.
- Always consider the client's network environment when choosing an affinity mode.
Consideration 3.1c: Configuring balancing methods, session affinity, URL maps, health checks
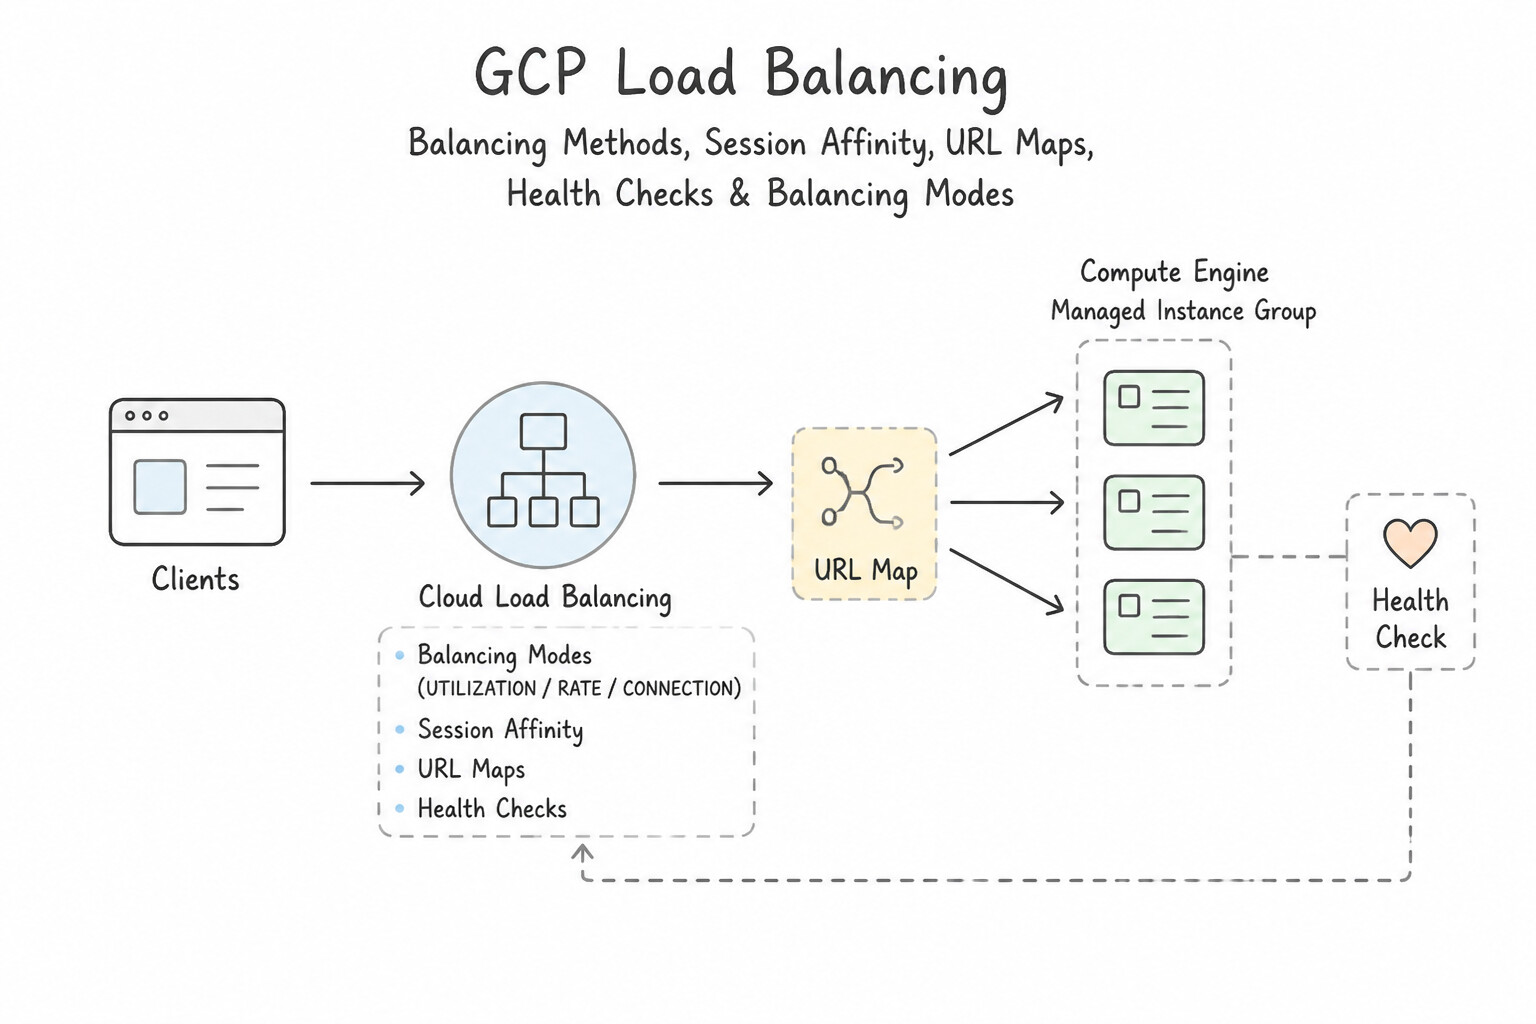
- Balancing Modes (
UTILIZATION,RATE,CONNECTION): UTILIZATION: Routes based on backend VM CPU utilization plus optional max rate/connections. Supported for MIGs, incompatible with Zonal NEGs (GCE_VM_IP_PORT).RATE(max-rateormax-rate-per-instance/max-rate-per-endpoint): Used for HTTP(S) Application Load Balancers (required when using Zonal NEGs on L7 ALBs).CONNECTION(max-connectionsormax-connections-per-instance/max-connections-per-endpoint): Used for Layer 4 Proxy Network Load Balancers (TCP/SSL Proxy) and External Passthrough NLB.- common pitfalls: You cannot use
RATEbalancing mode on a TCP/SSL Proxy LB, and you cannot useGCE_VM_IP_PORTNEGs withUTILIZATIONmode on an Application Load Balancer—you must useRATE(--max-rate-per-endpoint). - Session Affinity Mechanisms:
- Passthrough NLBs: Support
NONE,CLIENT_IP(2-tuple hash: Src IP, Dst IP),CLIENT_IP_PROTO(3-tuple), andCLIENT_IP_PORT_PROTO(5-tuple). - Application Load Balancers: Support
CLIENT_IP,GENERATED_COOKIE(GFE/Envoy sets aGCLBorGCILBcookie),HEADER_FIELD, andHTTP_COOKIE. - Health Check Prober IP Ranges & Firewall Rules:
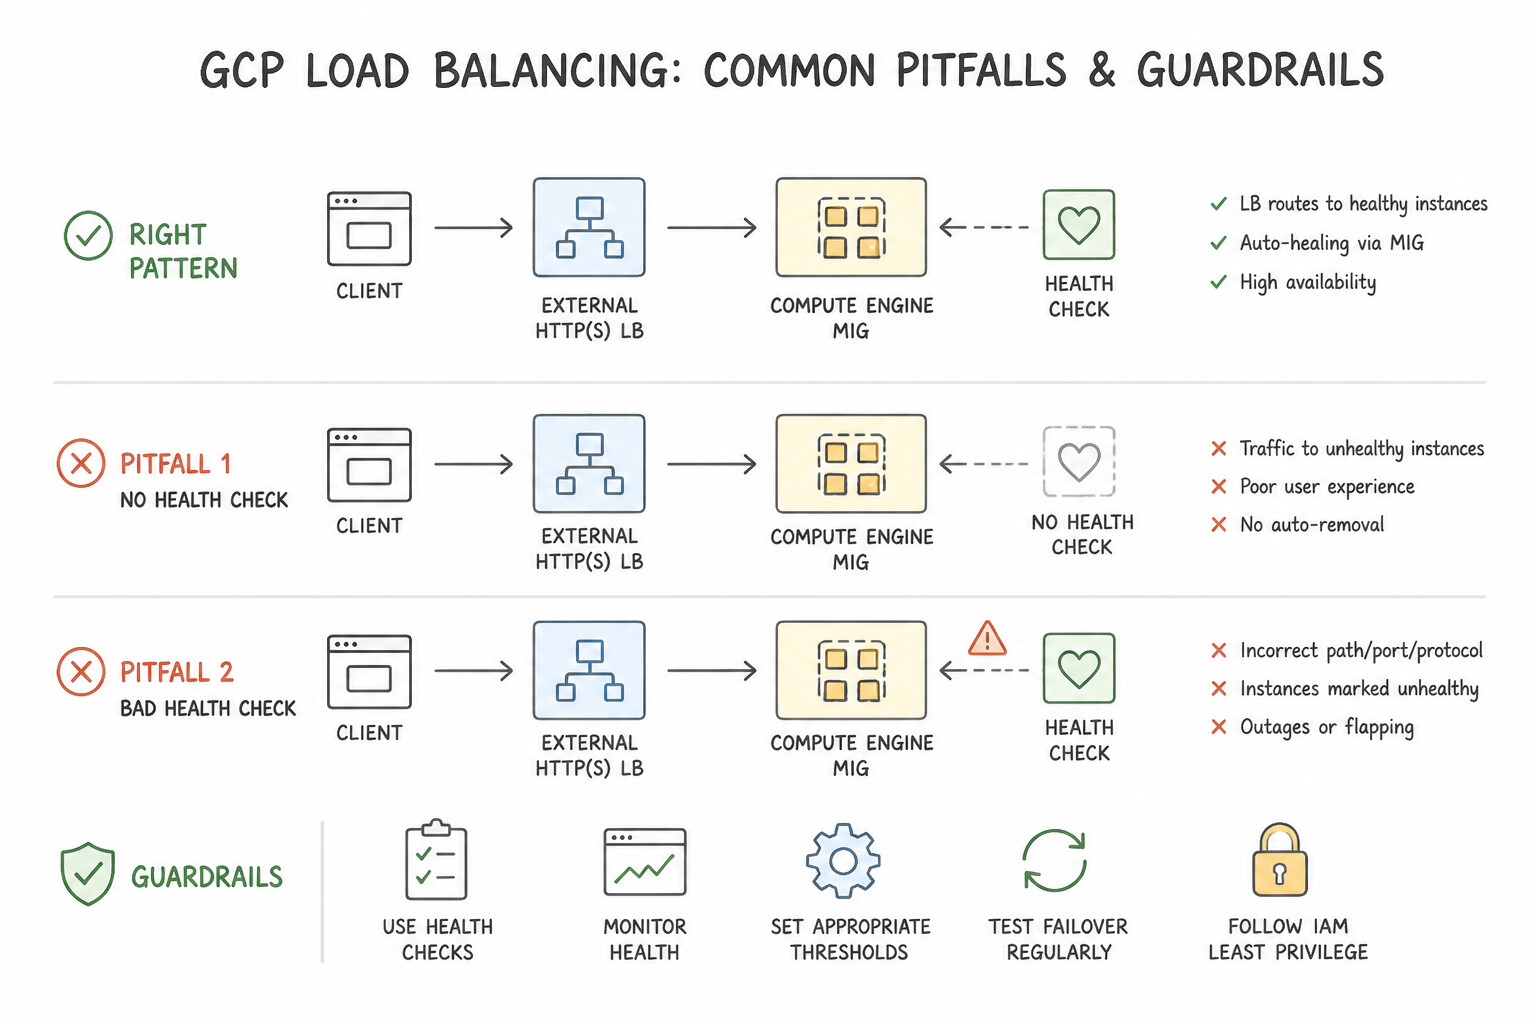
- Every load balancer (except Serverless and PSC NEGs) requires VPC ingress allow firewall rules permitting Google's centralized health check systems to reach backend instances.
- Global External ALB, Classic ALB, TCP/SSL Proxy NLB, External Passthrough NLB, and Internal Passthrough NLB: Probed from
35.191.0.0/16and130.211.0.0/22. - Regional Envoy-based LBs (Regional External ALB, Regional Internal ALB, Regional Proxy NLB): Health check probes are sourced from
35.191.0.0/16and130.211.0.0/22, while actual data-plane proxy traffic is sourced from the regional proxy-only subnet CIDR! Both must be allowed by ingress firewall rules on the backends. - Hybrid Connectivity NEGs (
NON_GCP_PRIVATE_IP_PORT): Because on-premises networks cannot route Google's public35.191.0.0/16and130.211.0.0/22over private RFC 1918 BGP sessions, health checks for Hybrid NEGs originate from the regional proxy-only subnet (--purpose=REGIONAL_MANAGED_PROXYorGLOBAL_MANAGED_PROXY), which must be advertised to on-premises via Cloud Router custom route advertisements! - Proxy-Only Subnets (
REGIONAL_MANAGED_PROXY): - Required in every region where you deploy a Regional Internal ALB, Regional External ALB, Cross-Region Internal ALB, or Regional Proxy NLB.
- Recommended prefix length is
/23(512 IPs) and minimum is/26(64 IPs). One--purpose=REGIONAL_MANAGED_PROXYwith--role=ACTIVEsubnet is shared across all Envoy-based regional LBs in that VPC and region. - Global Access on Internal Load Balancers:
- By default, Internal Passthrough NLB and Regional Internal ALB forwarding rules are only reachable by clients (VMs, VPN/Interconnect tunnels) located in the same region as the load balancer.
- Enabling Global Access (
--allow-global-access) on the internal forwarding rule allows VMs and dynamic routes from any region in the VPC (or connected via VPN/Interconnect in any region when Global Dynamic Routing is enabled) to reach the internal VIP.
Key Implementation Patterns
- Stateful Application Session Persistence: Use Update the Backend Service to use Generated Cookie session affinity. Generated Cookie affinity sets a specific cookie in the user's browser, ensuring all requests from that session are routed to the same instance. (Avoid alternative: Client IP affinity relies on the source IP, which can cause load imbalances if many users share an IP (like behind a proxy) and is less precise than cookies for web apps.)
- Health Check Firewall Configuration: Use Create an ingress allow firewall rule for source IP ranges 35.191.0.0/16 and 130.211.0.0/22 targeting the backend instances. Health check probes originate from 35.191.0.0/16 and 130.211.0.0/22, and these ranges must be allowed in the firewall.
- Microservices Path Routing: Use Set the default service to the "default-backend-service." Create a path matcher with a path rule that routes "/video/*" to the "video-backend-service.". The default service handles unmatched traffic, while a specific path rule routes the /video prefix to the specific backend.
Key Takeaways (3.1c)
- Stateful applications require session affinity (sticky sessions) when scaled horizontally.
- For HTTP(S) Load Balancers, 'Generated Cookie' affinity is the standard way to ensure browser sessions stick to a specific backend instance.
- Client IP affinity is less reliable for web traffic due to NATs and proxies masking individual users.
- Google Cloud health check probes originate from 35.191.0.0/16 and 130.211.0.0/22.
Consideration 3.1d: Optimizing traffic scalability
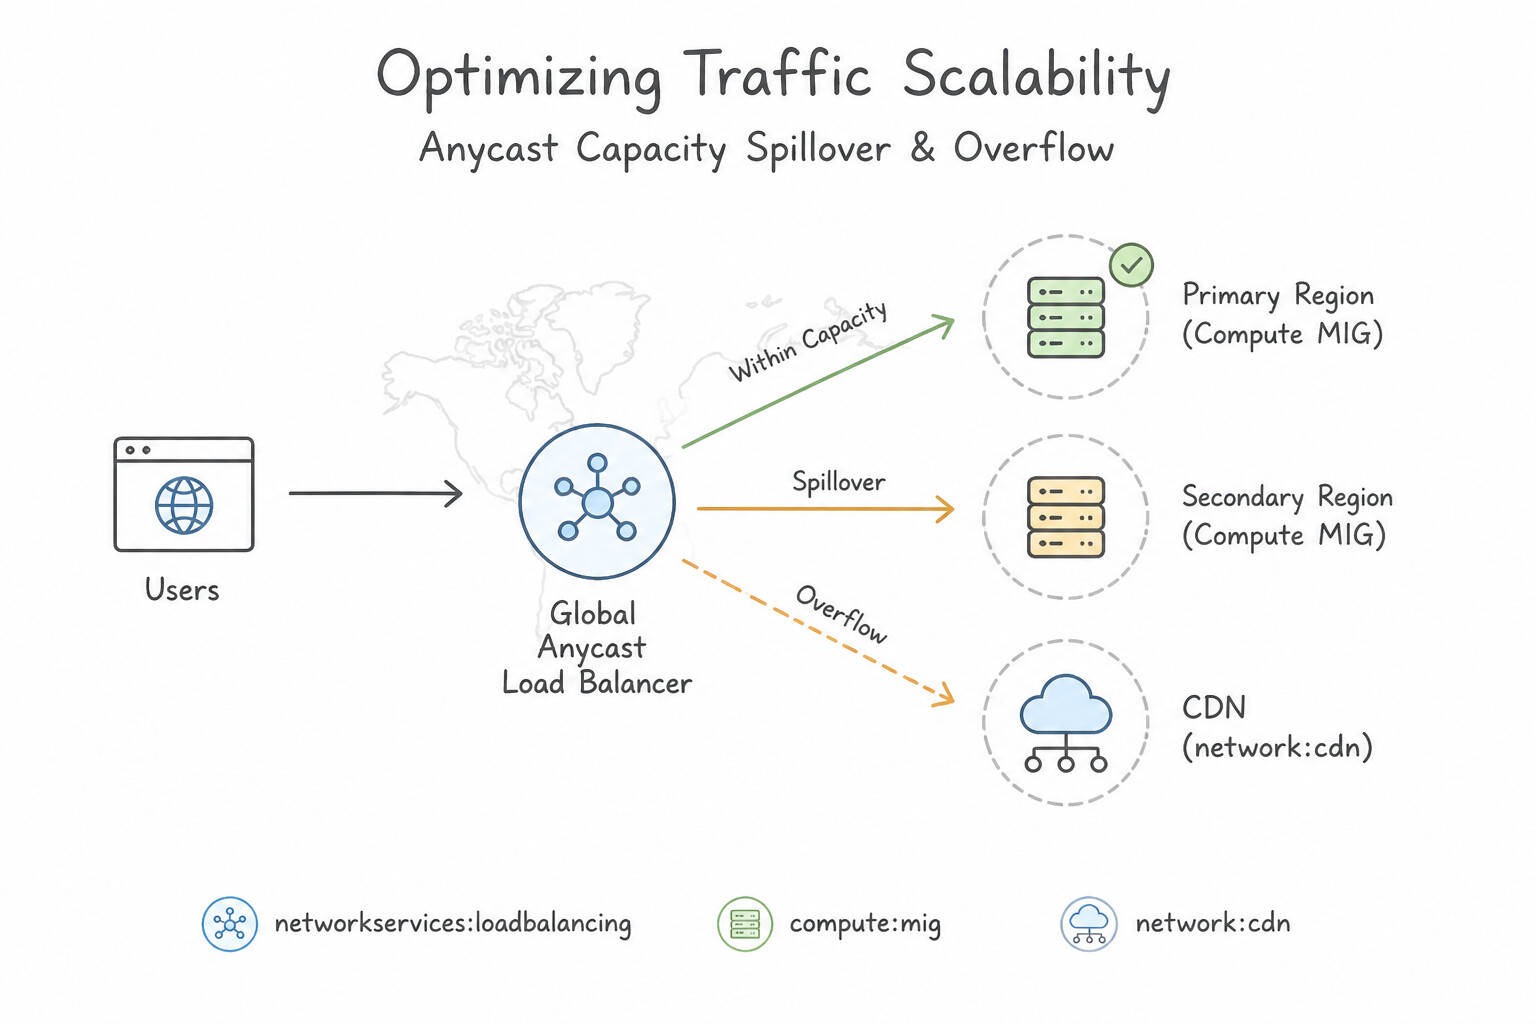
- Global Anycast Capacity Spillover & Overflow:
- When a Global External ALB or Proxy NLB routes traffic to the closest region (e.g.,
us-east1), it continuously monitors backend capacity (max-rate-per-instance,max-rate-per-endpoint, ormax-utilization). - Once
us-east1reaches 100% of its configured capacity ceiling, the GFE/Envoy global control plane automatically spills over excess requests to the next closest region with available capacity (e.g.,us-central1) without dropping requests or waiting for DNS TTL expiration. - Autoscaling vs. Load Balancer Capacity Interaction:
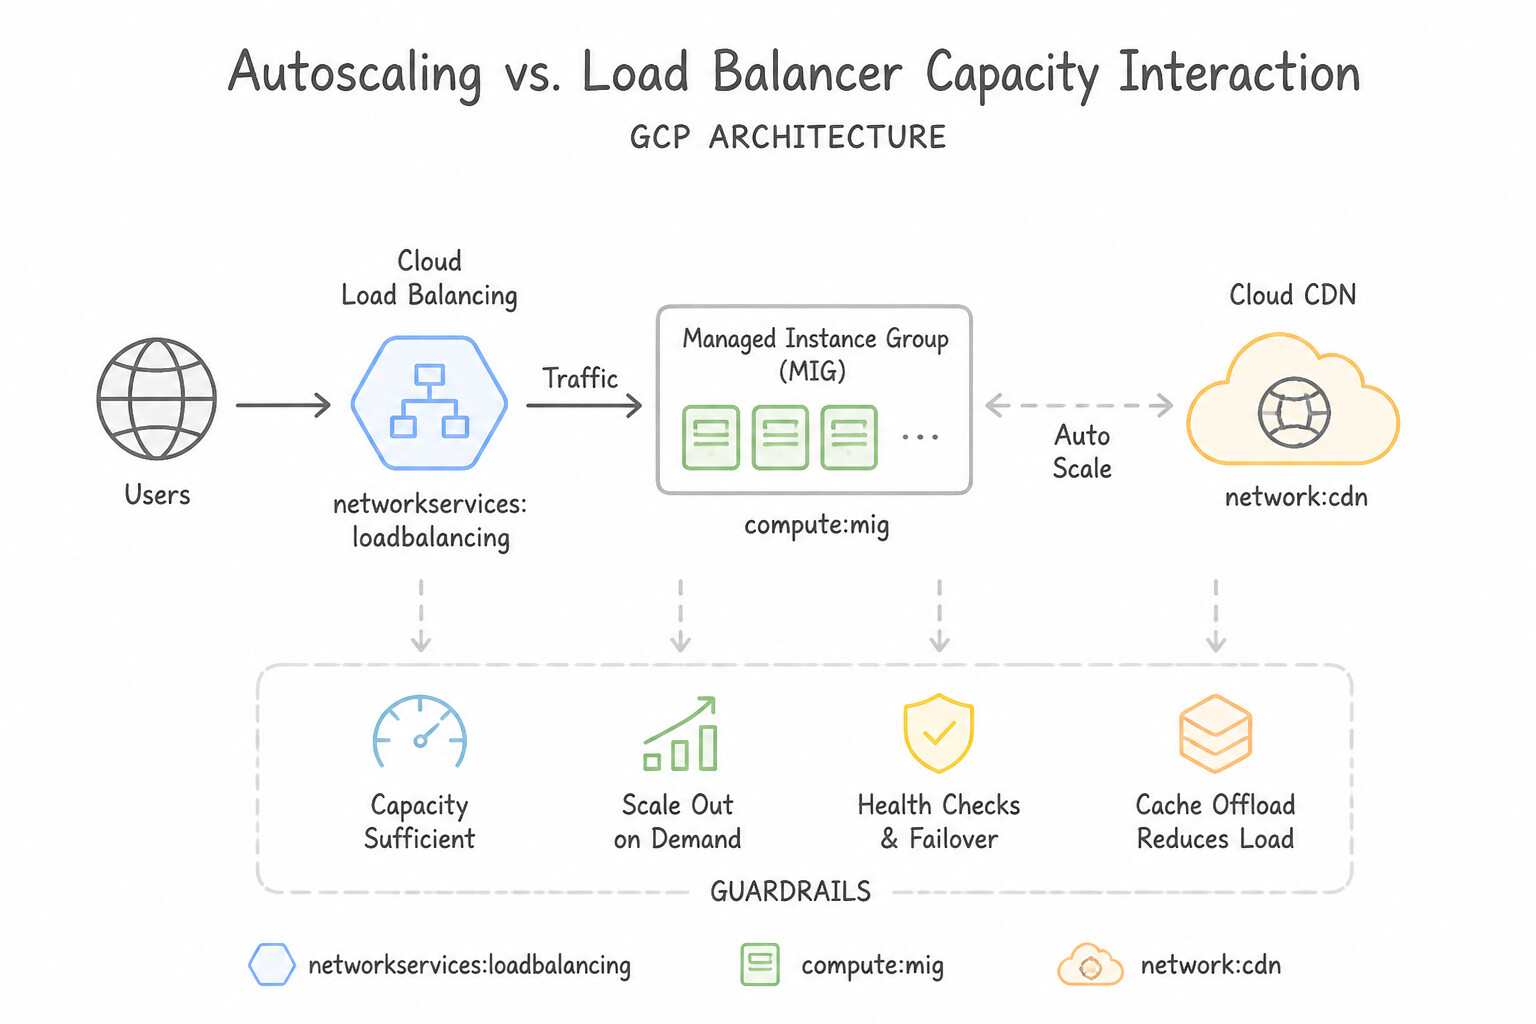
- If you configure MIG autoscaling based on Load Balancing Utilization (
--scale-based-on-load-balancing), the MIG autoscaler compares current traffic against the backend service'smax-utilizationormax-rate-per-instancetarget. - common pitfalls: In a multi-region active-active deployment using Global External ALB, if Region A's autoscaling target is set higher than the load balancer's capacity ceiling (e.g., LB max-utilization is
0.8, MIG autoscaler target is0.85), the load balancer will spill traffic over to Region B before Region A ever scales out! Always set the MIG autoscaler threshold lower than the backend service's max capacity limit so local scaling triggers before cross-region spillover. - Connection Draining (
--connection-draining-timeout): - When a VM or Pod is removed from a backend service (due to MIG scale-in, rolling update, or manual deletion), existing in-flight TCP connections would be abruptly reset (
RST). - Configuring a Connection Draining Timeout (
0to3600seconds, typically300s) instructs the load balancer to stop sending new requests to the terminating instance immediately while allowing existing active connections to complete gracefully up to the timeout duration.
Key Implementation Patterns
- Global Spillover Configuration: Use In the backend service configuration, set the balancing mode to Utilization or Rate and define the maximum capacity. Defining the balancing mode and maximum capacity enables the load balancer to detect overload and trigger cross-region spillover.
- Optimizing Static Asset Delivery: Use Enable Cloud CDN on the backend service to cache static content at the edge. Cloud CDN offloads static content delivery from backend VMs to edge locations, reducing CPU usage and improving latency. (Avoid alternative: Adding more VMs increases costs and doesn't address the inefficiency of using compute resources to serve static files.)
- Balancing Mode Mismatch: Use Change the balancing mode to RATE. Set the target capacity to the maximum requests per second (RPS) an instance can handle. Switch to RATE balancing mode because CPU usage does not reflect the memory bottleneck causing the crashes. (Avoid alternative: Connection draining manages instance removal, not traffic distribution or capacity planning.)
Key Takeaways (3.1d)
- Global External Application Load Balancers route traffic based on proximity first, then availability.
- 'Capacity' determines availability and must be explicitly configured using Balancing Modes (Rate or Utilization).
- Spillover allows traffic to automatically flow to other regions when the local region reaches its configured maximum capacity.
- Cloud CDN is the primary tool for offloading static content traffic from backend instances.
Consideration 3.1e: Understanding GKE load balancing
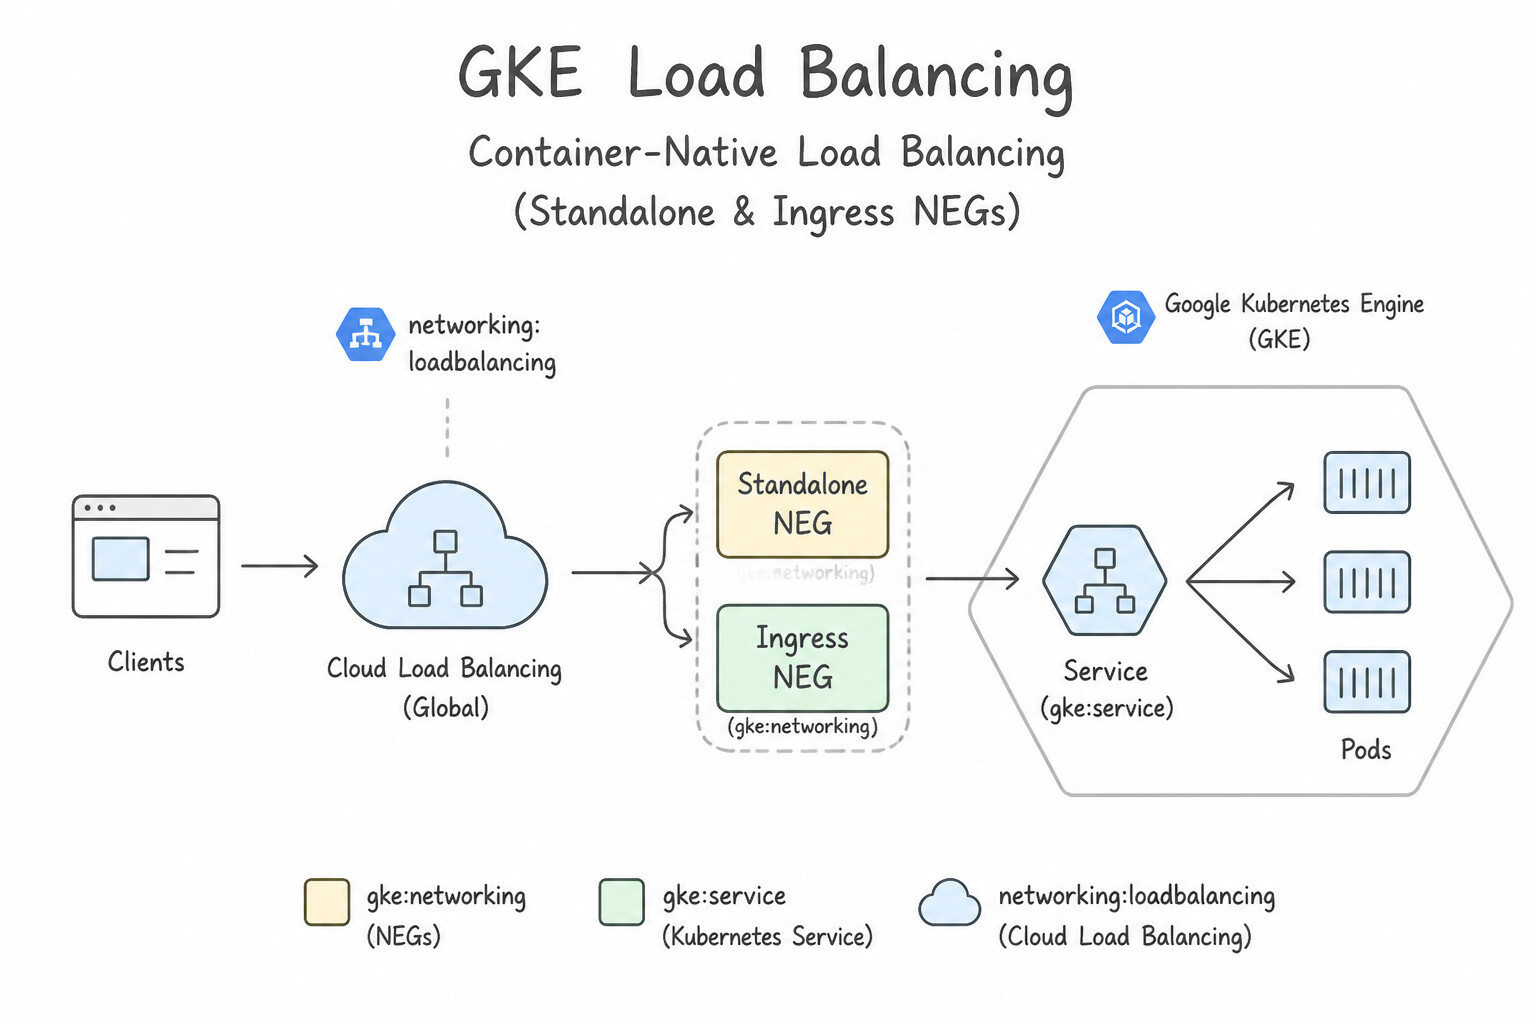
- Container-Native Load Balancing (Standalone & Ingress NEGs):
- Enabled by default on VPC-native GKE clusters via the
cloud.google.com/neg: '{"ingress": true}'Service annotation. - Instead of targeting NodePorts on worker VMs (
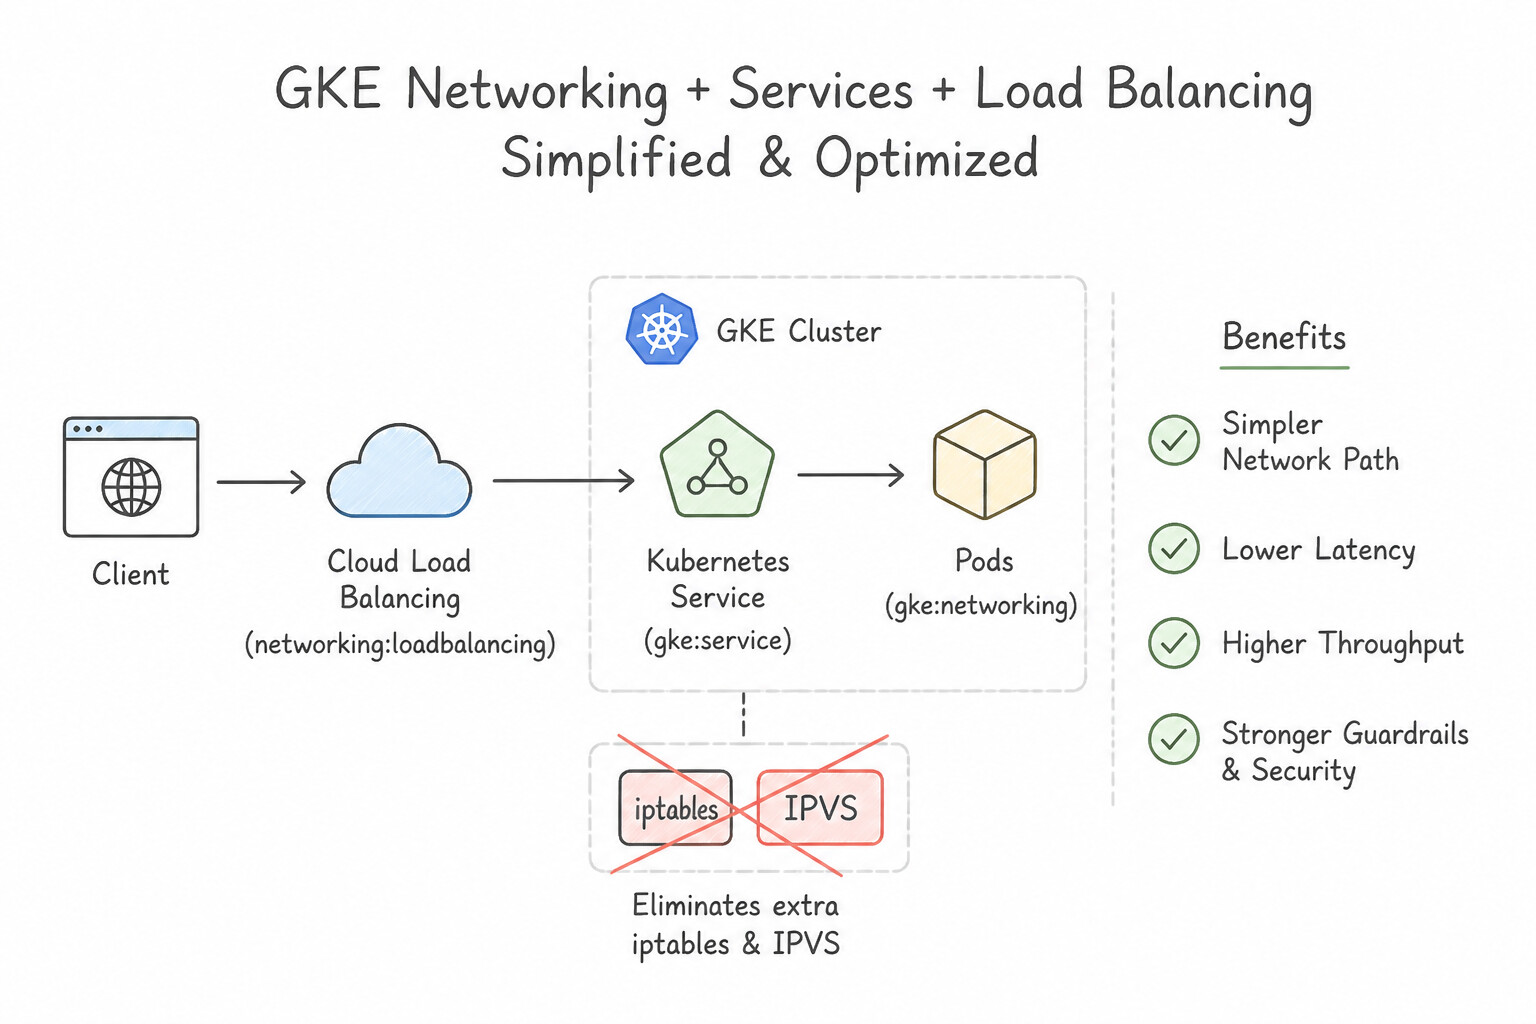
GCE_VM_PRIMARY_IP), the GKE controller programs ZonalGCE_VM_IP_PORTNEGs containing the actual Pod IP addresses (10.x.x.x:ContainerPort). - Benefits: Eliminates the extra
iptables/IPVShop across nodes, preserves client source IP visibility via Envoy headers directly to the Pod, avoids double health checking, and prevents blackholing during Pod termination via Pod readiness gates (cloud.google.com/load-balancer-neg-ready). - GKE Gateway API vs. GKE Ingress:
- GKE Gateway controller (
GatewayClass:gke-l7-global-external-managed,gke-l7-regional-external-managed,gke-l7-rilb,gke-l7-cross-regional-internal-managed) is the modern, role-oriented successor to Ingress. It natively supports Envoy-based Application Load Balancers, multi-namespaceHTTPRoutedelegation, traffic splitting (weight), header transformation, and cross-cluster Multi-Cluster Gateways (-mc). - GKE Ingress (
kubernetes.io/ingress.class: "gce"for External Classic ALB or"gce-internal"for Regional Internal ALB) uses Custom Resource Definitions (CRDs)—specificallyBackendConfig(for Cloud Armor security policies, Cloud CDN, IAP, session affinity, custom health checks, and connection draining) andFrontendConfig(for HTTP-to-HTTPS redirects and SSL policies). - GKE
Serviceoftype: LoadBalancer: - Without annotations,
type: LoadBalancerprovisions an External Passthrough Network Load Balancer (EXTERNAL). - Adding the annotation
networking.gke.io/load-balancer-type: "Internal"provisions an Internal Passthrough Network Load Balancer (INTERNAL). - Adding
cloud.google.com/l4-rbs: "enabled"upgrades an ExternalLoadBalancerService to use a Backend Service-based External Passthrough NLB (mandatory for IPv6, weighted load balancing, and non-legacy health checks).
Key Implementation Patterns
- Container-Native Load Balancing Implementation: Use Annotate the Service with cloud.google.com/neg: '{"ingress": true}'. This annotation enables Container-Native Load Balancing, allowing the load balancer to route traffic directly to Pod IP addresses. (Avoid alternative: Adding more replicas scales the application but does not solve the network routing inefficiency or hop count.)
- Internal L4 Load Balancing for Database: Use Define a Service of type LoadBalancer with the annotation networking.gke.io/load-balancer-type: "Internal". The annotation
networking.gke.io/load-balancer-type: "Internal"configures the Service to provision an Internal TCP/UDP Load Balancer with a private IP address. - Global Traffic Management with Multi-Cluster Ingress: Use Enable Multi Cluster Ingress. Deploy MultiClusterIngress and MultiClusterService resources to the configuration cluster. Multi Cluster Ingress provides a single global IP and manages routing across multiple clusters automatically.
Key Takeaways (3.1e)
- Container-Native Load Balancing allows Load Balancers to target Pod IPs directly.
- This reduces network hops and improves latency compared to node-based routing.
- Network Endpoint Groups (NEGs) are the underlying resource that enables this feature.
- Use the
cloud.google.com/negannotation on Services to explicitly enable NEGs for Ingress.
Consideration 3.1f: Traffic management including splitting and mirroring
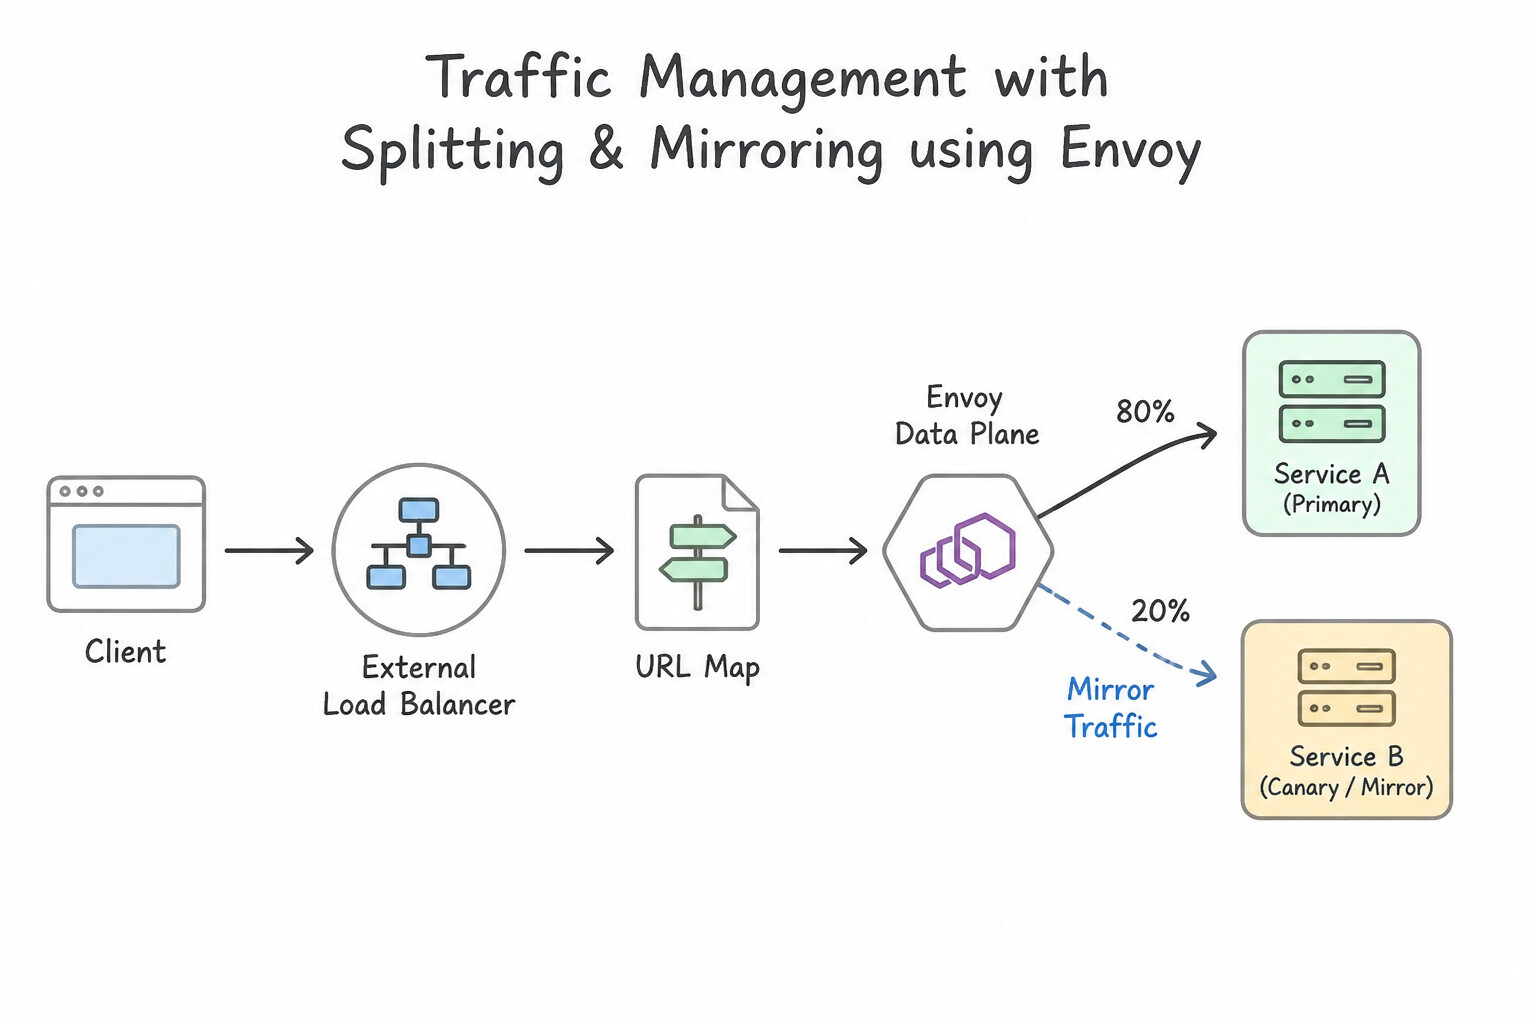
- Envoy Data Plane Requirement:
- Advanced traffic management features require an Envoy-based Application Load Balancer (
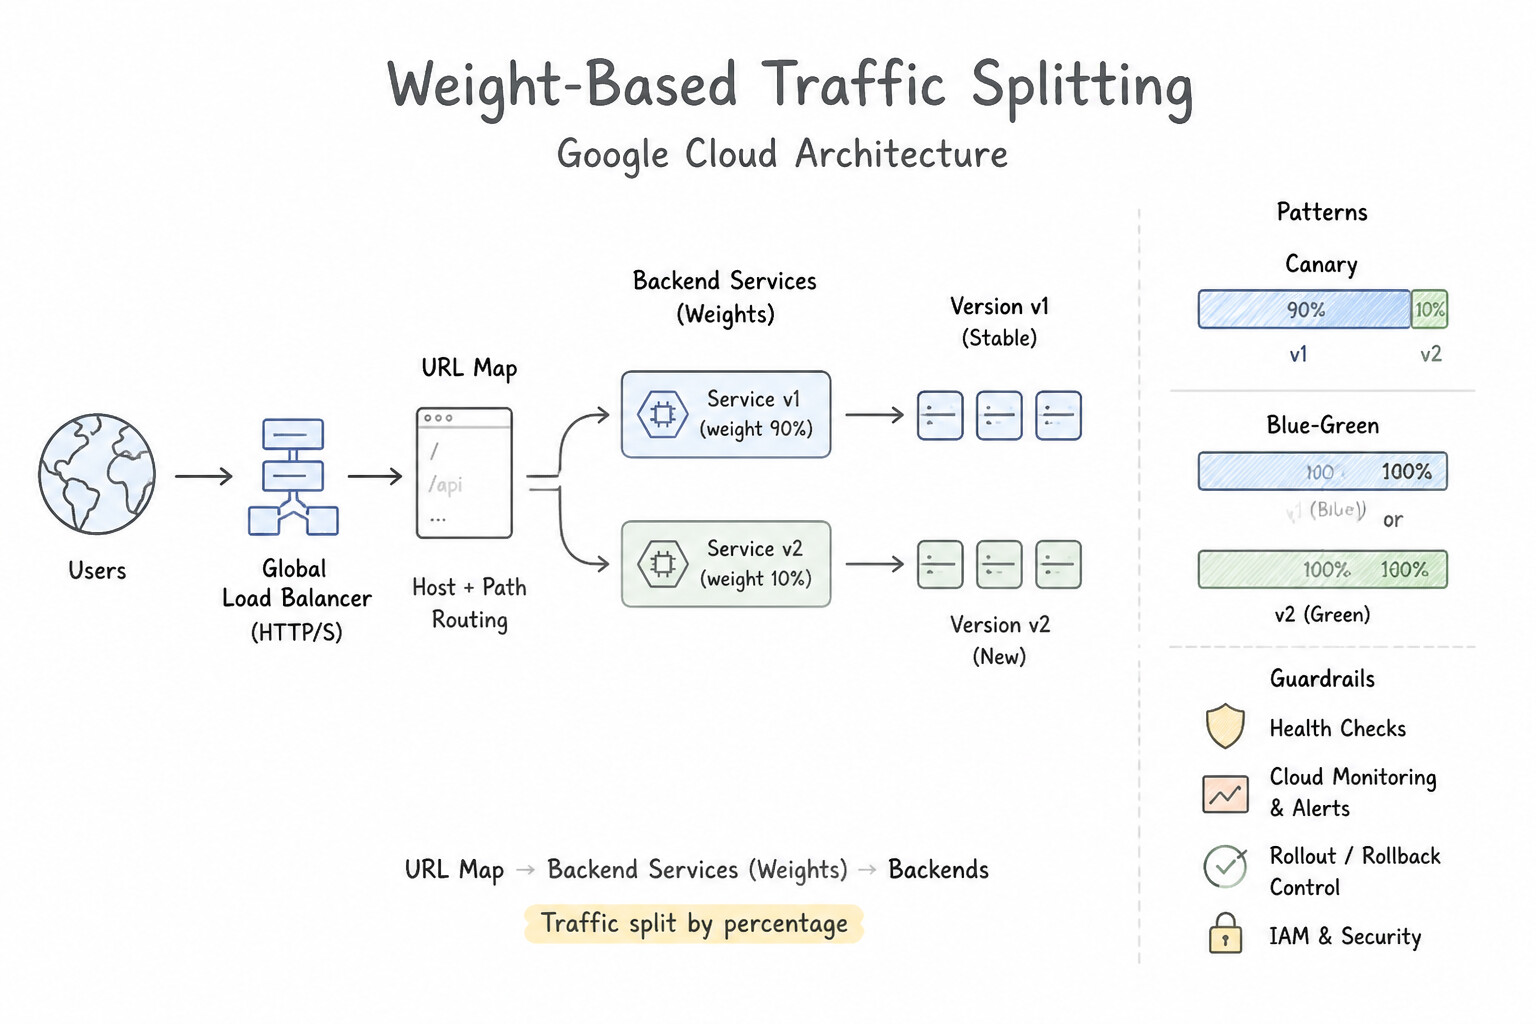
EXTERNAL_MANAGEDorINTERNAL_MANAGED). They are not supported on the legacy Classic Application Load Balancer (EXTERNAL) unless migrated toEXTERNAL_MANAGED. - Weight-Based Traffic Splitting (Canary / Blue-Green):
- Configured in the URL Map
routeAction.weightedBackendServices. Allows splitting traffic across multiple backend services by percentage weight (0to1000, e.g., 95% tobackend-v1and 5% tobackend-v2) without changing DNS records or client configurations. - Request Mirroring (Traffic Shadowing):
- Configured via
requestMirrorPolicyin the URL Map. The Envoy proxy sends the primary request to the production backend service and asynchronously duplicates (fire-and-forget) the request (GET/POST) to a shadow backend service. Responses from the mirrored backend are ignored by the proxy, incurring zero latency impact on the client. - Header/Cookie Routing, URL Rewrites, and Redirects:
routeRulesevaluate match conditions on path, prefix, regex, HTTP headers (exactMatch,prefixMatch,regexMatch), and query parameters (queryParameterMatches).- Supports dynamic URL rewrites (
hostRewrite,pathPrefixRewrite), HTTP redirects (301/302/307/308including HTTP-to-HTTPS redirect), and custom request/response header injection or removal (e.g., injectingX-Client-Geo-Location: {client_region},{client_city}). - Outlier Detection & Circuit Breaking:
- Outlier Detection (passive health checking on backend services): Continuously monitors backend HTTP
5xxresponses (consecutiveErrors,interval,baseEjectionTime,maxEjectionPercent). If a specific VM or Pod starts returning502/503errors between active health check intervals, Envoy temporarily ejects that endpoint from the load-balancing pool. - Circuit Breaking (
circuitBreakerson the backend service): Enforces hard limits onmaxConnections,maxPendingRequests,maxRequests, andmaxRetriesto prevent cascading overload on fragile downstream microservices.
Key Implementation Patterns
- Implementing a Canary Deployment via Weighted Load Balancing: Use Update the URL map. Configure a route rule with weightedBackendServices specifying a weight of 95 for the v1 backend service and 5 for the v2 backend service. Use weighted backend services in the URL map to split traffic based on specific percentages for canary deployments.
- A/B Testing with Header-Based Routing: Use Configure a route rule in the URL map that matches the specific header name and exact value. URL map route rules can inspect HTTP headers and direct traffic to specific backends based on header values. (Avoid alternative: Host rules select services based on domain names, not HTTP headers or IP addresses.)
Key Takeaways (3.1f)
- Use URL maps with
weightedBackendServicesfor percentage-based traffic splitting (canary deployments).- Traffic splitting is different from traffic mirroring; splitting routes live traffic, mirroring copies it.
- Capacity scaling alone does not ensure precise traffic distribution percentages.
- URL Maps in Application Load Balancers are the primary component for defining routing logic.
Quick Decision Cheat Sheet (Subsection 3.1)
If the Scenario Requires... | Choose This Google Cloud Pattern | Avoid This Common Mistake |
|---|---|---|
"Preserve client IP at Layer 3 without Proxy Protocol or X-Forwarded-For" | Passthrough Network Load Balancer (External Maglev DSR or Internal Andromeda SDN) | Proxy Network Load Balancer or Application Load Balancer |
"Container-native load balancing / route directly to GKE Pod IPs" | Zonal NEG ( GCE_VM_IP_PORT) with --max-rate-per-endpoint (RATE mode) | Managed Instance Group with UTILIZATION balancing mode |
"On-premises backend behind Cloud Load Balancer fails health checks" | Advertise the regional proxy-only subnet CIDR over Cloud Router BGP and allow it on the on-premises firewall | Allowing 35.191.0.0/16 and 130.211.0.0/22 on the private on-prem interface |
"Global External ALB spills traffic to backup region before primary region autoscales" | Set MIG Autoscaler Load Balancing Utilization threshold lower than the Backend Service's Max Utilization | Increasing health check interval or disabling global anycast |
"Need to mirror live production HTTP requests to a test backend without impacting user latency" | Request Mirroring ( requestMirrorPolicy) on an Envoy-based Application Load Balancer | Weight-based traffic splitting (sends real users to the test backend) |
"VMs in us-west1 cannot reach an Internal Load Balancer deployed in us-east1" | Enable Global Access ( --allow-global-access) on the Internal Load Balancer forwarding rule | Creating a VPC Network Peering or static route between subnets in the same VPC |
"Configure Cloud Armor, CDN, or IAP on a GKE Ingress resource" | Create a BackendConfig CRD and reference it via cloud.google.com/backend-config annotation on the Kubernetes Service | Putting BackendConfig annotations on the Ingress object or using FrontendConfig |
Further Reading (Subsection 3.1)
- Cloud Load Balancing overview — Provides a comparison of load balancer types and their features, including Cloud CDN and Cloud Armor support.
- Cloud CDN overview — Details the load balancing requirements for enabling Cloud CDN.
- Choosing a load balancer — Refer to the 'Summary of Google Cloud load balancers' table. Note that for 'UDP', 'External', and 'Regional', the recommended product is the External Passthrough Network Load Balancer.
- External passthrough Network Load Balancer overview — This page details the features of the External Passthrough Network Load Balancer, explicitly mentioning UDP support and its use for gaming.
- Backend services overview — Read the section on 'Session affinity' to understand the different modes available, including Client IP and Generated Cookie.
- External Application Load Balancer overview — Specific details on how session affinity works for Global External Application Load Balancers.
Subsection 3.2: Configuring Cloud CDN
The Big Picture
A poorly designed Content Delivery Network (CDN) configuration can be far more dangerous than having no CDN at all: whereas an uncached origin fails by slowing down or returning 503 errors, a misconfigured CDN fails by caching personalized user data (PII, session tokens, or shopping carts) at the global edge and serving User A's private response to User B. Conversely, when teams leave default query strings, random tracking parameters (?utm_source=..., ?fbclid=...), or Vary: * / Set-Cookie headers untouched, their cache hit ratio plummets below 10%, flooding backend origins with cache misses and inflating egress bills while giving a false sense of security.
In Google Cloud, Cloud CDN operates directly on Google's globally distributed edge Points of Presence (PoPs) integrated with the Global External Application Load Balancer (EXTERNAL or EXTERNAL_MANAGED). Mastering Cloud CDN for production architectures requires understanding exactly how cache modes (CACHE_ALL_STATIC, USE_ORIGIN_HEADERS, FORCE_CACHE_ALL) interact with HTTP Cache-Control directives, how to integrate external or third-party S3-compatible origins using Internet NEGs and AWS Signature Version 4 authentication, how to construct granular Cache Keys that strip noise while preserving content variants, and how to enforce cryptographic access control at the edge using Signed URLs and Signed Cookies.
Consideration 3.2a: Configuring CDN for supported origins
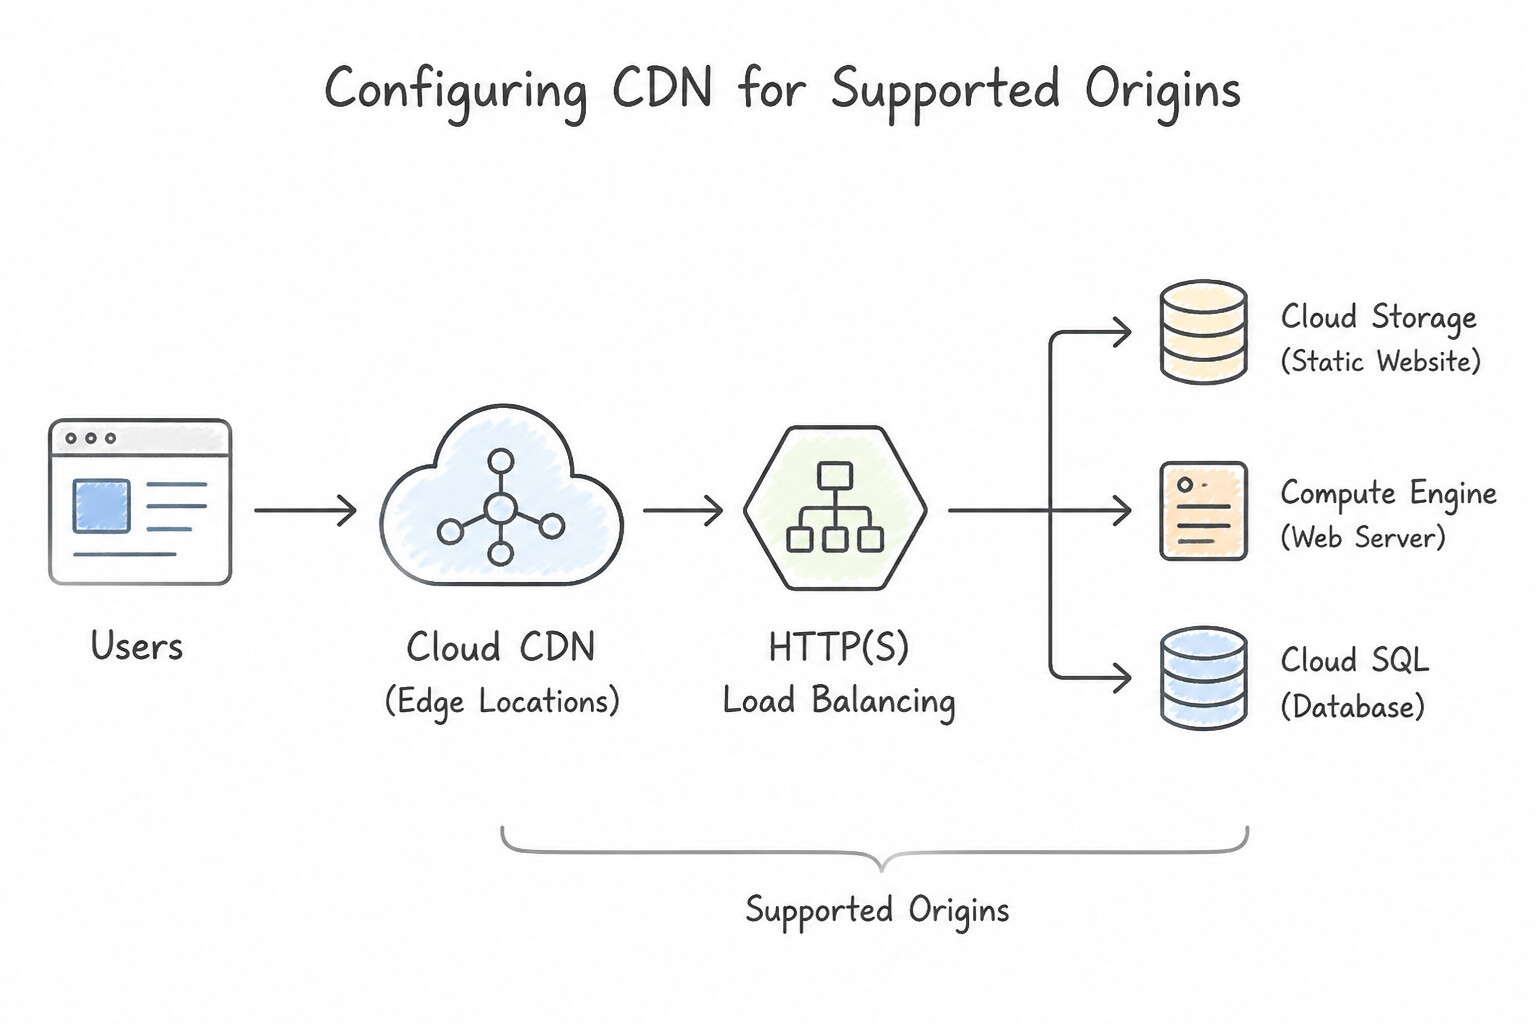
- Supported Origins:
- Cloud CDN is enabled on a Backend Service (pointing to a Managed Instance Group, Zonal NEG, Serverless NEG for Cloud Run/App Engine/Cloud Functions, Hybrid NEG, or Global Internet NEG) or a Backend Bucket (pointing to a Cloud Storage bucket) attached to an External Application Load Balancer.
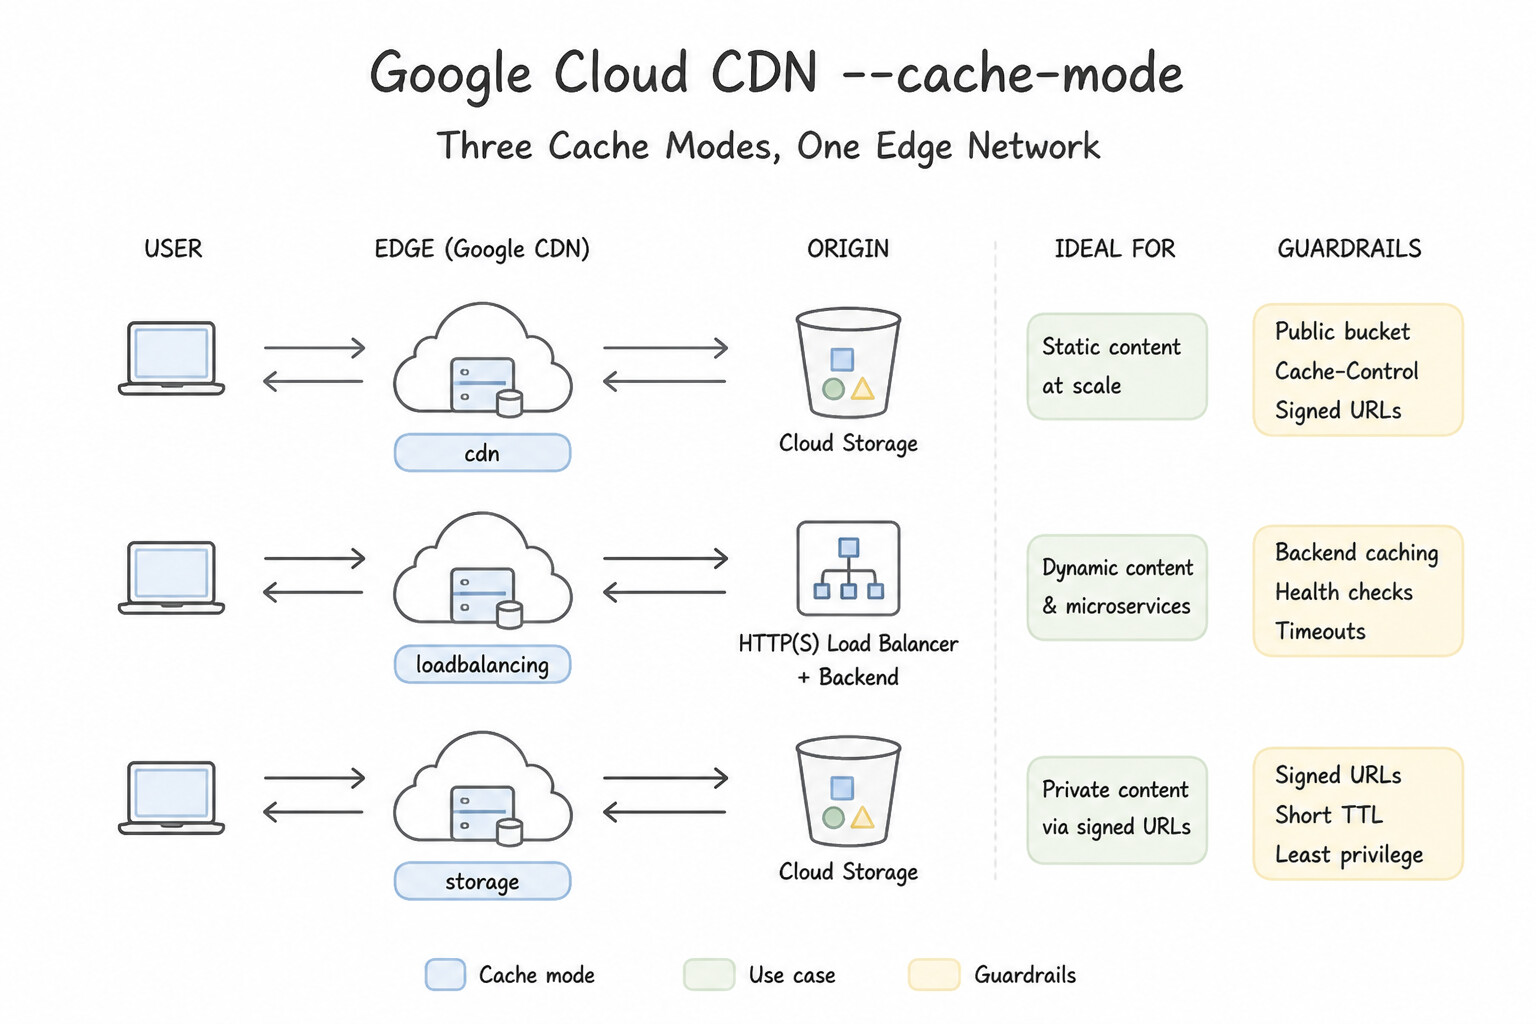
- The Three Cloud CDN Cache Modes (
--cache-mode): CACHE_ALL_STATIC(Default): Automatically caches static content based on the responseContent-Typeheader (e.g.,text/css,application/javascript,image/*,video/*,font/*,application/pdf) unless the origin explicitly forbids caching viaCache-Control: private,no-store, orno-cache. Dynamic HTML/JSON responses are only cached if they include valid explicitCache-Control: public, max-age=...ors-maxage=...headers.USE_ORIGIN_HEADERS: Strictly respects origin HTTP caching headers. Cloud CDN will never cache a response—even a.jpgor.cssfile—unless the origin returns explicit valid caching headers (Cache-Control: publicwithmax-age,s-maxage, orExpires). Ideal when origin developers want 100% programmatic control over edge caching.FORCE_CACHE_ALL: Unconditionally caches all successful responses from the origin, overriding and ignoring anyCache-Control: privateorno-storedirectives sent by the origin.- architectures Warning: Never enable
FORCE_CACHE_ALLon origins that return user-specific HTML/JSON orSet-Cookieheaders, as Cloud CDN will strip/ignore privacy controls and serve cached personal responses across users. - TTL Hierarchy (
default-ttl,client-ttl,max-ttl): default-ttl: Used whenCACHE_ALL_STATICorFORCE_CACHE_ALLcaches an object that lacks an originmax-age/s-maxageheader (default3600s/ 1 hour). Cannot be set when usingUSE_ORIGIN_HEADERS.max-ttl: Caps the maximum time an object can stay cached at the edge, even if the origin sends a highermax-age(cannot be used withFORCE_CACHE_ALL).- Non-Cacheable Responses: Even in
CACHE_ALL_STATIC, Cloud CDN will not cache responses containing aSet-Cookieheader, responses to requests with anAuthorizationheader (unlessCache-Control: publicors-maxageis explicitly present), or non-GET/HEADrequests.
Key Implementation Patterns
- Static Website Asset Offloading: Use Create a backend bucket that points to the Cloud Storage bucket. Enable Cloud CDN on the backend bucket and update the URL map. Cloud Storage buckets must be added as a 'backend bucket' to the load balancer, where Cloud CDN can be enabled.
- Caching Dynamic Content from MIGs: Use Update the backend service associated with the managed instance group to enable Cloud CDN. Cloud CDN is enabled specifically on the Backend Service resource that manages the backends (MIGs). (Avoid alternative: Instance templates control VM configuration (CPU, Disk), not network load balancer features like Cloud CDN.)
- Serverless Origin Configuration: Use Create a serverless network endpoint group (NEG) for the Cloud Run service, and add it to the backend service. Cloud Run services require a Serverless Network Endpoint Group (NEG) to act as a backend for a load balancer. (Avoid alternative: Managed Instance Groups are for Virtual Machines, not for serverless Cloud Run services.)
Key Takeaways (3.2a)
- Cloud Storage buckets are connected to Load Balancers via Backend Buckets, not Backend Services.
- Cloud CDN is enabled at the Backend level (Backend Service or Backend Bucket).
- Using Cloud CDN with Cloud Storage offloads traffic from VMs and improves global latency.
- Cloud CDN is enabled on the Backend Service of a Load Balancer.
Consideration 3.2b: Configuring CDN for internet NEGs and third-party storage
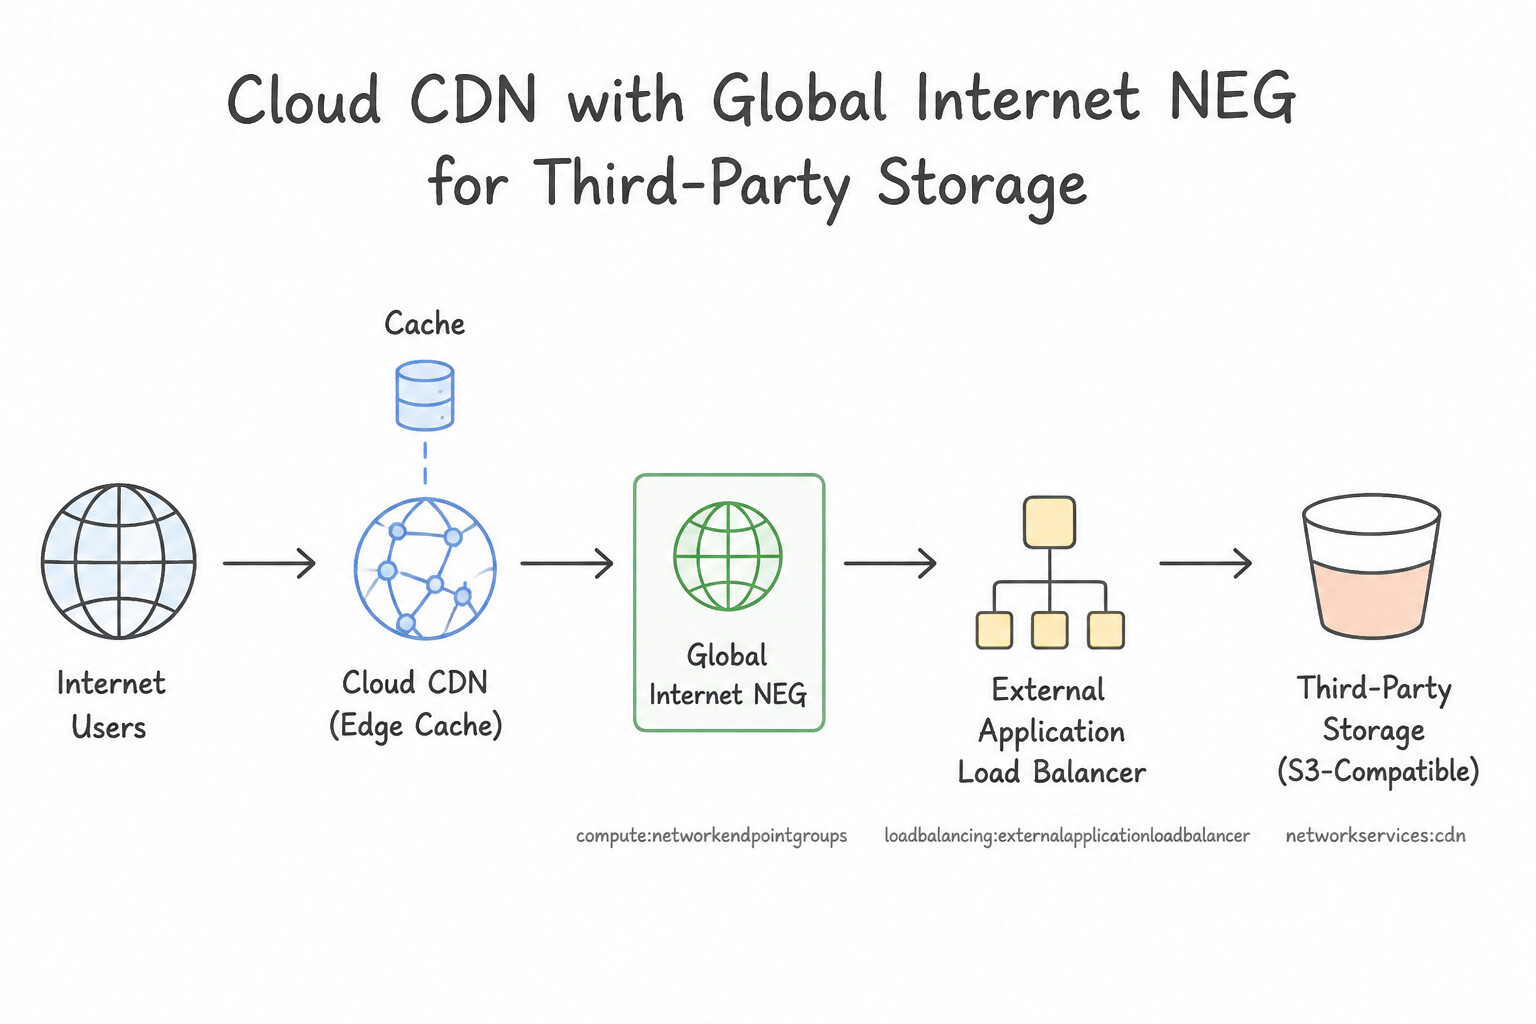
- Global Internet NEGs as Cloud CDN Origins:
- To accelerate an on-premises web server, another cloud provider's ALB, or an external object store using Cloud CDN, create a Global Internet NEG (
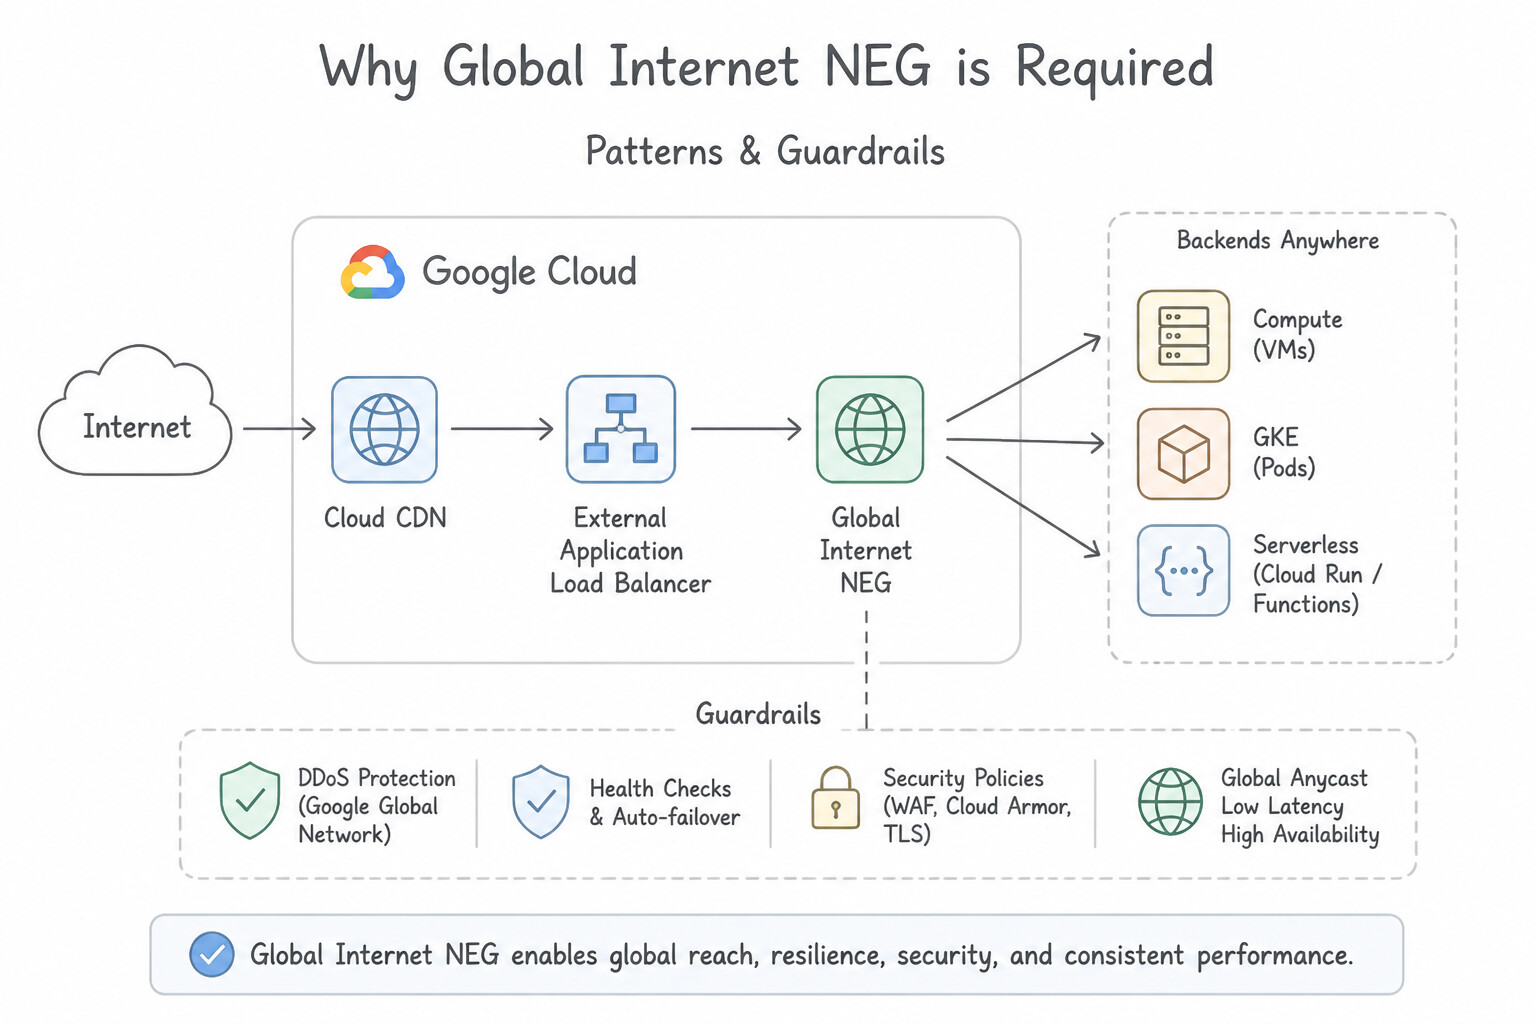
--network-endpoint-type=INTERNET_FQDN_PORTorINTERNET_IP_PORT), attach it to a global Backend Service, and enable--enable-cdn. - Why Global Internet NEG is Required: Cloud CDN operates on the Global External Application Load Balancer, which requires a global Internet NEG (where cache-fill requests egress directly from Google edge PoPs over the public internet).
- Header Manipulation for External & S3-Compatible Origins:
- External origins (like AWS S3 buckets or on-premises virtual hosts) often reject requests whose
Hostheader matches the public vanity domain (cdn.example.com) rather than the storage bucket's endpoint (my-bucket.s3.us-east-1.amazonaws.com). - Configure a URL Map
hostRewrite(or custom request headerHostoverride on the backend service) so cache-fill requests arrive at the external origin with the exactHostheader expected by the third-party provider. - Use custom response headers (
--custom-response-header='Cache-Control: public, max-age=86400') or stripping rules to clean up unwanted third-party headers (such asx-amz-request-idorx-amz-id-2) before delivering responses to clients. - Private Origin Authentication (AWS Signature Version 4):
- Rather than making an external AWS S3 or S3-compatible bucket publicly readable to the entire internet, configure Private Origin Authentication (
awsV4Authentication) on the Cloud CDN backend service. - Cloud CDN automatically signs every outbound cache-fill request to the private S3 bucket using AWS Signature Version 4 (
HMAC-SHA256) with your configured Access Key ID, Secret Access Key, and Origin Region, keeping the external bucket completely locked down to authenticated Cloud CDN cache fills.
Key Implementation Patterns
- Configuring AWS S3 as a Cloud CDN Backend: Use Create an Internet network endpoint group (NEG) using the fully qualified domain name (FQDN) of the S3 bucket. Add the NEG to a backend service and enable Cloud CDN. Internet NEGs allow load balancers to reach external public endpoints like S3 using FQDNs, and Cloud CDN is enabled on the backend service.
- Handling Host Headers for Third-Party Storage: Use Update the backend service to include a custom request header named 'Host' with the value of the storage provider's domain. The backend service must override the client's original Host header with the domain name expected by the third-party storage provider.
- Securing Content on External Origins: Use Configure the backend service to enforce Cloud CDN signed URLs. Signed URLs allow you to generate time-limited, cryptographic tokens that Cloud CDN validates at the edge before serving content. (Avoid alternative: IAP secures backend access but does not validate access to cached content at the CDN edge.)
Key Takeaways (3.2b)
- Internet NEGs are required to route Load Balancer traffic to endpoints on the public internet (like AWS S3).
- Use FQDN (Fully Qualified Domain Name) for public endpoints where IP addresses are dynamic.
- Cloud CDN is enabled on the Backend Service associated with the NEG to cache content from the external origin.
- Backend Buckets are specifically for Google Cloud Storage and cannot point to third-party storage.
Consideration 3.2c: Invalidating cache
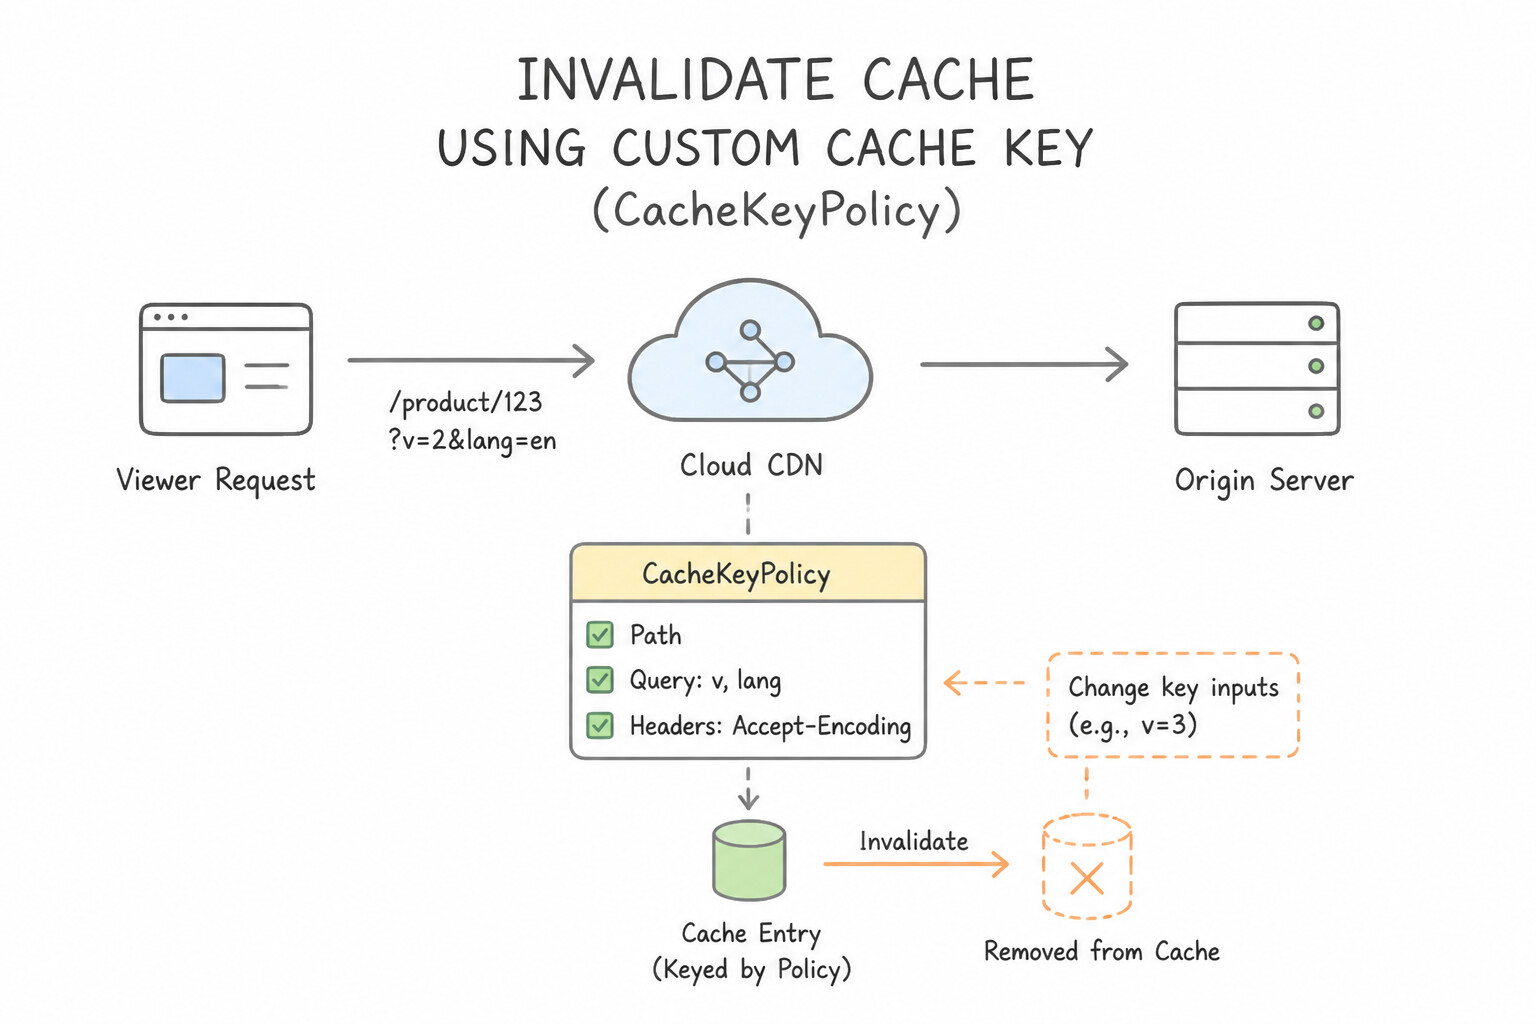
- Customizing the Cache Key (
CacheKeyPolicy): - By default, a Cloud CDN cache key consists of: Protocol (
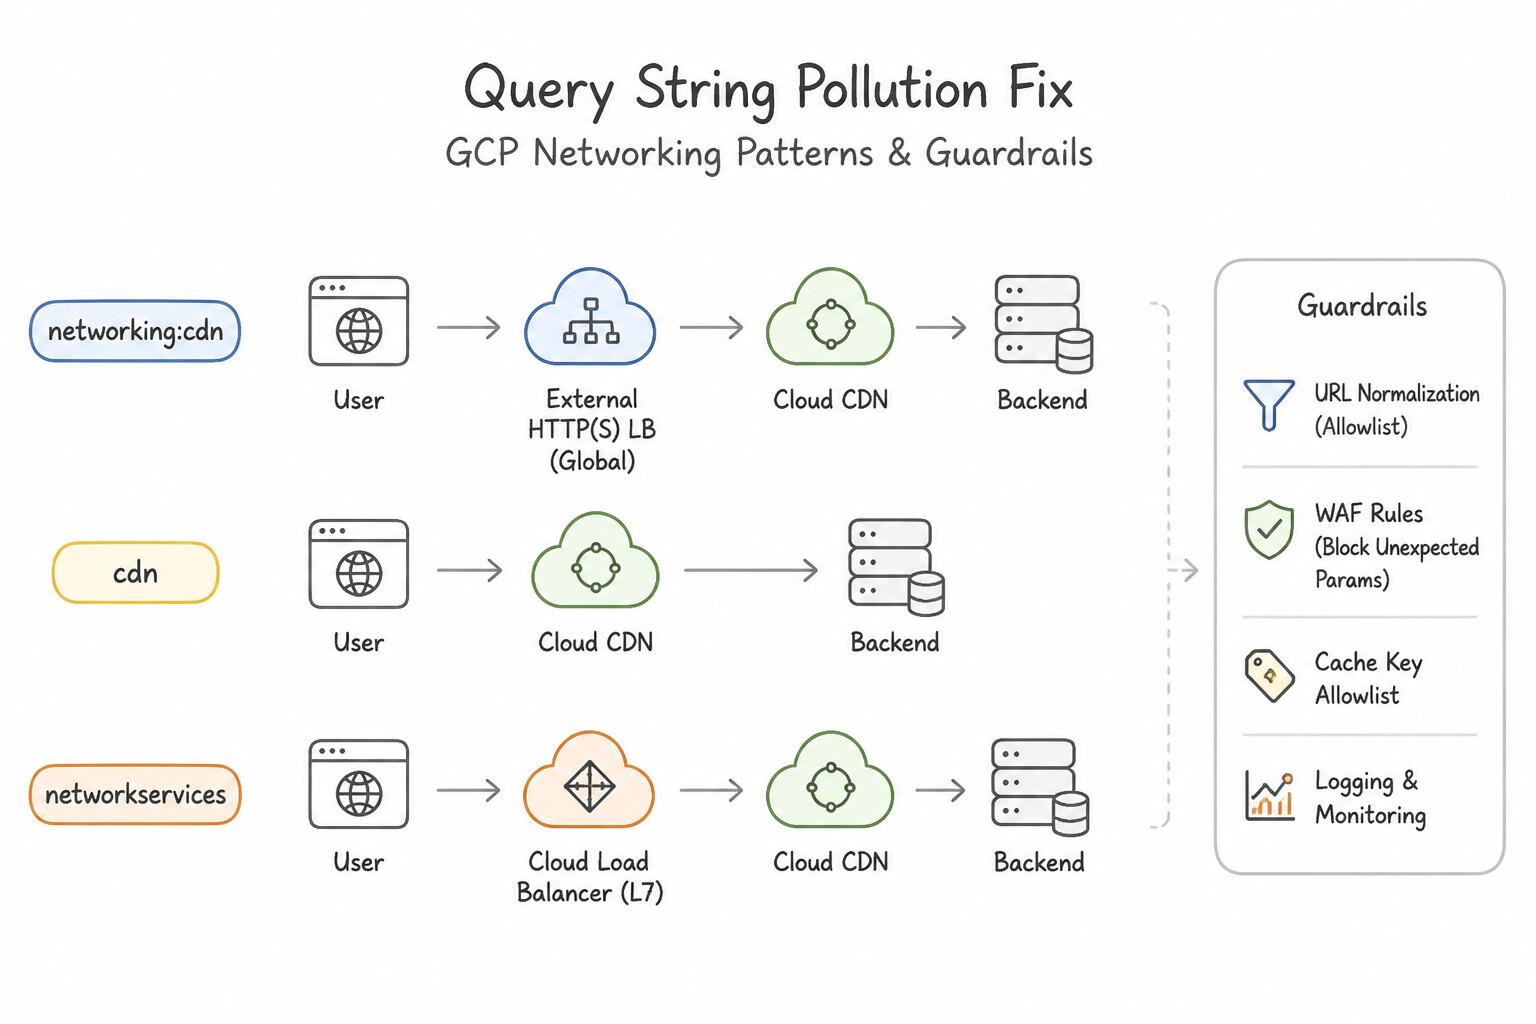
http/https) +Hostheader + URL Path + Complete Query String. - Query String Pollution Fix: Marketing campaign parameters (
?utm_source=x&gclid=y) create thousands of unique cache keys for identical pages, destroying your cache hit ratio. Configure--cache-key-include-query-string=false(to ignore all query strings) or use allowlists (--cache-key-query-string-whitelist=page,lang) / denylists (--cache-key-query-string-blacklist=utm_source,fbclid) to normalize the cache key. - Multi-Site & Device-Specific Caching: Use
--cache-key-include-host,--cache-key-include-protocol,--cache-key-include-http-header(e.g.,X-Device-Type), or--cache-key-include-named-cookieto partition the cache accurately without usingVary: *(which disables caching entirely). - Negative Caching (
--negative-caching): - Allows Cloud CDN to cache specific HTTP error status codes (
300,301,302,307,308,400,404,405,410,421,451,501) with fine-grained per-code TTLs (--negative-caching-policy='404=120,400=60'). - Protects origins from accidental DDoS/stampedes caused by broken links (
404 Not Found) or crawler bots hammering non-existent paths. - Cache Invalidation Mechanics & Rate Limits:
- Cache invalidation evicts objects across all global edge PoPs asynchronously (typically completing within seconds to a few minutes).
- Supported Patterns: Exact path (
/images/logo.png), wildcard prefix ending in/*(/images/*or/*for the entire cache), and optional--hostfilter (--host=media.example.com). - common pitfalls (Wildcard Rules): Prefix wildcards are only supported at the very end of a path immediately following a forward slash (
/*). Invalidation patterns like/images/*.jpgor/assets/v1*are invalid. - Best Practice: Cache invalidation is rate-limited (1,000 single-path or 50 wildcard invalidations per minute per project) and intended for emergency purge of bad/sensitive content. For routine deployments, use versioned URLs (
/assets/app.v2.jsor/assets/app.js?v=20261013) instead of issuing frequent cache invalidations.
Key Implementation Patterns
- Invalidating Specific Files vs. Directories: Use Request a cache invalidation for the path
/images/header-v2.jpg. Invalidating the specific file path removes only that file from the cache without affecting other cached content. (Avoid alternative: Disabling and re-enabling Cloud CDN clears the entire cache for the service and disrupts traffic.) - Using Wildcards for Recursive Invalidation: Use Submit a cache invalidation request for the path pattern "/static/". The path pattern /static/ uses a wildcard to recursively match and invalidate all files within the /static/ directory. (Avoid alternative: The pattern /static/ only targets the exact URL ending in a slash, not the files contained within that directory.)
- Managing Origin Load During Invalidation: Use Provision additional backend resources to handle the expected surge in origin traffic, and then invalidate the cache. Scaling the backend first prepares it for the request spike caused by cache invalidation. (Avoid alternative: Immediate invalidation causes a traffic spike that crashes the already loaded backend.)
Key Takeaways (3.2c)
- Cache Invalidation: Use this feature to force Cloud CDN to stop serving old content before its TTL expires.
- Path Specificity: Always invalidate the most specific path possible (e.g., a single file) to avoid negatively affecting the cache hit ratio of other assets.
- Wildcards: Use wildcards only when you need to purge large groups of files or entire directories.
- Cloud CDN allows you to invalidate cached content before it expires.
Consideration 3.2d: Configuring signed URLs
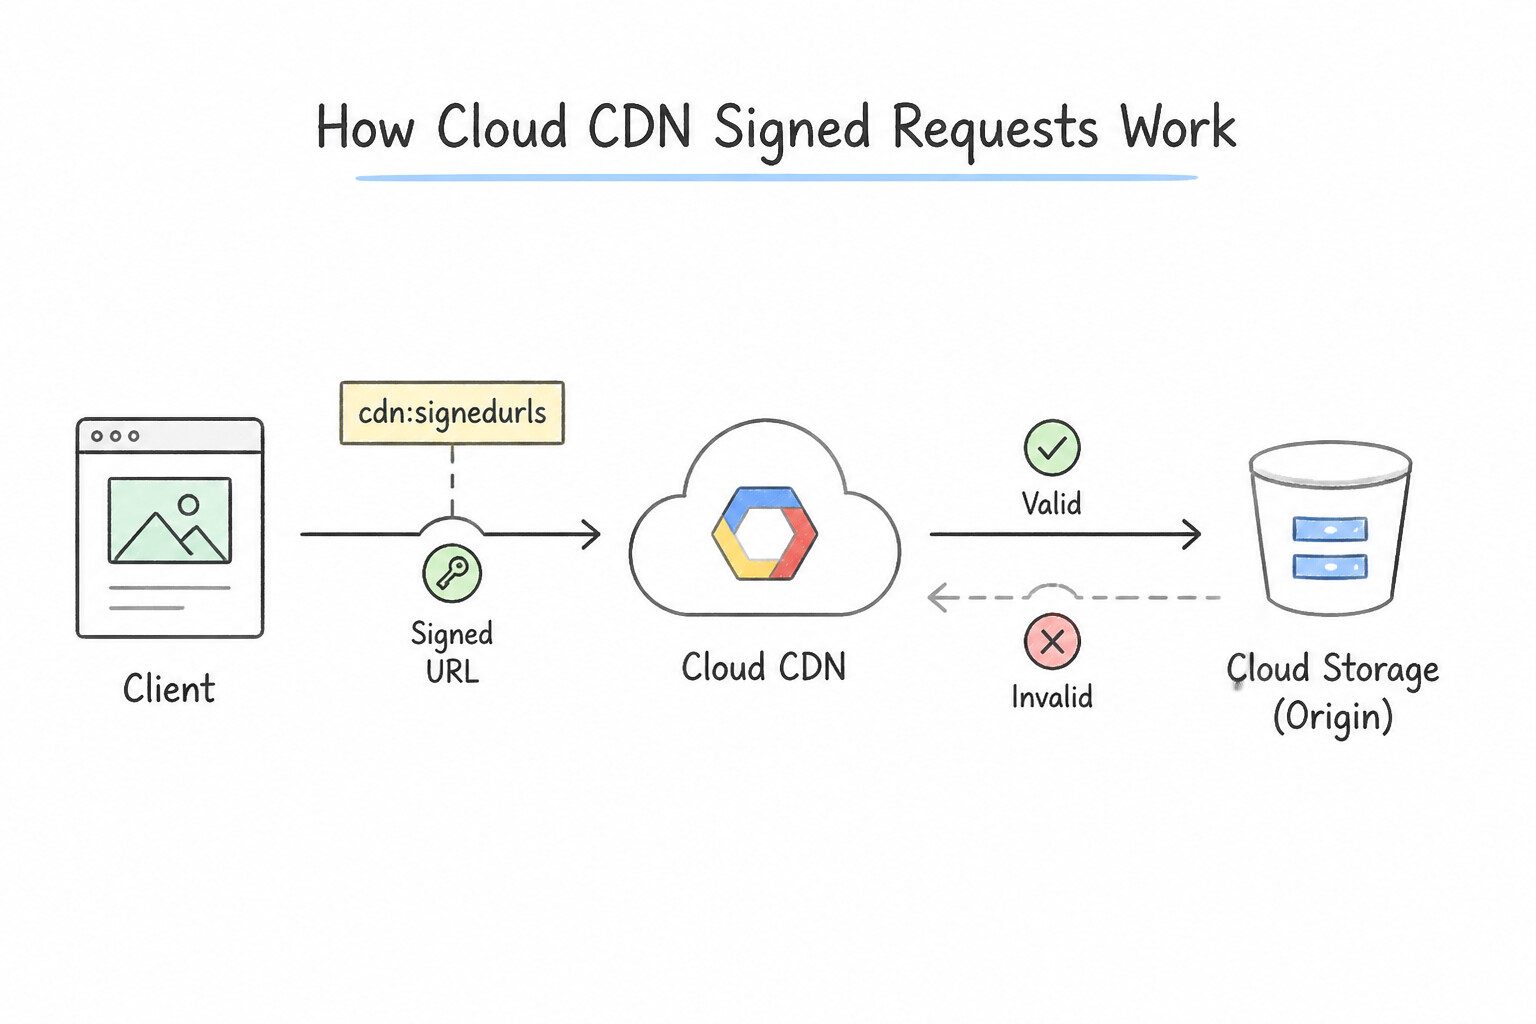
- How Cloud CDN Signed Requests Work:
- When you add at least one Signing Key (a 128-bit / 16-byte base64url-encoded secret key, up to 3 keys per backend service/bucket to support zero-downtime key rotation) to a Cloud CDN backend, all direct unsigned requests to that backend are rejected at the Google Edge with
403 Forbidden. - Your application server authenticates the user and issues either a Signed URL or Signed Cookies containing an expiration timestamp (
Expires=), Key Name (KeyName=), and cryptographic HMAC-SHA1/Ed25519 signature (Signature=). - Importantly, Cloud CDN strips the
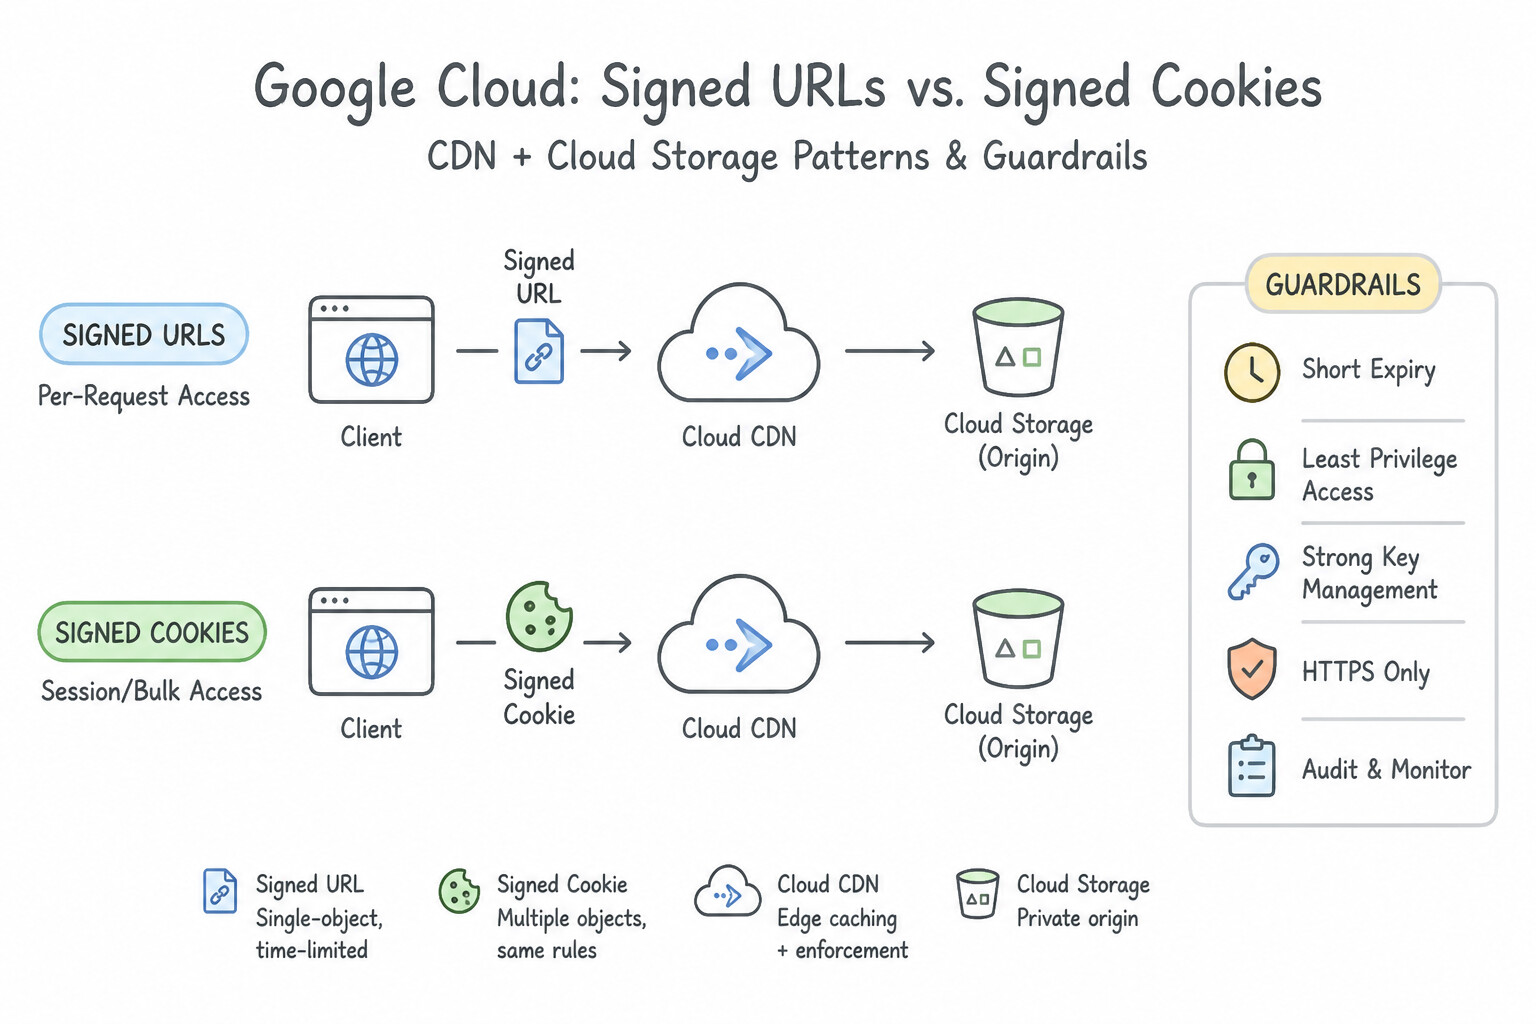
Signature,KeyName, andExpiresparameters from the Cache Key before looking up the object! That means 10,000 different users each given a unique time-limited Signed URL for/videos/keynote.mp4will all be served from the exact same single cached object at the edge PoP. - Signed URLs vs. Signed Cookies :
- Signed URLs: Sign a single individual URL. Ideal for standalone file downloads (a PDF invoice, a software
.zipbinary, or a single progressive MP4 download). - Signed Cookies: Sign an entire URL prefix (
URLPrefix=https://media.example.com/hls/movie123/) stored in theCloud-CDN-CookieHTTP cookie. Mandatory when serving HLS (m3u8/.ts) or MPEG-DASH video streaming or a multi-file web course where a video player dynamically fetches hundreds of sequential video chunk files without rewriting every chunk URL in the manifest. - Configuring Cloud Storage Origins with Signed URLs:
- When using Cloud CDN Signed URLs/Cookies with a Cloud Storage Backend Bucket, the bucket should not be granted
allUsers:objectViewer. Instead, grantroles/storage.objectVieweronly to the Cloud CDN Service Account (service-<PROJECT_NUMBER>@cloud-cdn-fill.iam.gserviceaccount.com) so users cannot bypass Cloud CDN and fetch objects directly fromstorage.googleapis.com.
Key Implementation Patterns
- Optimizing Access for HLS/DASH Streaming: Use Create a signed URL that authorizes a URL prefix for the directory. A signed URL with a URL prefix grants access to all files under a specific directory with one signature. (Avoid alternative: Generating signatures for every single file is inefficient and impractical for streaming.)
- Troubleshooting 403 Forbidden Errors: Use Verify that the key name in the signed URL matches the key name configured on the backend service. The KeyName parameter in the URL must match the key name configured on the backend service for validation to succeed. (Avoid alternative: Cloud CDN signed URLs require the HMAC-SHA1 algorithm, not SHA-256.)
Key Takeaways (3.2d)
- Signed URLs are used to grant temporary access to private content on Cloud CDN.
- Use URL prefixes with Signed URLs to grant access to all files within a specific folder or path.
- URL prefixes are ideal for media streaming (HLS/DASH) where clients need access to many segment files.
- Signed URLs allow limited-time access to private resources without requiring Google account credentials.
Quick Decision Cheat Sheet (Subsection 3.2)
If the Scenario Requires... | Choose This Google Cloud Pattern | Avoid This Common Mistake |
|---|---|---|
"Users are seeing other users' private profile pages after enabling Cloud CDN" | Switch from FORCE_CACHE_ALL to CACHE_ALL_STATIC or USE_ORIGIN_HEADERS and ensure private responses send Cache-Control: private, no-store | Disabling Negative Caching or lowering max-ttl |
"Bot traffic requesting non-existent /wp-login.php paths is overloading origin VMs with 404 responses" | Enable Negative Caching ( --negative-caching) with a custom TTL for HTTP 404 | Creating a URL Map redirect or increasing default-ttl |
"Routine CI/CD frontend release deploying updated app.js and styles.css bundles" | Use Cache Busting / Versioned File Names ( app.8f3a1.js or ?v=1.2.4) | Running invalidate-cdn-cache --path="/*" on every deployment (hits rate limits and causes origin cache-fill stampedes) |
"Key rotation for Cloud CDN Signed URLs without invalidating active user sessions" | Add a new signing key (up to 3 keys supported concurrently), start signing with the new key, wait for old URLs to expire, then delete the old key | Deleting and recreating the existing signing key in-place (immediately breaks all active Signed URLs with 403) |
"Serve different cached HTML for mobile vs. desktop users on the same URL" | Include a normalized custom header (e.g., X-Device-Type) in the Cache Key (--cache-key-include-http-header) | Setting Vary: User-Agent at the origin (thousands of User-Agent strings destroy cache hit ratio) |
"External on-premises origin returns 400 Bad Request or 404 during Cloud CDN cache fill" | Configure a URL Map hostRewrite so the cache-fill request uses the origin's expected internal/external Host header | Changing the health check port or switching to Passthrough NLB |
Further Reading (Subsection 3.2)
- Setting up Cloud CDN with a Cloud Storage bucket — This guide provides step-by-step instructions on creating a backend bucket and enabling Cloud CDN to serve content from Cloud Storage.
- Set up a backend bucket — This guide explains the exact steps to enable Cloud CDN on a backend service that points to an instance group.
- Setting up a global external Application Load Balancer with Cloud Run — This guide provides step-by-step instructions on configuring a load balancer for serverless backends, explicitly detailing the creation of a Serverless NEG.
- Serverless network endpoint groups overview — Explains what Serverless NEGs are, their use cases, and how they function as backends for load balancers.
- Set up an external backend with an internet NEG — This guide details the specific steps to configure Cloud CDN for external backends (Internet NEGs), including setting up the NEG with an FQDN and attaching it to a backend service.
- Internet network endpoint groups overview — Provides a conceptual overview of Internet NEGs, explaining when to use them and the difference between using IP:Port and FQDN:Port endpoints.
Subsection 3.3: Configuring Cloud DNS
The Big Picture
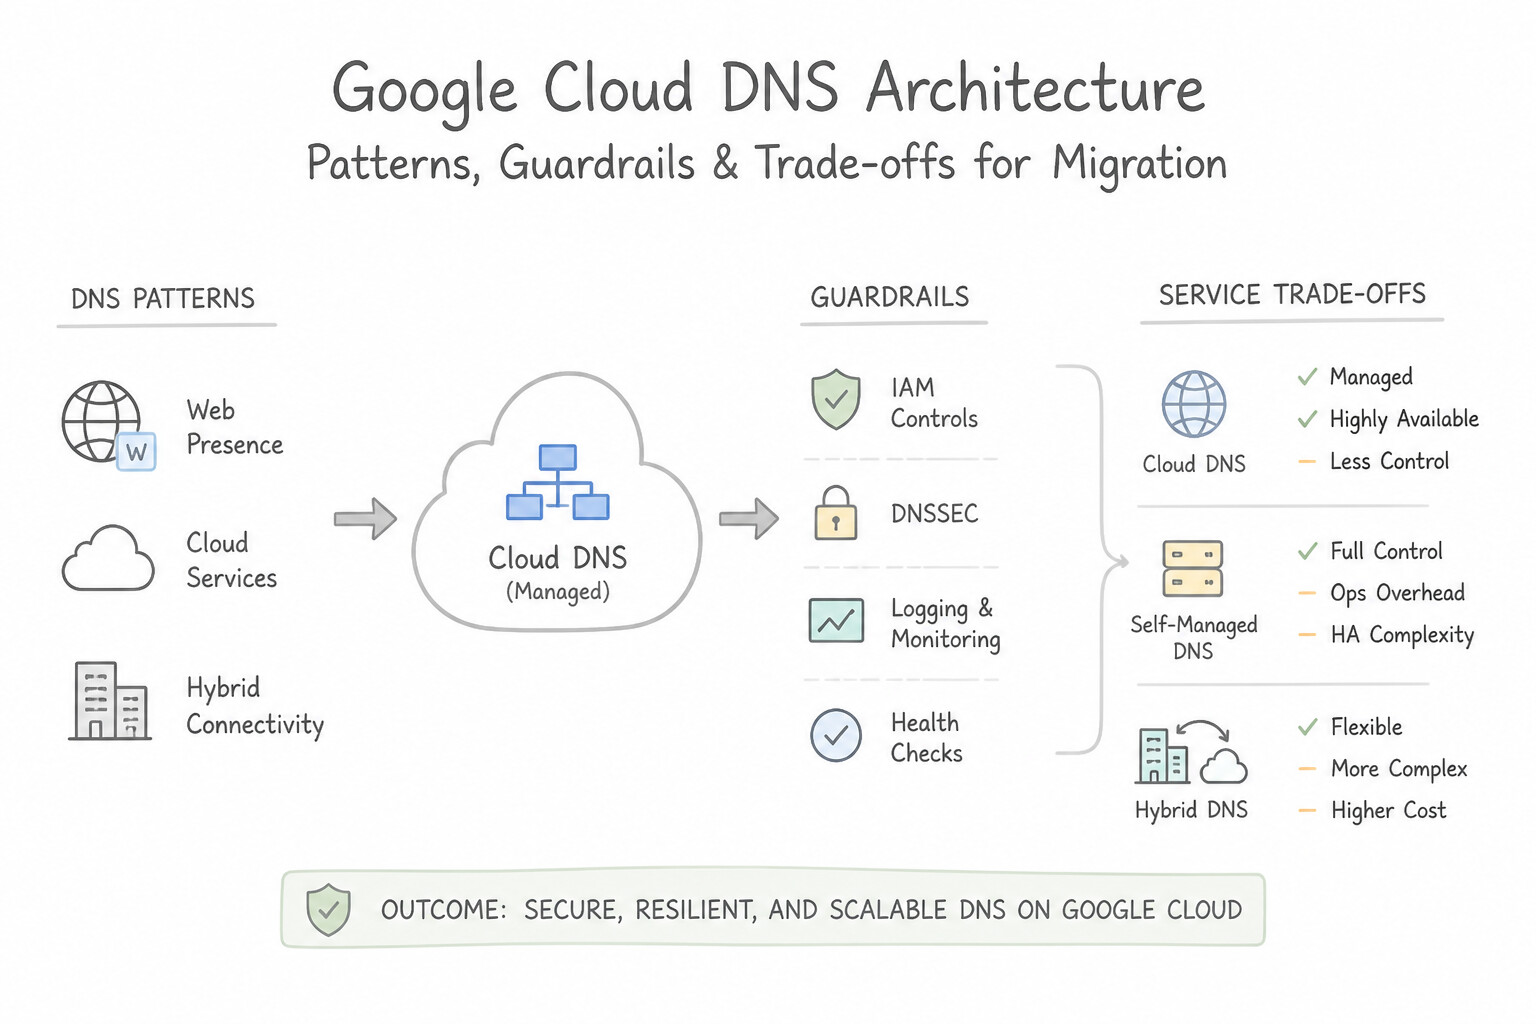
In enterprise hybrid and multicloud networks, "it's always DNS" is more than a cliché—it is a structural reality. Most production hybrid failures happen not because BGP routes are missing, but because private DNS resolution paths and data-plane IP routes are decoupled. Every Compute Engine VM resolves DNS by querying its local metadata server (169.254.169.254), which invokes Cloud DNS's VPC-scoped resolver hierarchy. When an on-premises server attempts to query 169.254.169.254 over Cloud VPN or Cloud Interconnect, the packets drop immediately because 169.254.169.254 is link-local to a Google Cloud VM's virtual NIC. Without configuring an Inbound Server Policy (which exposes regional 35.199.192.0/19 proxy listeners inside your VPC) and advertising 35.199.192.0/19 over Cloud Router BGP, on-premises workloads are completely blind to Cloud DNS Private Zones.
Conversely, when Cloud DNS forwards queries outbound to on-premises Active Directory / BIND servers, responses routinely blackhole unless the on-premises firewall permits and routes return traffic back to 35.199.192.0/19 (or unless the forwarding target is configured with private routing mode). Combine these hybrid nuances with DNS Peering vs. Cross-Project Zone Binding, Split-Horizon DNS, DNSSEC key rollover mechanics, Cloud DNS Routing Policies (WRR, Geolocation with fencing, and Internal Health-Checked Failover), and Cloud DNS for GKE, and Chapter 11 becomes one of the most foundational architectural domains on the entire Google Cloud architecture.
Consideration 3.3a: Managing zones and records
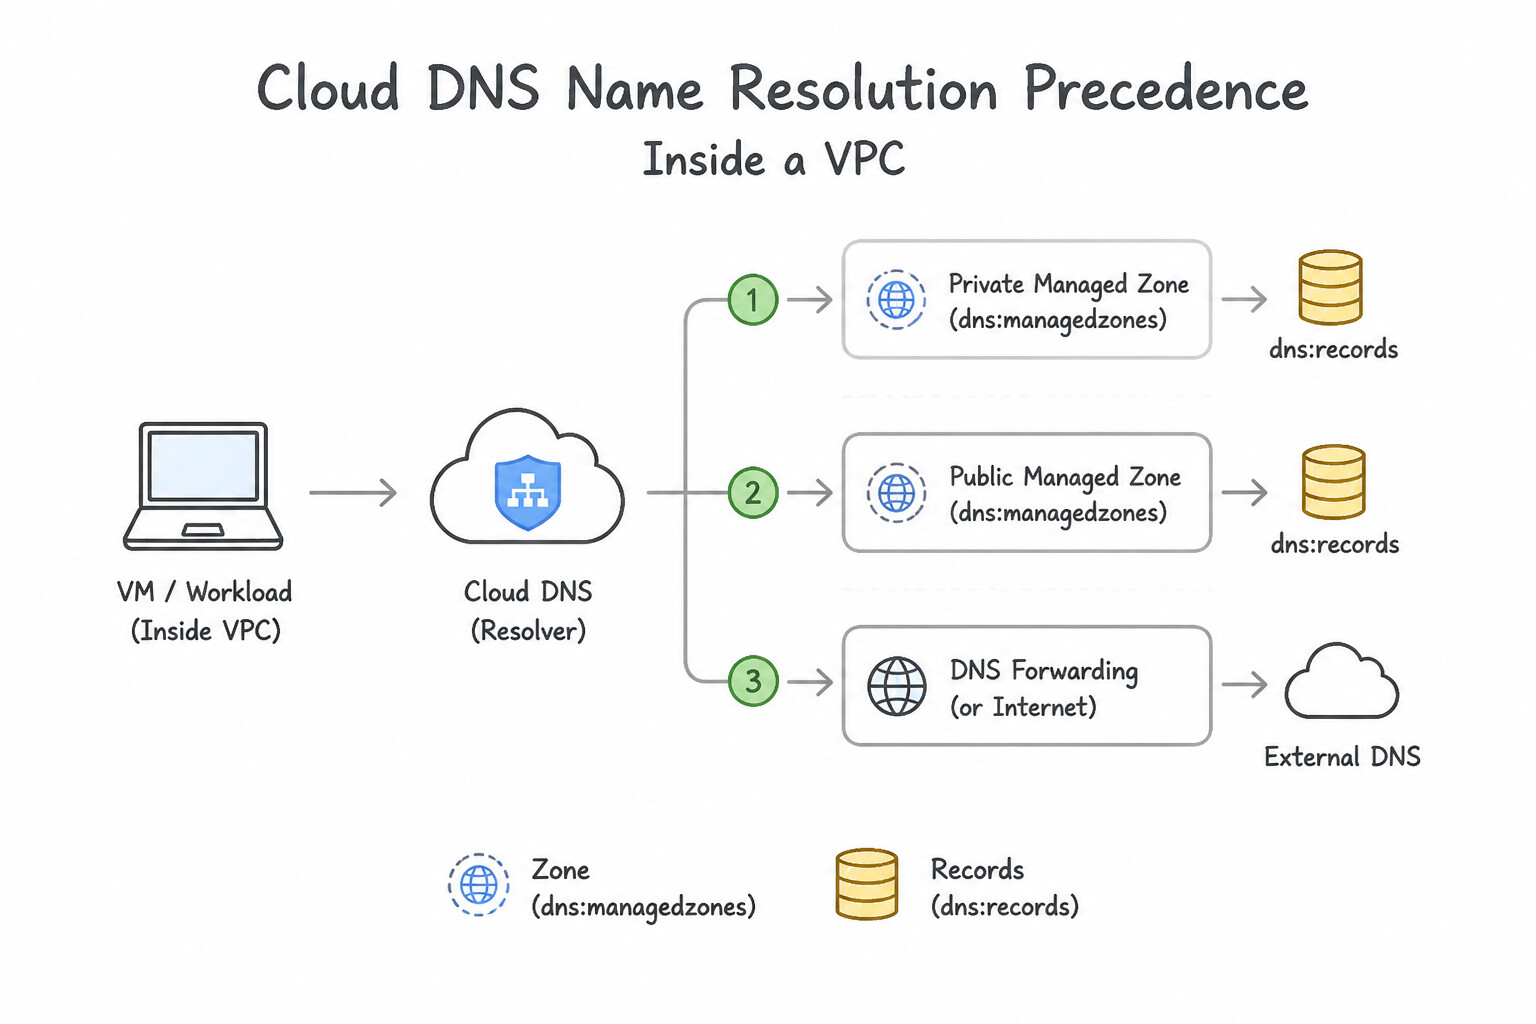
- Cloud DNS Name Resolution Precedence inside a VPC:
- When a VM queries
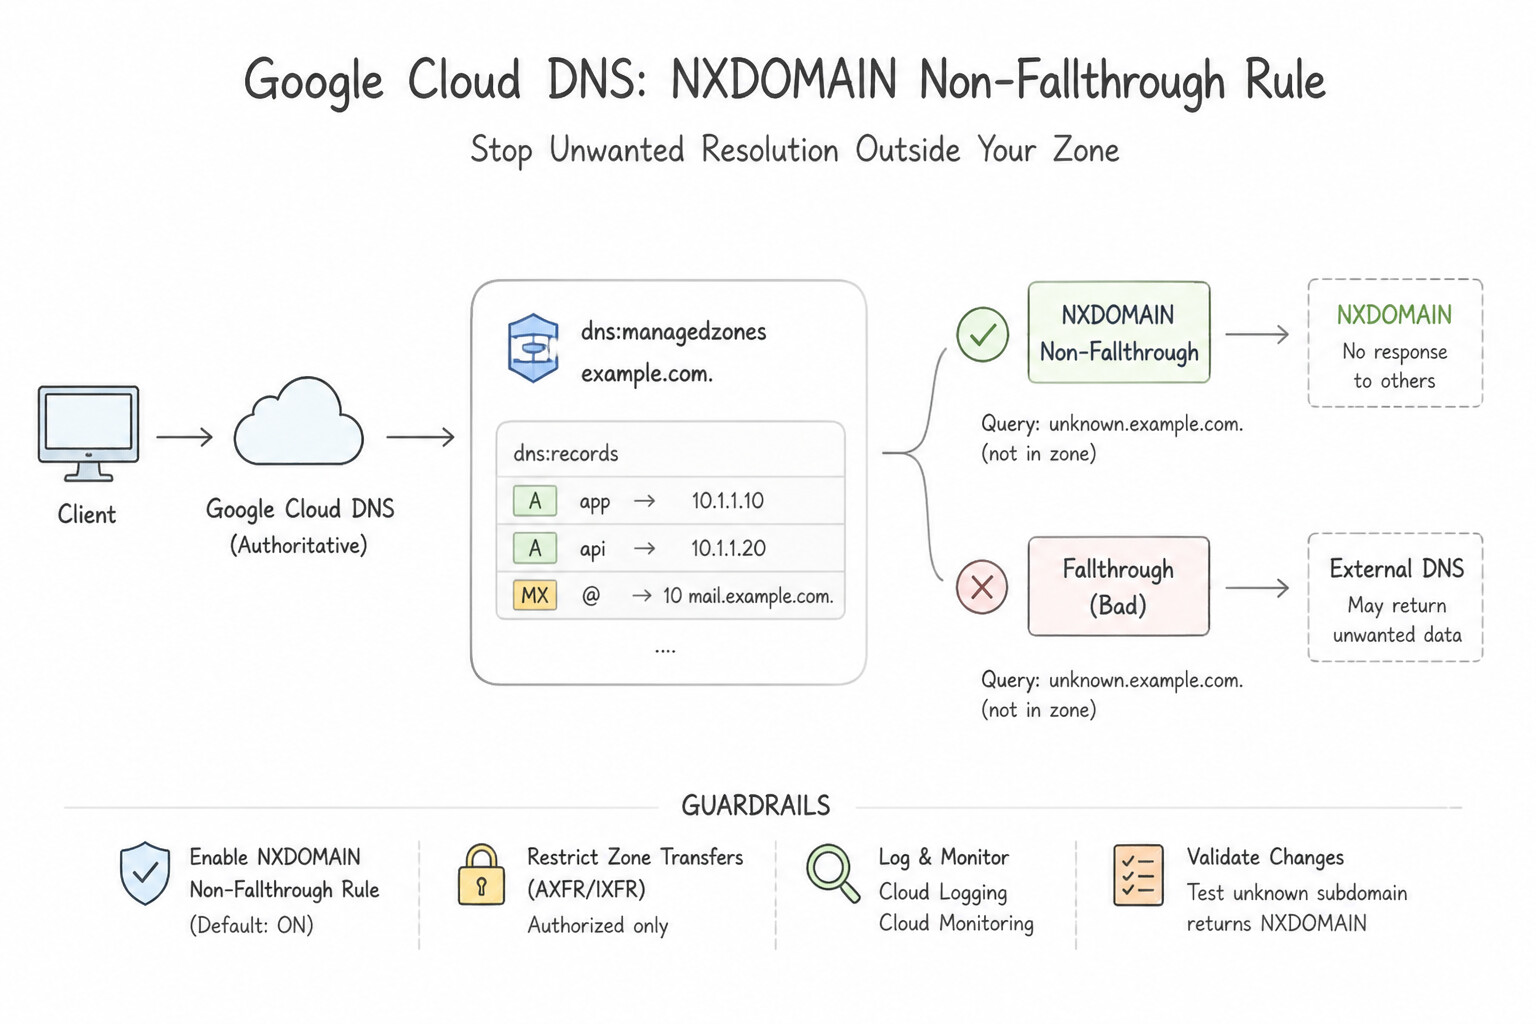
169.254.169.254, Cloud DNS evaluates zones bound to that VPC using longest-suffix match (most specific domain wins). For example, if bothexample.com.andprod.example.com.private zones are bound to the VPC, a query fordb.prod.example.com.is answered authoritatively byprod.example.com.. - NXDOMAIN Non-Fallthrough Rule (Major common pitfalls!): If a query matches a Private Zone (
prod.example.com.), Cloud DNS never falls back to the public internet or a parent zone if a specific record (missing.prod.example.com.) does not exist in that Private Zone—it immediately returnsNXDOMAIN. - Key Record Types & Apex Record Constraints:
- Standard records include
A(IPv4),AAAA(IPv6),CNAME(canonical name alias),TXT(SPF/DKIM/verification),MX(mail exchange),SRV(service discovery port/weight/priority),PTR(reverse DNS inin-addr.arpa.), andCAA(Certification Authority Authorization restricting which CAs can issue TLS certificates for the domain). - Zone Apex Trap (
@/example.com.): RFC 1034 prohibits placing aCNAMErecord at the zone apex (example.com.) because it conflicts with mandatoryNSandSOArecords. In Cloud DNS, point the zone apex directly to a Global External Load Balancer's anycast IP using anA/AAAArecord (or an Alias record in Public Zones).
Key Implementation Patterns
- Implementing Split-Horizon DNS: Use Create a Public managed zone for the domain. Create a Private managed zone for the same domain and authorize it for the VPC. Add the appropriate A record to each zone. Use split-horizon DNS by creating a Private zone for the VPC and a Public zone for the internet with the same domain name.
- Cross-Project Private Zone resolution: Use Configure a DNS peering zone in each Spoke VPC that targets the Hub VPC network. DNS peering zones allow a VPC to consult the naming configuration of another VPC. (Avoid alternative: Duplicating zones manually is inefficient and difficult to maintain.)
- Hybrid Outbound DNS Forwarding: Use Create a Cloud DNS private forwarding zone for the .local domain and configure the on-premises DNS IP addresses as the destination. Private forwarding zones direct DNS queries for specific domains to external name servers. (Avoid alternative: Peering zones share DNS records between VPCs, not with on-premises networks.)
Key Takeaways (3.3a)
- Split-horizon DNS uses the same domain name to serve different records to internal and external users.
- Private Managed Zones are only visible to authorized VPCs and take precedence over Public zones for those VPCs.
- Public Managed Zones are visible to the internet.
- Never put private internal IP addresses in a Public zone if you want to keep your internal network topology hidden.
Consideration 3.3b: Migrating to Cloud DNS
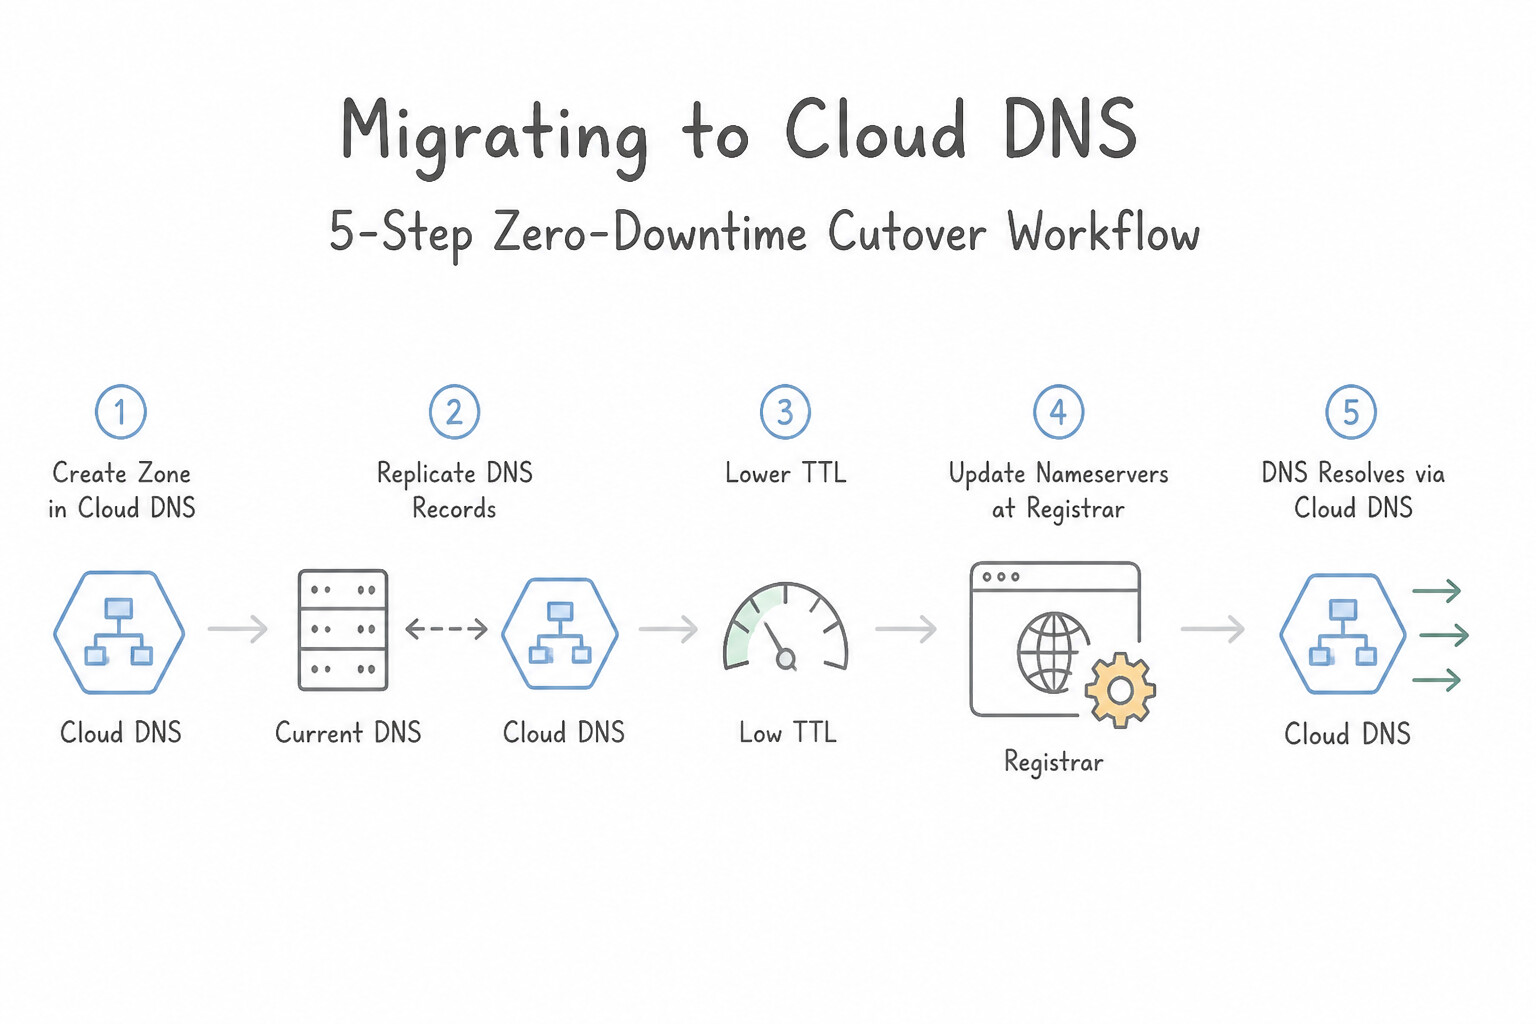
- The 5-Step Zero-Downtime Cutover Workflow:
- Lower TTLs in Advance: At least 24–48 hours before cutover (longer than the current
NSand record TTLs), lower the TTLs on the existing DNS provider's records andNSrecords (e.g., to60–300seconds) so recursive resolvers worldwide do not cache stale delegation. - Create the Cloud DNS Public Managed Zone: Note the four assigned
ns-cloud-x1.googledomains.com.name servers. (Note: Disable DNSSEC at the current registrar before migrating if DNSSEC is currently active, and wait for the oldDSrecord TTL to expire!). - Import Records: Export the zone file from the legacy DNS provider and import it into Cloud DNS using
gcloud dns record-sets import <FILE> --zone=<ZONE> --zone-file-format(for standard BIND format) or YAML format. - Verify Authoritative Resolution Before Switching: Test Cloud DNS directly using
dig @ns-cloud-a1.googledomains.com www.example.comorwatchbefore touching the domain registrar. - Update Registrar
NSDelegation & Keep Legacy Provider Live: Update the domain registrar'sNSrecords to point to Cloud DNS. Keep the legacy DNS provider running and serving identical records until the previousNSTTL has completely expired globally.
Key Implementation Patterns
- Importing Legacy BIND Zones: Use Run the
gcloud dns record-sets importcommand, and use the--zone-file-formatflag to point to the BIND file. The--zone-file-formatflag allowsgcloudto read and import standard BIND zone files directly. (Avoid alternative: Thecreatecommand initializes a zone but does not import records; the--dns-nameflag sets the domain name, not the data source.) - Minimizing Downtime During Cutover: Use Decrease the TTL values of the NS records at the current provider significantly (e.g., to 60 seconds) well in advance of the migration. Lowering the TTL ensures cached records expire quickly, allowing the new Cloud DNS nameservers to propagate faster during the switch.
- Implementing Split-Horizon DNS: Use Create a public managed zone for the domain. Create a private managed zone for the same domain and make it visible to the VPC network. Split-horizon DNS is achieved by creating both a public zone and a private zone for the same domain, attaching the private zone to the specific VPC.
Key Takeaways (3.3b)
- Use
gcloud dns record-sets importfor bulk updates to a zone.- The
--zone-file-formatflag allows direct import of legacy BIND files without conversion.- Transactions (
transaction start) are better suited for small, specific atomic changes rather than initial bulk loads.- Always create the managed zone container before attempting to import records into it.
Consideration 3.3c: Configuring routing policies
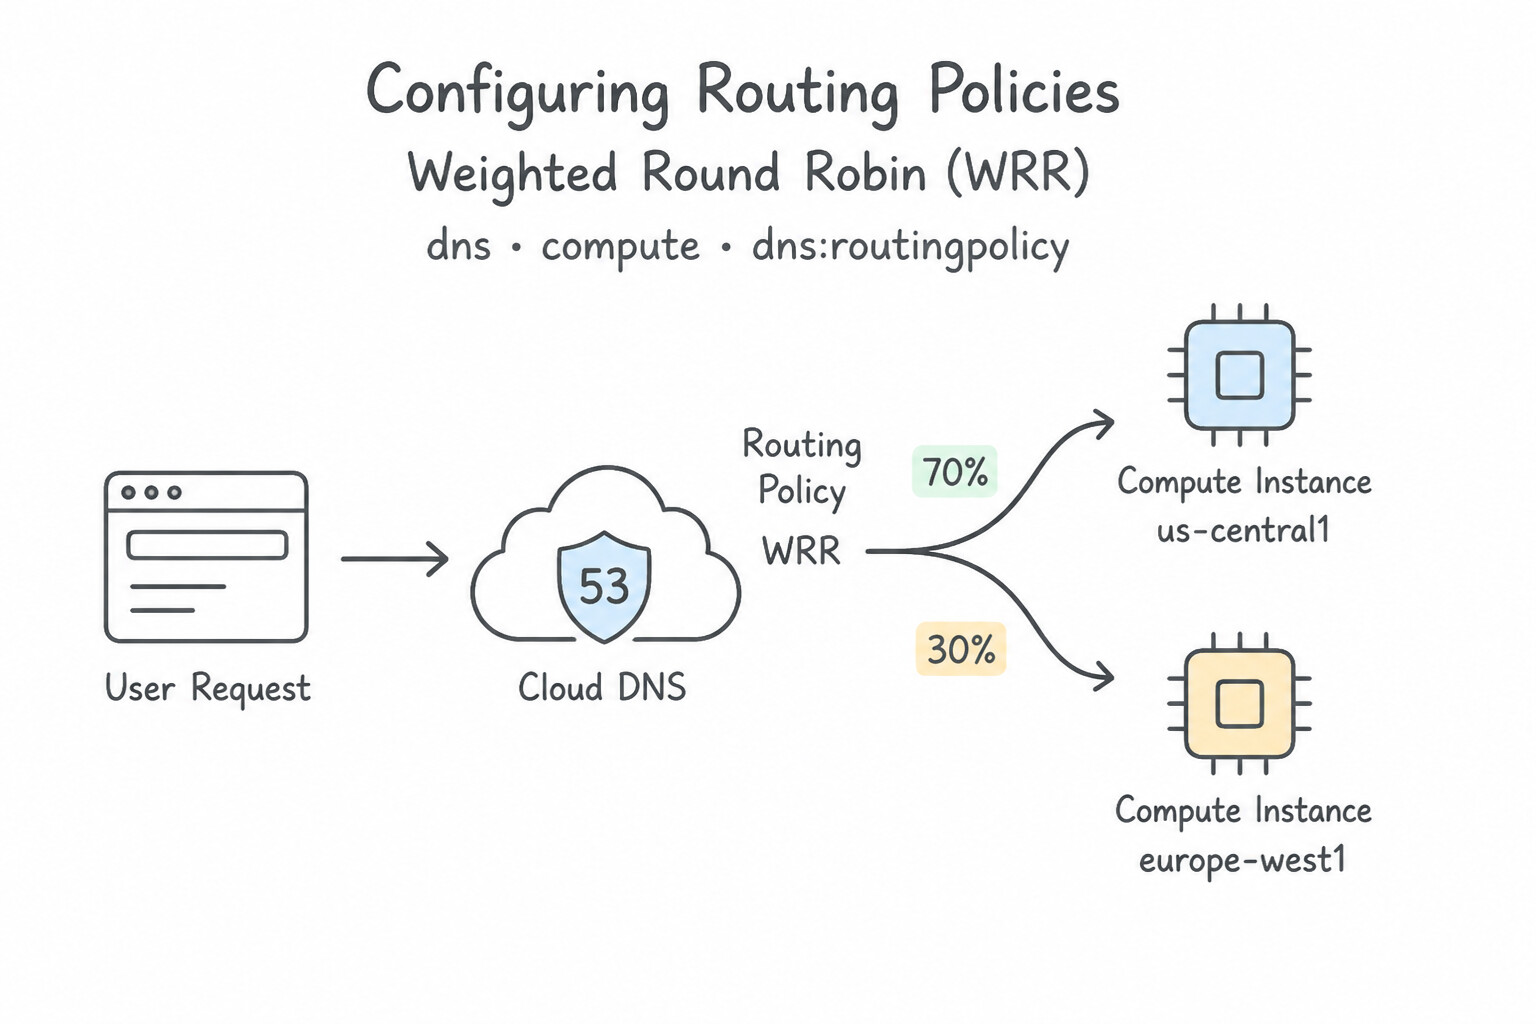
- Weighted Round Robin (WRR):
- Distributes DNS responses across multiple IP targets based on configured weights (e.g.,
0.9/0.1for canary testing across two External Regional Load Balancers or multi-cloud endpoints). Supports health checking for internal load balancer targets. - Geolocation Routing Policy (with Fencing):
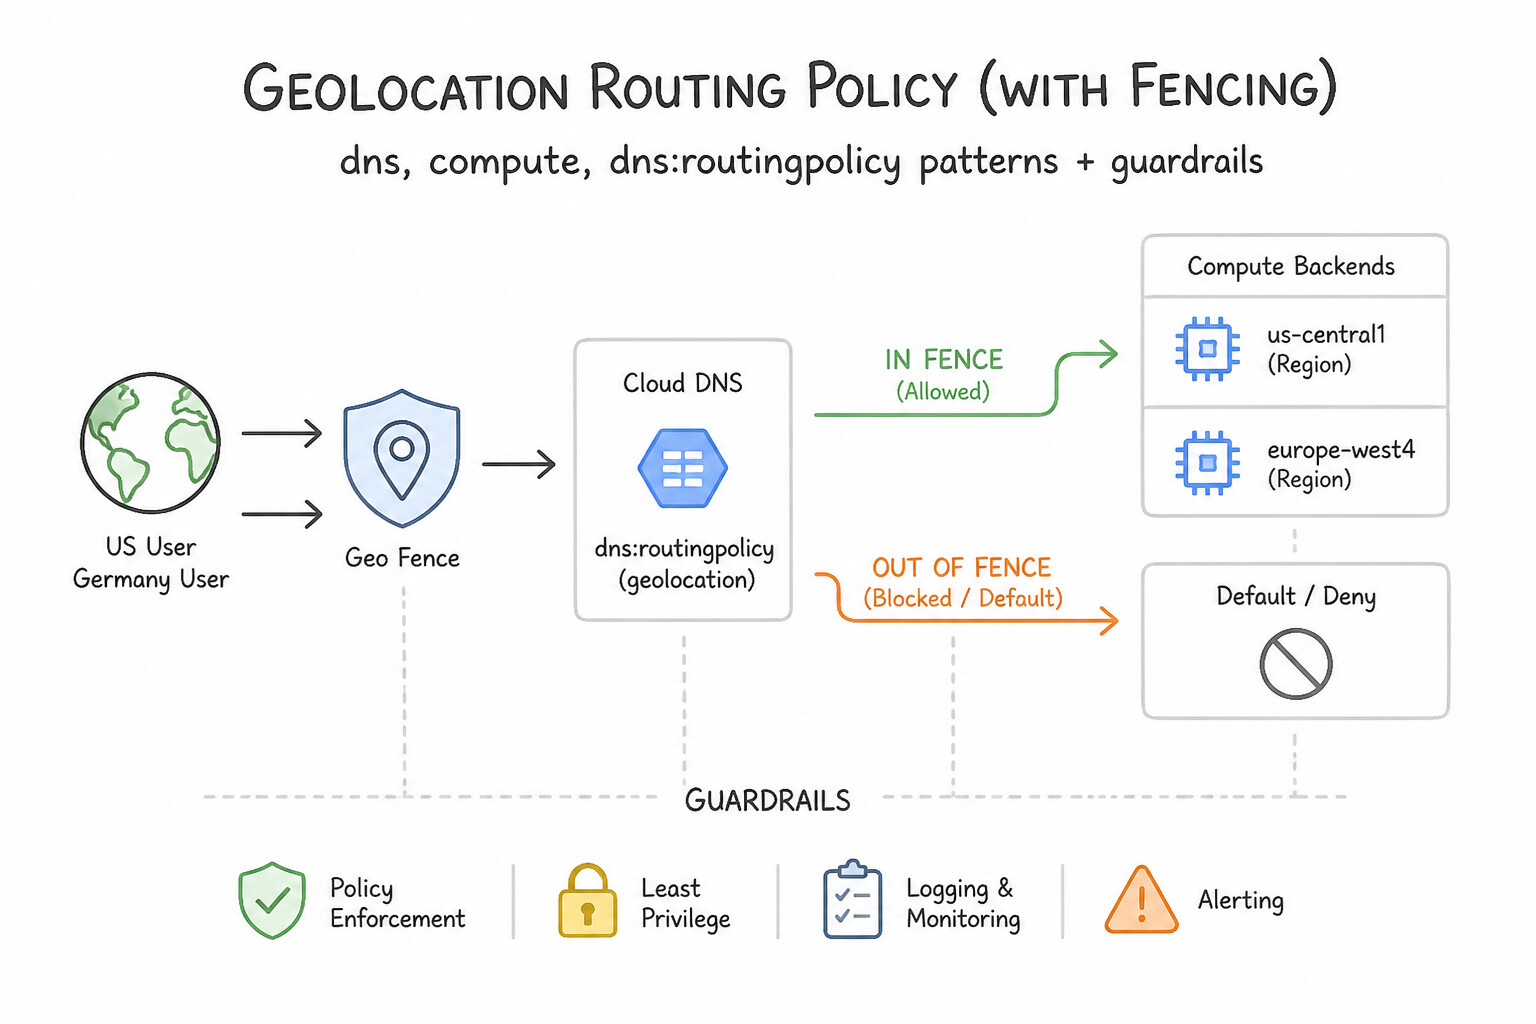
- Routes queries to the IP target residing in the Google Cloud region closest to the client's source location (or EDNS0 Client Subnet
ECSfor public zones). - Geolocation Fencing (
--enable-geo-fencing): By default, if all endpoints inus-east1fail health checks, Geolocation routing fails over to the next closest healthy region (us-central1). If regulatory compliance forbids traffic from ever leavingeurope-west3even during an outage, enabling Geo-Fencing prevents cross-region failover. - Active-Passive Failover Routing Policy:
- Supported in Private Zones (and Public Zones for internal/external passthrough and regional Envoy LBs). Configures
primaryTargets(which must be Internal Passthrough Network Load Balancers or Regional Envoy-based Internal/External Application or Proxy Network Load Balancers) andbackupTargets(which can use Geolocation routing). - Integrates natively with Google Cloud Health Checks (
--enable-health-checking): if all primary ILB backends become unhealthy, Cloud DNS automatically serves thebackupTargetsIPs (or can trickle a canary percentage of traffic to primaries using--backup-data-trickle-ratio).
Key Implementation Patterns
- Canary Deployment using Weighted Round Robin: Use Create a Weighted Round Robin routing policy. Assign a weight of 5 to the new IP address and 95 to the stable IP address. Weighted Round Robin allows you to distribute traffic based on defined numerical weights. (Avoid alternative: TTL controls caching duration, not traffic distribution percentages.)
- GDPR Compliance Data Residency: Use Create a Record Set with a Geolocation routing policy. Map the EU region to the europe-west1 IP address and the US region to the us-central1 IP address. Geolocation routing policies map traffic from specific source regions to specific destination IP addresses.
- Active-Passive Disaster Recovery: Use Configure a Failover routing policy. Set the us-east1 IP address as the primary target and the us-west1 IP address as the backup target. Enable health checks on the primary target. A Failover routing policy uses health checks to route traffic to a backup target only when the primary target becomes unhealthy.
Key Takeaways (3.3c)
- Weighted Round Robin is the go-to DNS policy for A/B testing, canary deployments, and uneven traffic distribution.
- Geolocation policies optimize latency by routing users to the nearest physical resource.
- Failover policies provide high availability by switching to a backup only when the primary fails.
- Standard A records do not support granular traffic percentages.
Consideration 3.3d: Enabling DNSSEC
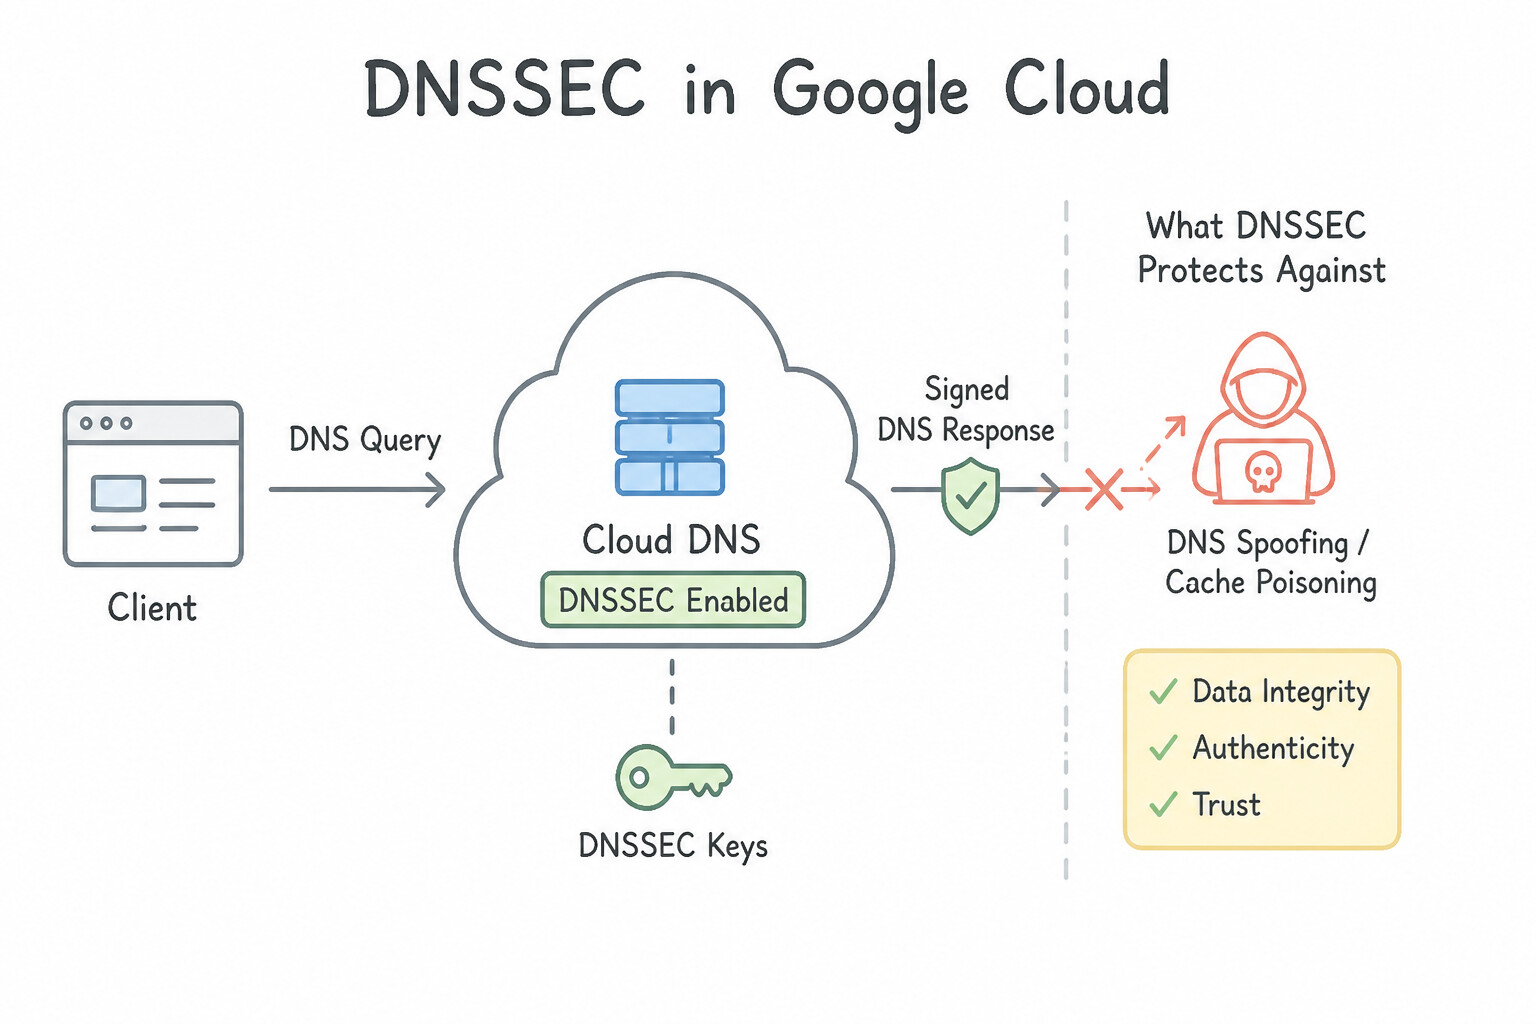
- What DNSSEC Protects Against:
- DNS Security Extensions (DNSSEC) protect recursive resolvers against DNS cache poisoning, man-in-the-middle spoofing, and forged DNS responses by cryptographically signing DNS resource record sets (
RRSIG). - common pitfalls: DNSSEC does NOT encrypt DNS queries (queries remain plaintext on port 53 unless DNS-over-HTTPS/TLS is used) and does not apply to Cloud DNS Private Zones.
- Chain of Trust (
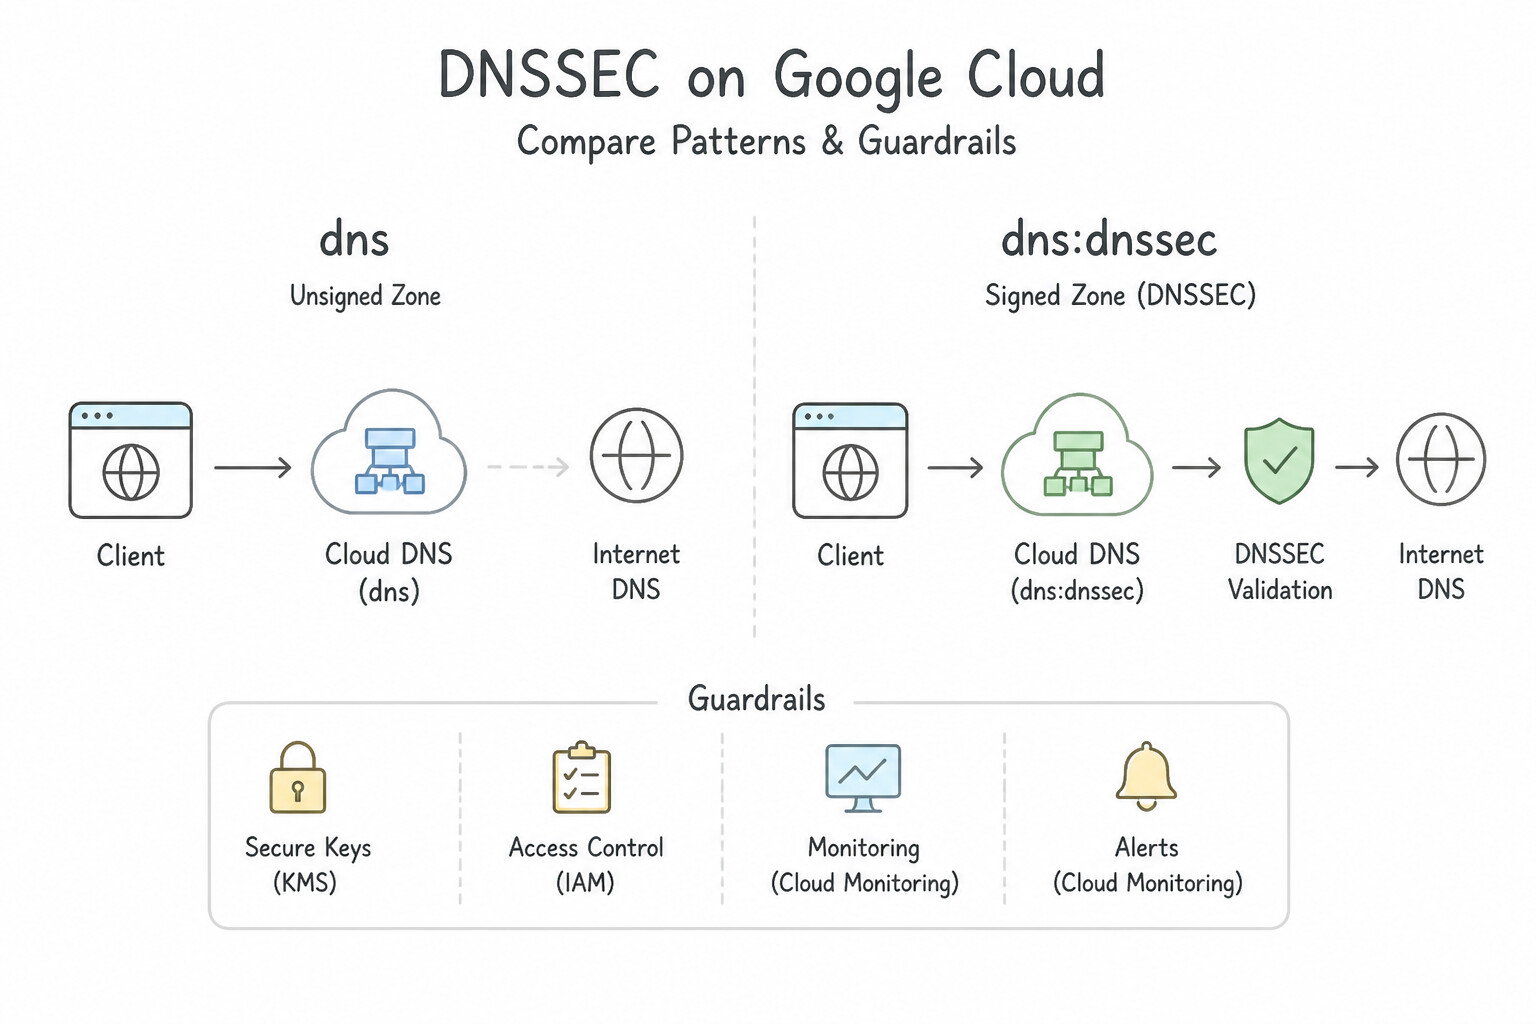
KSK,ZSK, andDSRecords): - When you enable DNSSEC on a Cloud DNS Public Zone (
--dnssec-state=on), Google Cloud automatically generates and rotates the Zone-Signing Key (ZSK) (which signs individual records) and the Key-Signing Key (KSK) (which signs theDNSKEYRRset). - Mandatory Manual Step: Enabling DNSSEC in Cloud DNS alone does not activate the chain of trust! You must export the Delegation Signer (
DS) record from Cloud DNS (gcloud dns dns-keys describe) and add theDSrecord to your parent domain registrar. - Domain Transfer Trap:
- Before transferring a domain between registrars or migrating authoritative DNS providers, always set DNSSEC to
off, remove theDSrecord from the parent registrar, and wait for the parentDSTTL to expire—otherwise validating resolvers (8.8.8.8,1.1.1.1) will returnSERVFAILduring the transfer.
Key Implementation Patterns
- Completing the Chain of Trust: Use Copy the Delegation Signer (DS) record from the Cloud DNS console and configure it at your domain registrar. You must manually copy the DS record to the registrar to complete the chain of trust. (Avoid alternative: Restarting VMs does not solve DNS configuration issues.)
- Preventing Zone Enumeration: Use Update the DNSSEC state to use NSEC3 denial-of-existence. NSEC3 hashes the next record name, preventing attackers from reading the actual domain names during zone walking. (Avoid alternative: Disabling DNSSEC removes the protection required by the scenario.)
- Safe KSK Rotation Procedure: Use Copy the new DS record from Cloud DNS and update it at your domain registrar. Rotating the KSK changes the DS record, which must be updated at the registrar to maintain the chain of trust. (Avoid alternative: KSK rotation changes cryptographic keys, not the name servers (NS records) hosting the zone.)
Key Takeaways (3.3d)
- Enabling DNSSEC in Cloud DNS is only the first step.
- You must manually update your domain registrar with the DS records provided by Cloud DNS.
- The Chain of Trust connects the parent zone to the child zone via DS records.
- Failure to update the registrar results in validation errors ('Bogus' status).
Consideration 3.3e: Integrating self-hosted DNS
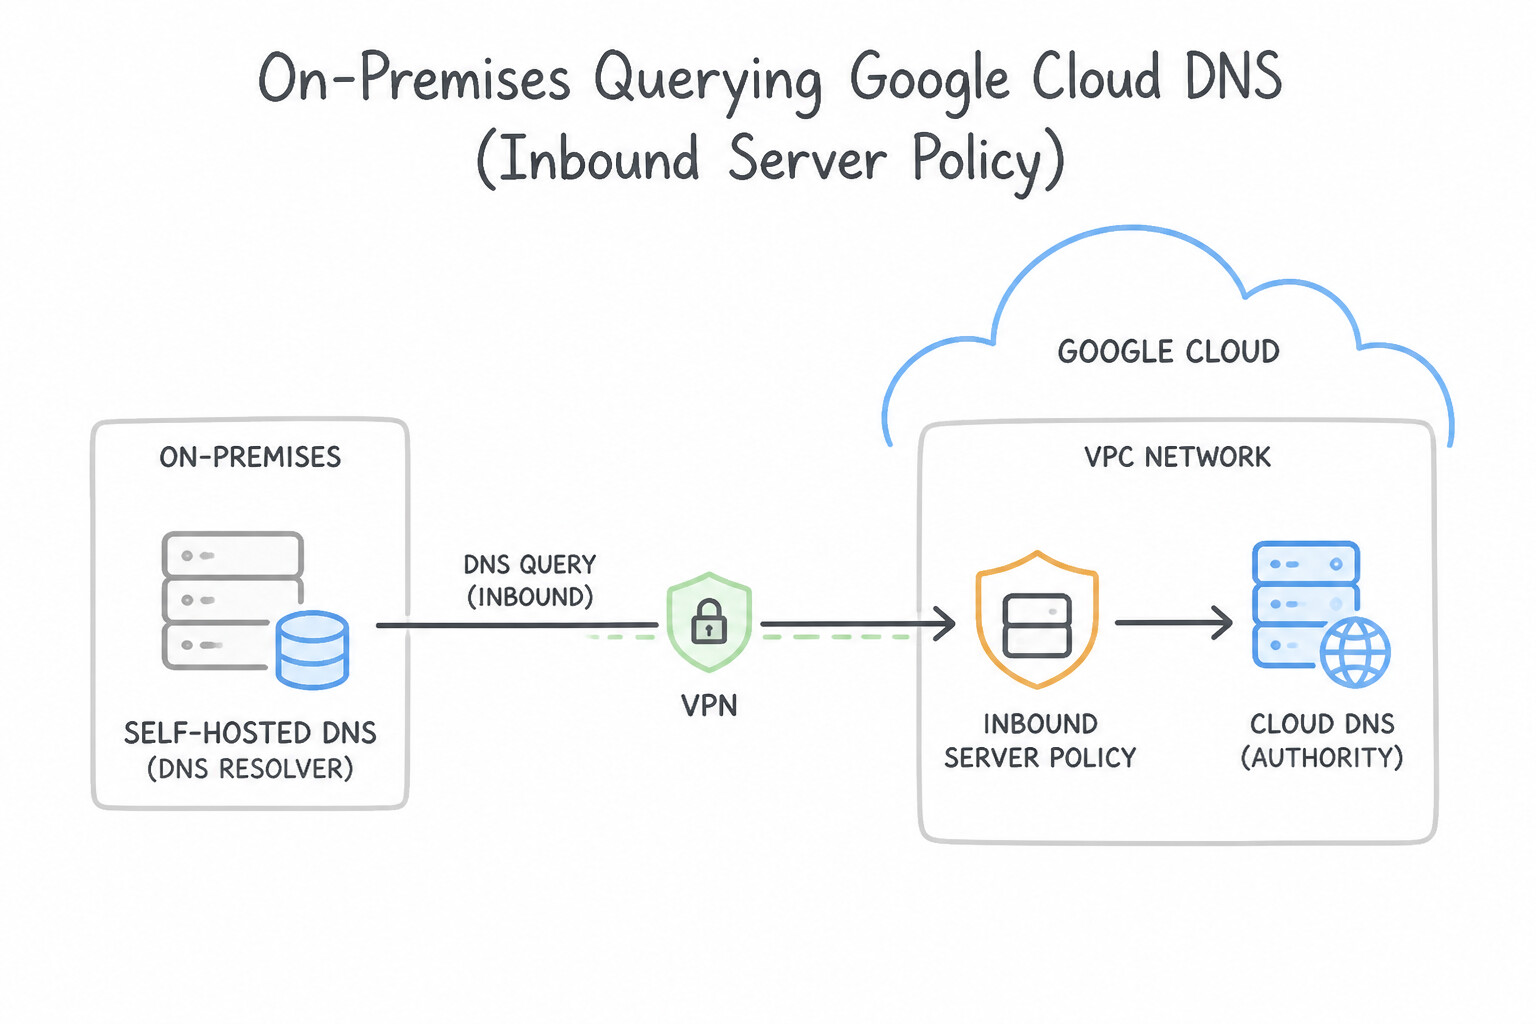
- On-Premises Querying Google Cloud (Inbound Server Policy):
- On-premises hosts cannot reach
169.254.169.254. To let on-premises DNS servers resolve Cloud DNS Private Zones, enable an Inbound Server Policy on the VPC. - Cloud DNS automatically allocates a regional internal IP address from each subnet in the VPC that has a hybrid attachment (VPN/Interconnect).
- Configure on-premises DNS servers with a conditional forwarder (e.g., for
*.gcp.example.comand*.googleapis.com) pointing to those allocated Inbound Forwarder entry point IPs inside the VPC subnets. - Google Cloud Querying On-Premises (Outbound Forwarding Zones):
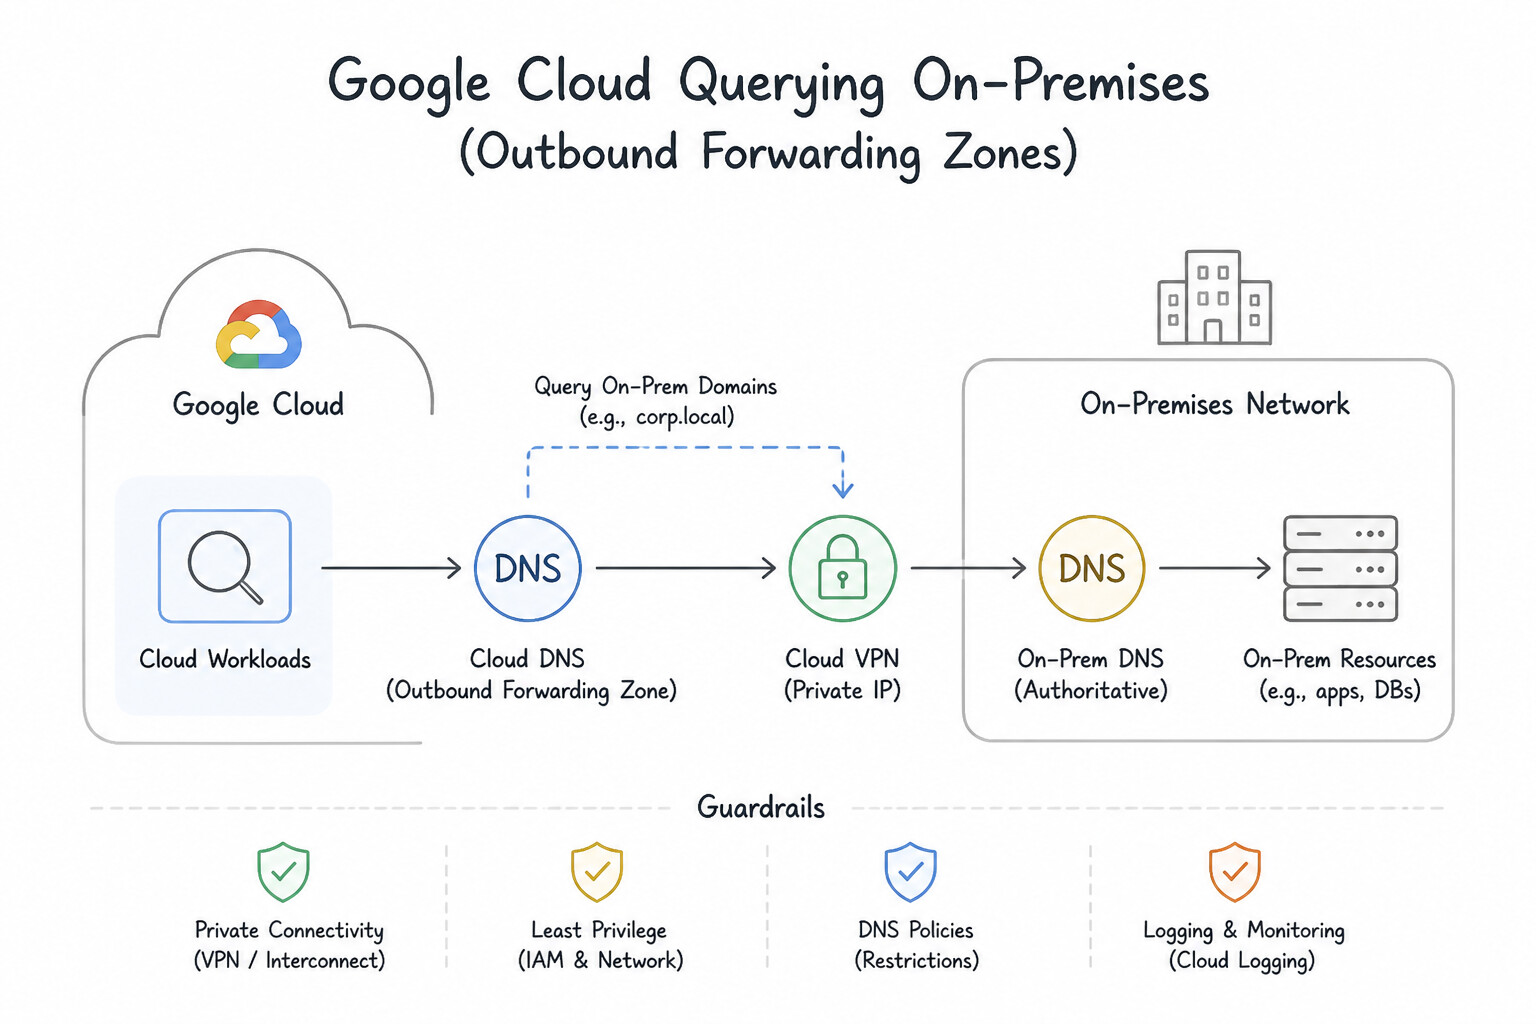
- Create a Cloud DNS Forwarding Zone (
--forwarding-targetsor--private-forwarding-targets) bound to the VPC. - When a Google Cloud VM queries a domain matching the Forwarding Zone, Cloud DNS forwards the query to the target on-premises DNS server IP using source IPs from Google's reserved range
35.199.192.0/19. - Two Forwarding Path Types (Critical architectures Distinction):
- Type 1 (
--forwarding-targets/ Standard Default Routing): Traffic is routed through the VPC's dynamic/static routing table (over HA VPN or Cloud Interconnect) with a source IP in35.199.192.0/19. You must configure a custom route advertisement on Cloud Router for35.199.192.0/19AND allow35.199.192.0/19through on-premises firewalls so return UDP/TCP port 53 packets route back into the tunnel! - Type 2 (
--private-forwarding-targets/ Private Routing): Forces Cloud DNS to route queries strictly to RFC 1918 targets inside the same VPC, a peered VPC, or behind an Internal Load Balancer / HA VPN without using the public35.199.192.0/19external-style path when standard routing fails across peering boundaries.
Key Implementation Patterns
- Enabling On-Premises Resolution of GCP Hostnames: Use Create an inbound server policy in Cloud DNS. Configure your on-premises DNS servers to forward queries to the IP addresses provided by the policy. An inbound server policy provides the entry point IPs for on-premises systems to query Cloud DNS.
- Firewall Requirements for Inbound DNS Policies: Use Create an ingress firewall rule to allow traffic from the IP range 35.199.192.0/19 on UDP and TCP port 53. Cloud DNS inbound forwarding uses a specific proxy IP range (35.199.192.0/19) that must be allowed via ingress firewall rules on port 53.
Key Takeaways (3.3e)
- Use an Inbound Server Policy to allow on-premises systems to query Cloud DNS private zones.
- The Inbound Server Policy provides entry point IP addresses that serve as DNS forwarder targets.
- Use Forwarding Zones (or Outbound Policies) when Google Cloud resources need to query on-premises DNS.
- DNS Peering is strictly for sharing DNS resolution between Google Cloud VPC networks.
Consideration 3.3f: Configuring public/private split horizon zones
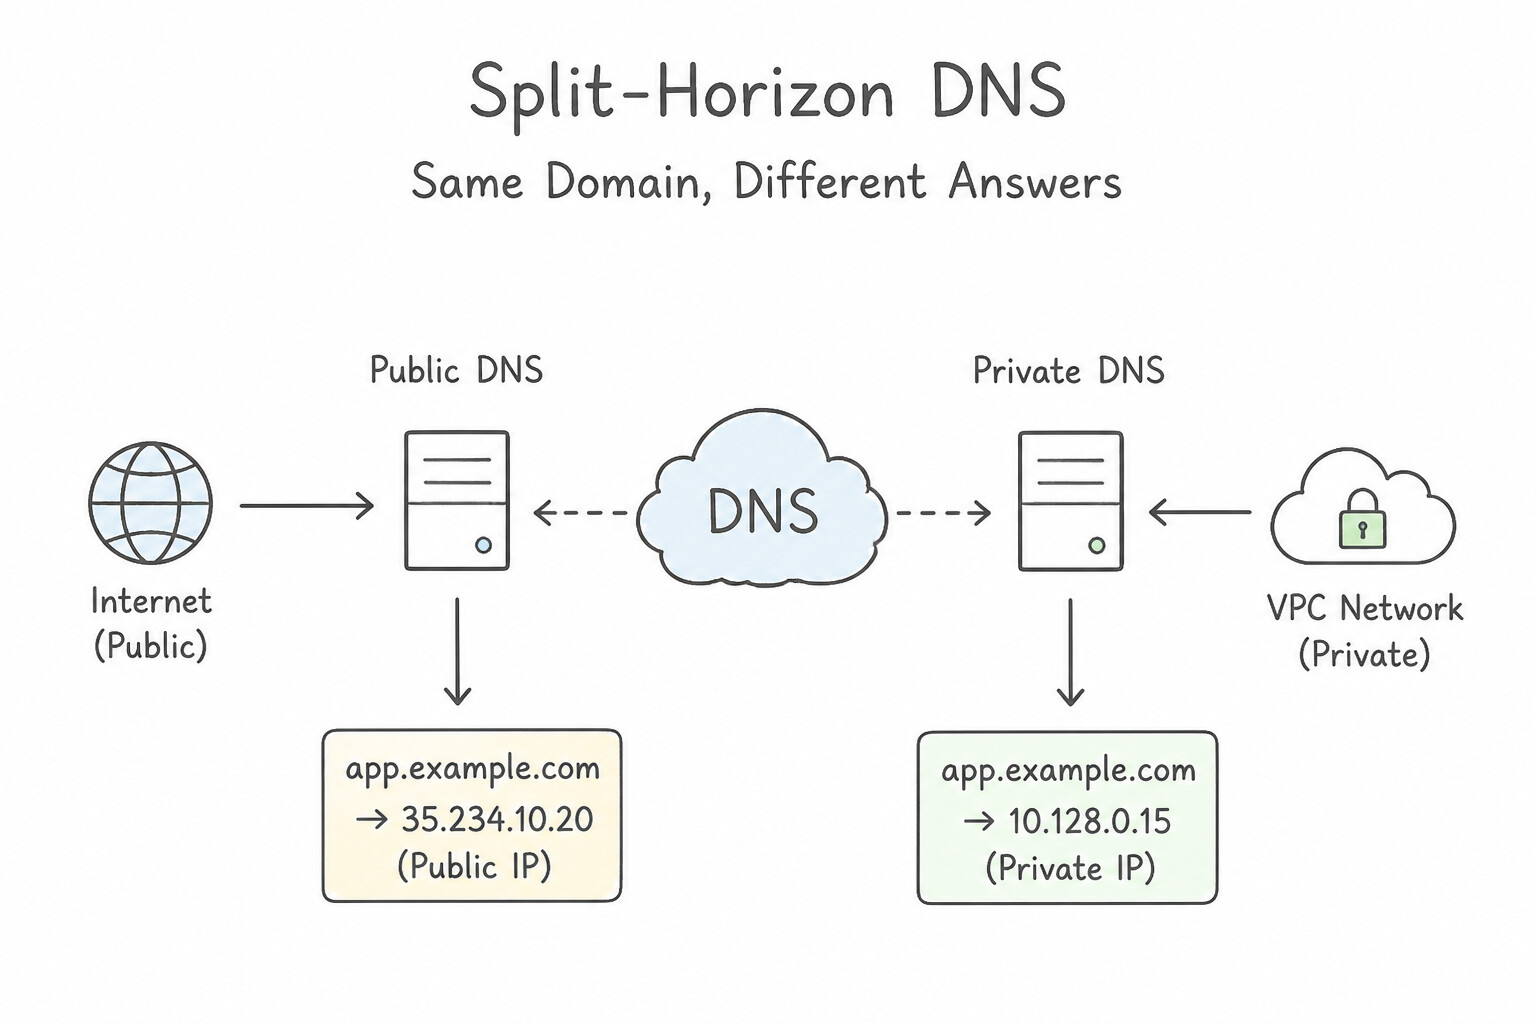
- What is Split-Horizon (Split-Brain) DNS?:
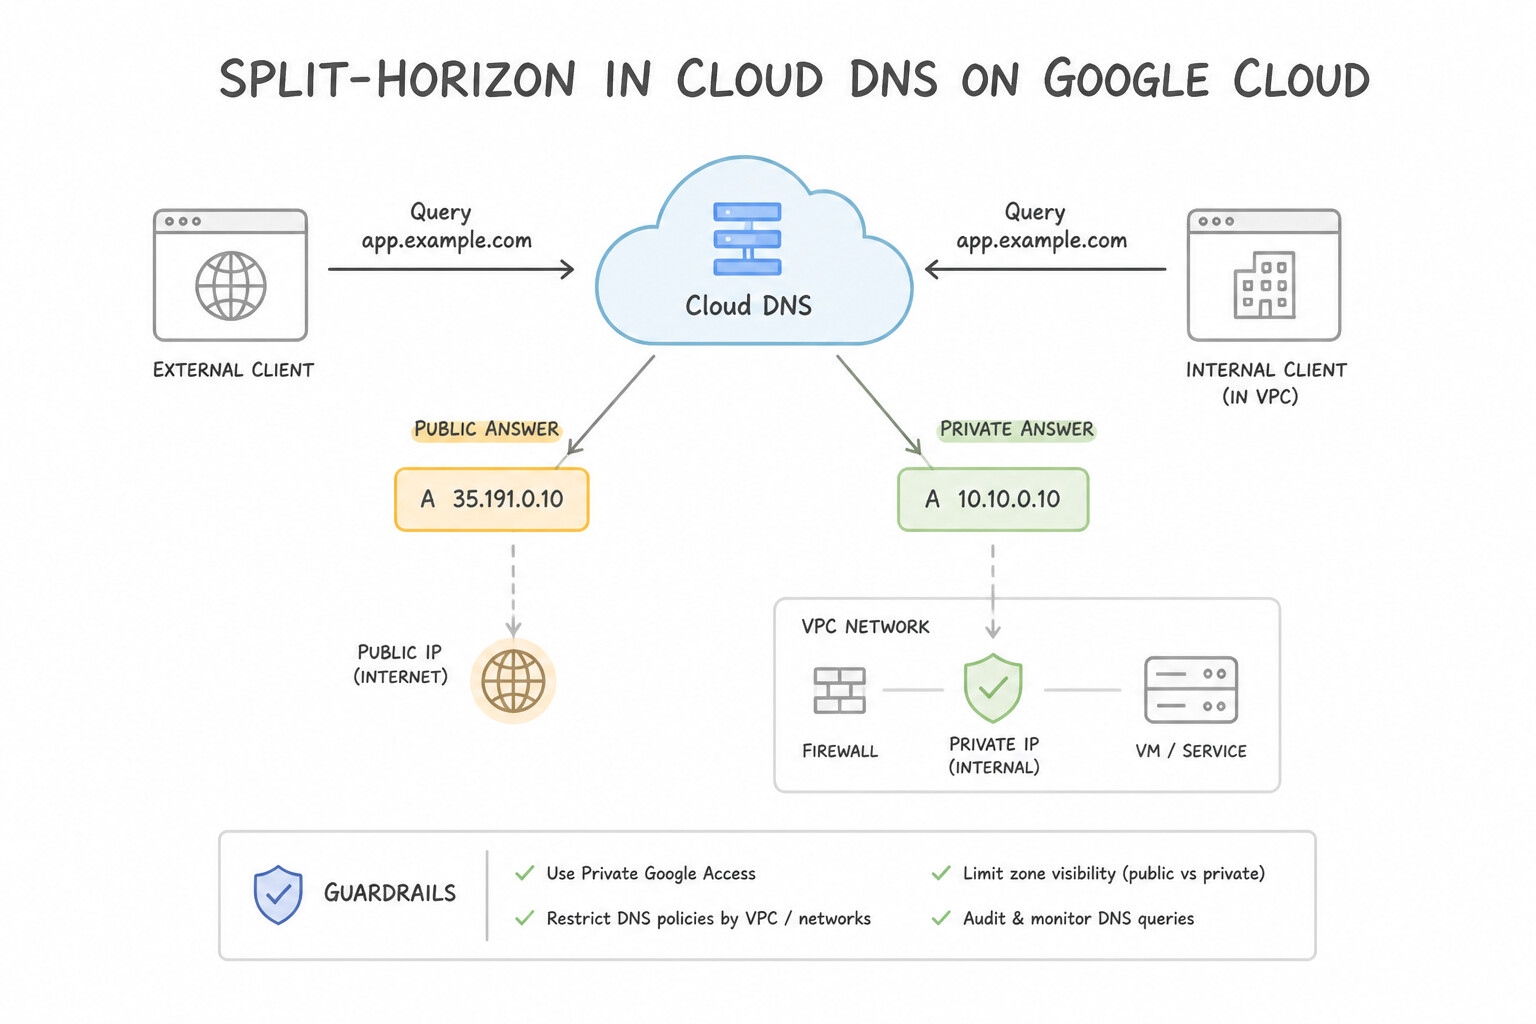
- Serving two different IP answers for the exact same domain name (
api.example.com) depending on whether the client is querying from inside an authorized VPC (returns internal RFC 1918 IP10.10.1.50of an Internal ALB) or from the public internet (returns public IP34.120.55.10of an External ALB). - Implementing Split-Horizon in Cloud DNS:
- Create two separate managed zones with the exact same DNS name (
example.com.): - A Public Zone (
--visibility=public) containing publicA/CNAMErecords exposed to internet resolvers. - A Private Zone (
--visibility=private --networks=prod-vpc) containing internal RFC 1918Arecords bound to your VPCs. - Crucial Pitfall:
- Because a Private Zone overrides a Public Zone of the same name for all records under that zone (
NXDOMAINnon-fallthrough rule), ifwww.example.comexists in the Public Zone (example.com.) and you create a Private Zone forexample.com.that only containsinternal-api.example.com, VMs insideprod-vpcwill suddenly getNXDOMAINwhen looking upwww.example.com! - Fix: Either replicate the required public records into the Private Zone, or scope the Private Zone to a more specific subdomain (
internal.example.com.).
Key Implementation Patterns
- Basic Split Horizon Configuration: Use Create a public managed zone and a private managed zone. Set the DNS name to "app.retail.com" for both zones and add the appropriate A records. Split horizon DNS uses two zones (one public, one private) with the same name to serve different records based on the query source.
- Troubleshooting Private Zone Visibility: Use Update the private managed zone configuration to authorize the "prod-vpc" network. Private zones must be explicitly authorized for specific VPC networks to be visible to VMs within those networks. (Avoid alternative: Deleting the public zone breaks external resolution and destroys the split horizon configuration.)
- Resolution Behavior (NXDOMAIN): Use An NXDOMAIN error indicating the record does not exist. The private zone shadows the public zone; missing records result in NXDOMAIN. (Avoid alternative: Private zones do not fall back to public zones for missing records.)
Key Takeaways (3.3f)
- Split Horizon DNS allows you to serve different data for the same domain name depending on the source of the query (Internet vs. VPC).
- It requires creating two Managed Zones with the same DNS name: one with visibility set to Public and one set to Private.
- VPC-attached resources prioritize the Private Zone records over Public Zone records for the same name.
- Split Horizon DNS uses two zones (one public, one private) for the same domain.
Consideration 3.3g: Configuring DNS peering and cross-project binding
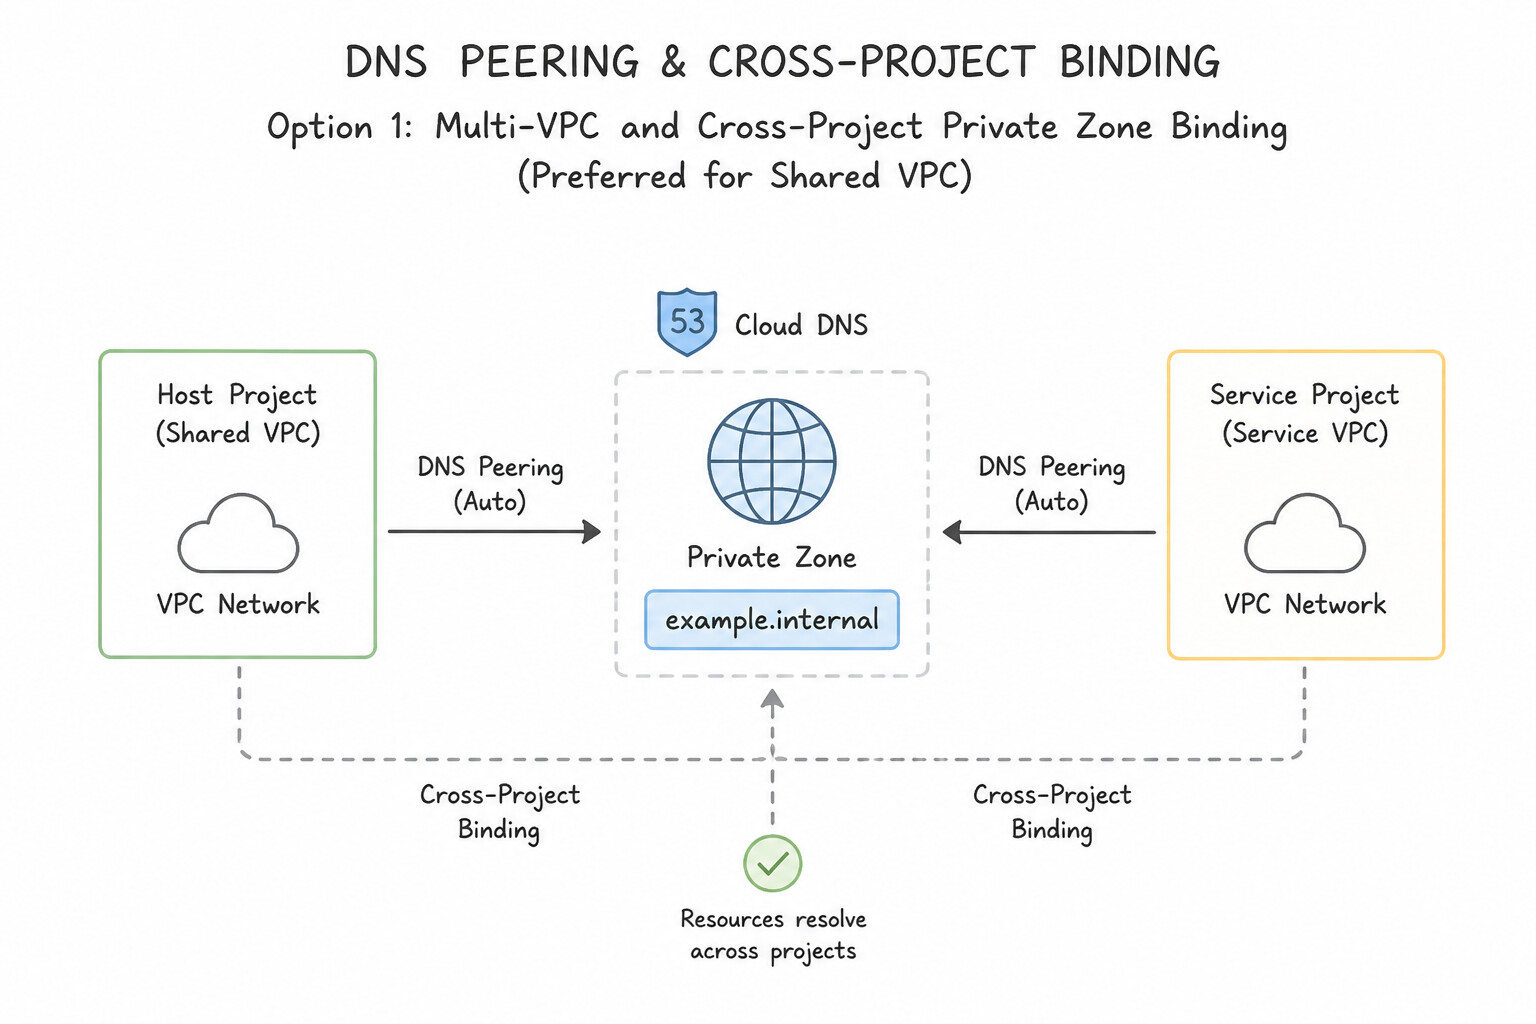
- Option 1: Multi-VPC & Cross-Project Private Zone Binding (Preferred for Shared VPC & Simple Multi-VPC):
- A single Cloud DNS Private Zone (or Forwarding Zone / Response Policy) can be bound directly to up to 50 VPC networks, including VPCs in different projects within the same organization (
gcloud dns managed-zones update --networks=...). - Does not require VPC Network Peering between the VPCs for DNS resolution to succeed (though VMs still need L3 connectivity via VPN/NCC/Peering to actually connect to the resolved IPs).
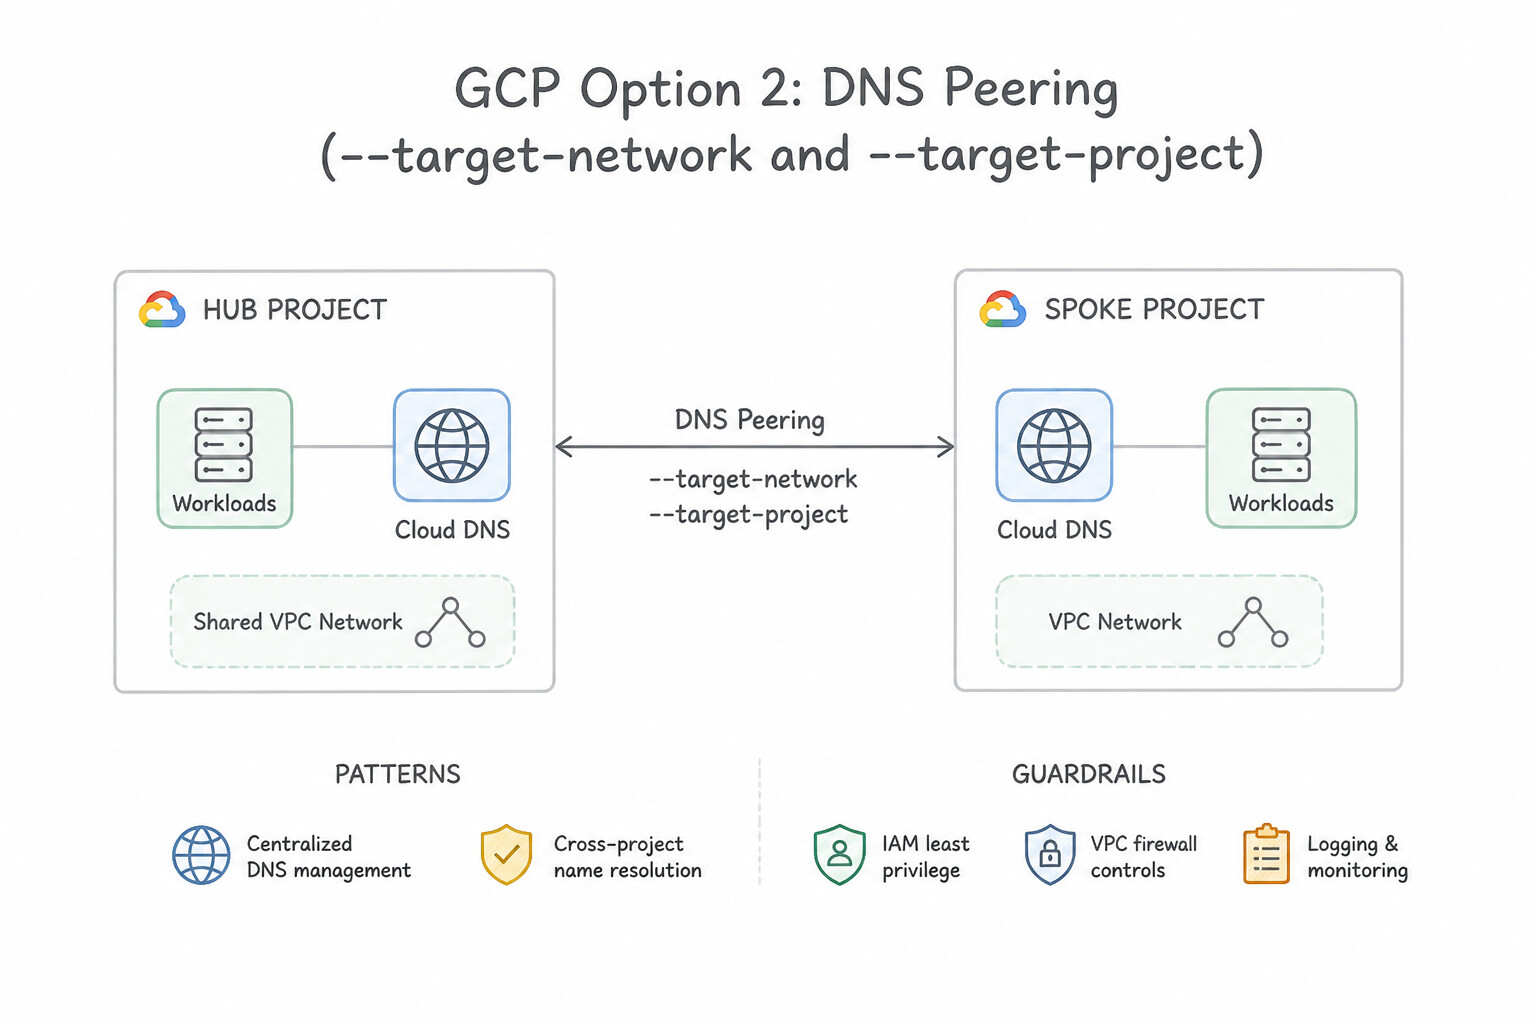
- Option 2: DNS Peering (
--target-network&--target-project): - Creates a unidirectional delegation where a consumer VPC sends all DNS queries for a specific namespace (e.g.,
corp.internal.) to a producer VPC's DNS resolution order. - When to Use DNS Peering: In a Hub-and-Spoke hybrid architecture where the Hub VPC owns the Cloud Interconnect / HA VPN and the Outbound Forwarding Zone to on-premises DNS (
corp.internal.). By creating a DNS Peering Zone in each Spoke VPC pointingcorp.internal.to the Hub VPC, Spoke VMs can resolve on-premises DNS names through the Hub VPC's Outbound Forwarding Zone without duplicating forwarding zones or VPN tunnels in every spoke! - common pitfalls: DNS Peering is not transitive. If VPC A DNS-peers with VPC B, and VPC B DNS-peers with VPC C, VPC A cannot resolve VPC C's peered namespace. Instead, VPC A must point its DNS Peering zone directly to the VPC that owns the authoritative Private Zone or Outbound Forwarding Zone.
Key Implementation Patterns
- Centralized DNS for Hub-and-Spoke Topology: Use Create a Cloud DNS peering zone in each Spoke project for "example.corp" with the Hub VPC as the peer network. DNS peering zones allow Spoke VPCs to query the DNS configuration of a Hub VPC without requiring VPC Network Peering.
- Transitive DNS Peering Limitations: Use Create a DNS peering zone in VPC-A that targets VPC-C. Cloud DNS peering is not transitive; you must create a direct peering zone in VPC-A targeting VPC-C. (Avoid alternative: Cloud DNS does not have a setting to enable transitive forwarding between peered zones.)
- Cross-Project DNS Peering Configuration: Use Set the --target-network flag to projects/Project-Host/global/networks/shared-network. Cross-project references require the full resource path format: projects/[PROJECT_ID]/global/networks/[NETWORK_NAME]. (Avoid alternative: Providing just the network name implies the network exists in the same project as the DNS zone.)
Key Takeaways (3.3g)
- Cloud DNS Peering allows a VPC to resolve names using the DNS configuration of another VPC.
- DNS Peering does not require VPC Network Peering or IP connectivity between the networks.
- Use DNS Peering to centralize DNS management in Hub-and-Spoke topologies.
- Avoid duplicating DNS records across projects manually.
Consideration 3.3h: Configuring DNS for GKE
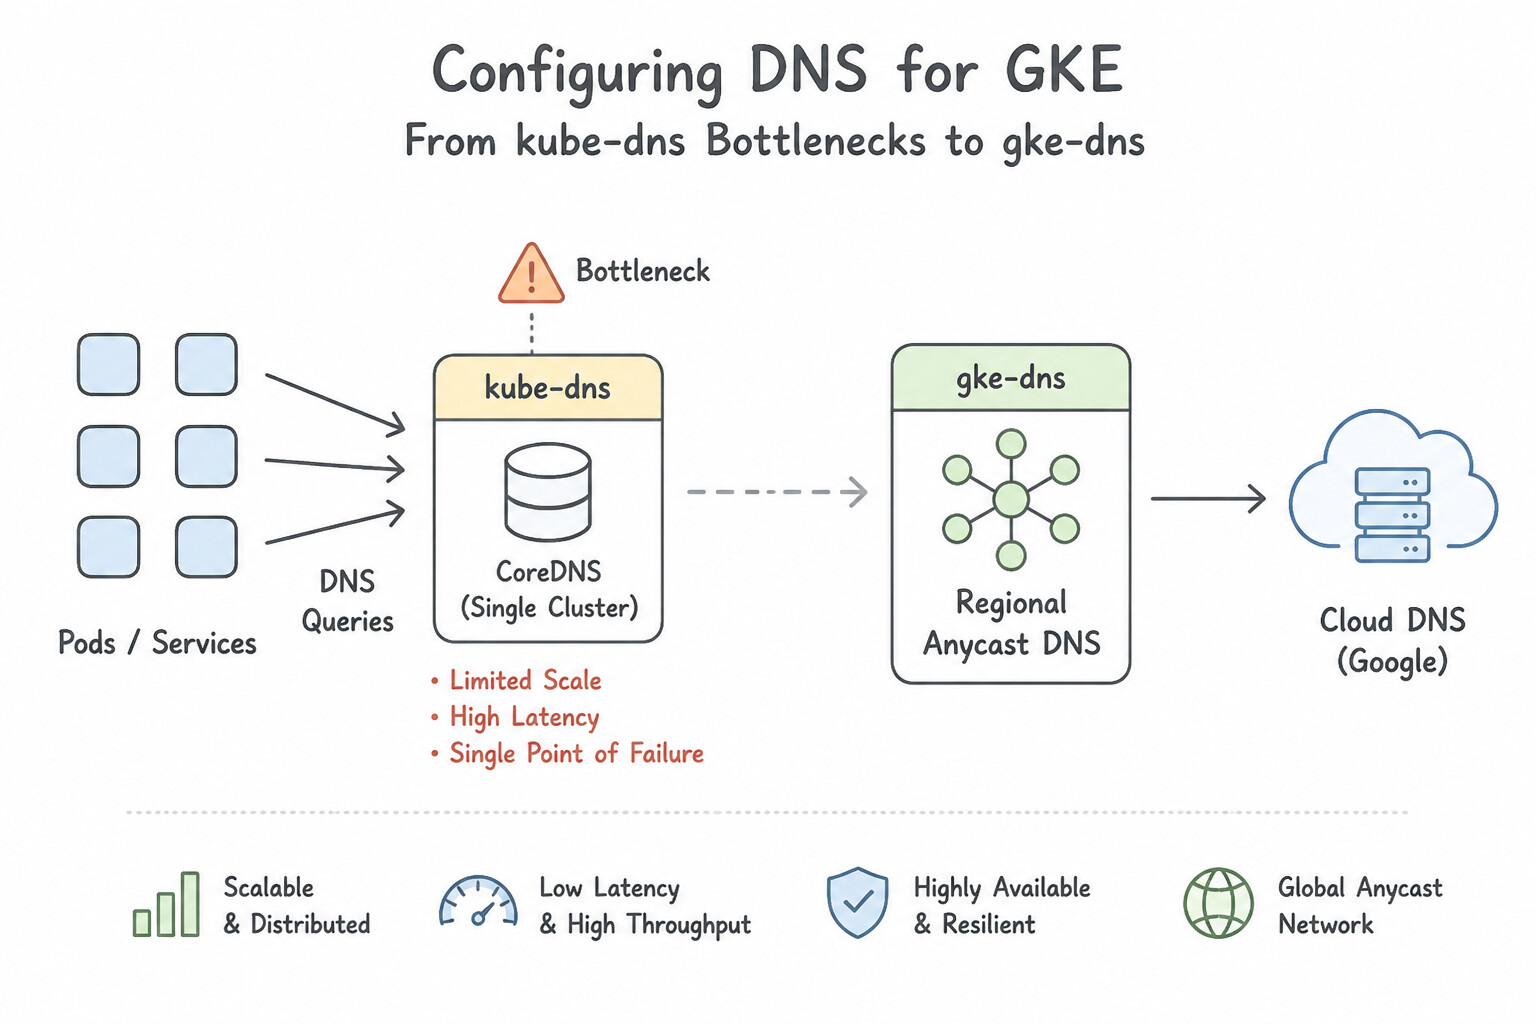
kube-dnsBottlenecks in Large GKE Clusters:- By default, GKE runs
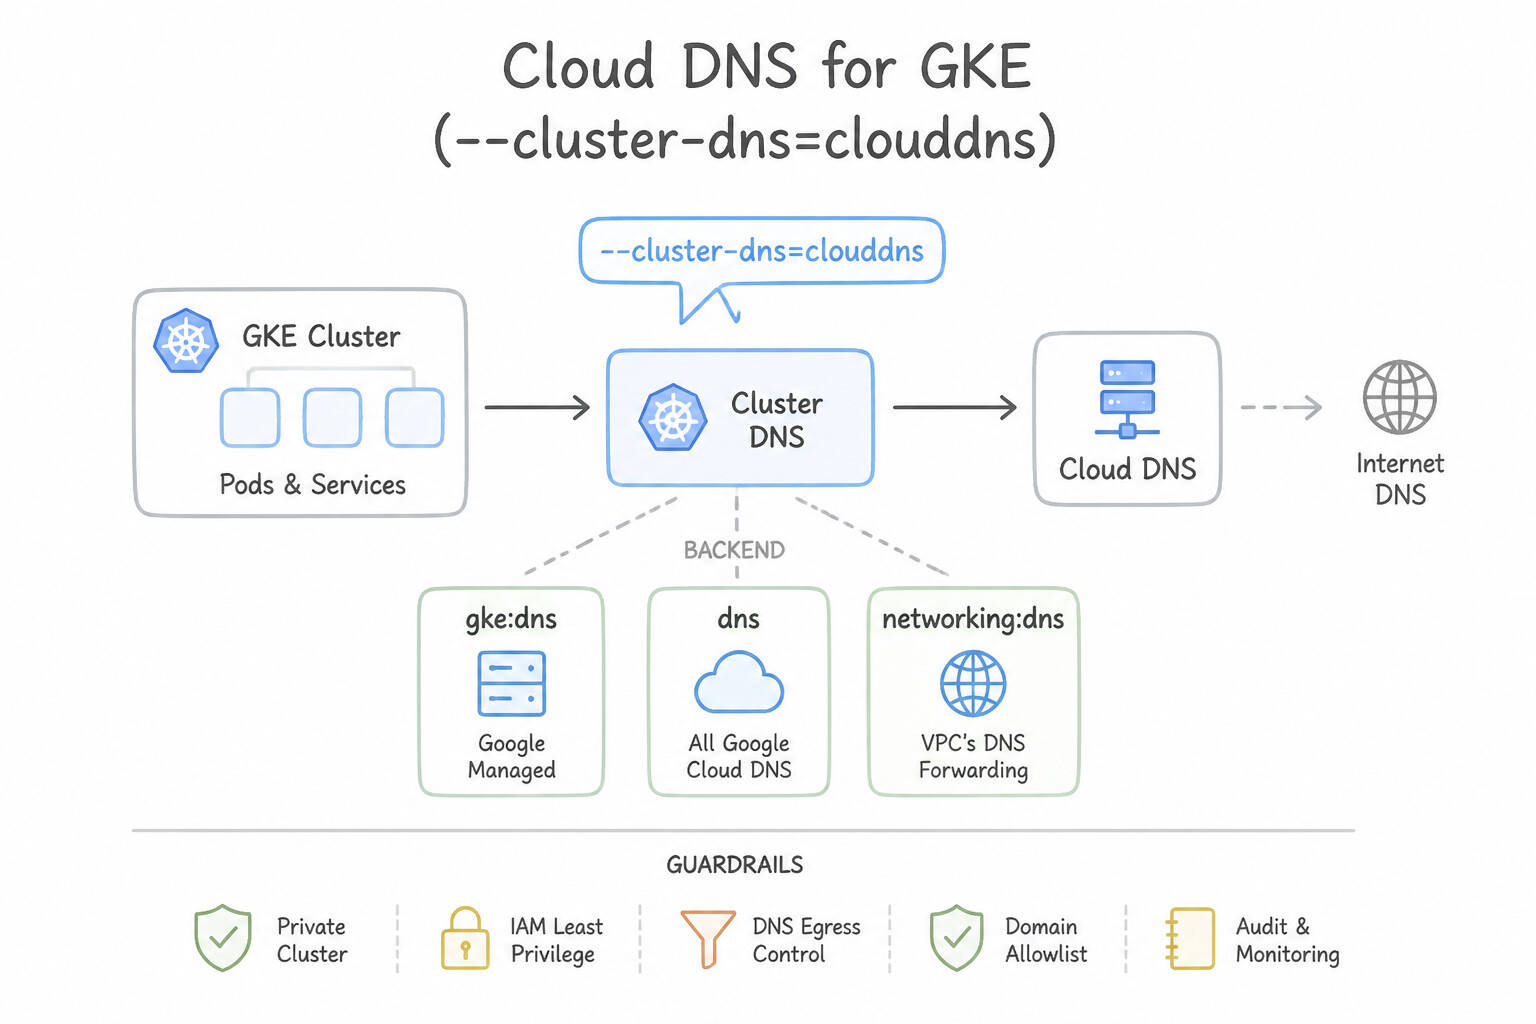
kube-dnsasDeploymentPods managed by an autoscaler (kube-dns-autoscaler). Under heavy DNS query rates (or worsened by Alpine Linuxmuslandndots:5search-path amplification),kube-dnsPods can exhaust CPU/memory or conntrack entries on worker nodes. - Cloud DNS for GKE (
--cluster-dns=clouddns): - Replaces in-cluster
kube-dnsPods entirely with the local Node Metadata Server (169.254.169.254) backed by Google's infinitely scalable Cloud DNS infrastructure—requiring zero in-cluster DNS Pods and zero node CPU/memory overhead. - Two Scopes (
--cluster-dns-scope): CLUSTER_SCOPE: Cluster Service records (my-svc.my-ns.svc.cluster.local) are resolvable only by Pods running inside that GKE cluster (drop-in replacement forkube-dns).VPC_SCOPE(Additive VPC Scope): Cluster headless/ClusterIP/Internal LB Service records (my-svc.my-ns.svc.<cluster-domain>) are written into a VPC-scoped Cloud DNS Private Zone, making GKE Services directly resolvable by non-GKE Compute Engine VMs, Cloud Run services, and on-premises hosts connected to the VPC!NodeLocal DNSCache:- Runs a lightweight caching agent (
DaemonSet) on every GKE node at a link-local IP (169.254.20.10). Can be combined with eitherkube-dnsorCloud DNS for GKEto absorb repetitive queries locally on the node and convert UDP queries to TCP upon upstream cache misses.
Key Implementation Patterns
- Scaling DNS for Large GKE Clusters: Use Enable Cloud DNS for GKE on the cluster. Cloud DNS for GKE offloads DNS resolution to Google's managed infrastructure, removing the scaling burden of in-cluster DNS pods. (Avoid alternative: Scaling kube-dns replicas keeps the workload inside the cluster and does not switch to a fully managed service.)
- Resolving GKE Services from VPC VMs: Use Enable Cloud DNS for GKE on the cluster and set the scope to VPC. Setting the Cloud DNS scope to VPC exposes GKE service DNS records to the entire VPC network. (Avoid alternative: Manually managing DNS records for ephemeral pods is not scalable as IP addresses change frequently.)
- Automating Public DNS Records with ExternalDNS: Use Deploy ExternalDNS to the cluster with permissions to modify the Cloud DNS managed zone. ExternalDNS is the standard tool to automate syncing Kubernetes Ingress hostnames to Cloud DNS records. (Avoid alternative: Cloud DNS for GKE handles internal cluster DNS resolution, not public DNS records for Ingress.)
Key Takeaways (3.3h)
- Default kube-dns deployments run as pods within the cluster and consume cluster resources.
- Large clusters may overwhelm standard kube-dns, causing latency.
- Cloud DNS for GKE is a managed service that offloads DNS resolution from the cluster.
- Cloud DNS provides better scalability and removes the maintenance burden of DNS pods.
Quick Decision Cheat Sheet (Subsection 3.3)
If the Scenario Requires... | Choose This Google Cloud Pattern | Avoid This Common Mistake |
|---|---|---|
"35.199.192.0/19" | Cloud DNS Outbound Forwarding source IP range (must be advertised via Cloud Router BGP to on-premises) | Google Front End health check prober IP range ( 35.191.0.0/16 & 130.211.0.0/22) |
"On-premises hosts need to resolve Private Google Access ( *.googleapis.com -> 199.36.153.8/30) via Cloud DNS" | Create a Private Zone for googleapis.com., enable an Inbound Server Policy, and point on-prem conditional forwarders to the Inbound Policy IPs | Forwarding on-prem queries to 8.8.8.8 (returns public internet IPs instead of 199.36.153.8/30) |
"Protect public domain against DNS cache poisoning and spoofed responses" | Enable DNSSEC on the Cloud DNS Public Zone AND register the DS record at the domain registrar | Enabling DNSSEC without adding the DS record at the registrar (leaves chain of trust broken) |
"Eliminate kube-dns Pod CPU/memory overhead and scaling limits in GKE" | Enable Cloud DNS for GKE ( --cluster-dns=clouddns) | Increasing kube-dns deployment replicas manually without kube-dns-autoscaler |
"Keep DNS queries strictly within a specific region even if all regional endpoints fail health checks" | Cloud DNS Geolocation Routing Policy with Fencing enabled ( --enable-geo-fencing) | Standard Geolocation Policy without fencing (automatically fails over to the next closest healthy region) |
"Migrate a live production domain to Cloud DNS with zero downtime" | Lower TTLs first, import BIND/YAML zone file, verify with dig @ns-cloud-..., update registrar NS, wait for old TTL before deleting old zone | Leaving DNSSEC enabled during registrar NS switch or deleting the old DNS zone immediately after updating NS records |
Further Reading (Subsection 3.3)
- Manage zones and records — Provides details on creating and managing Public and Private zones, including split-horizon configurations.
- Split-horizon DNS — Specifically explains the concept of split-horizon DNS where you have a private zone and a public zone with the same name.
- Cloud DNS Peering Zones — Explains how DNS peering allows a zone to send queries to another VPC network for resolution.
- Cloud DNS Forwarding Zones — Documentation describing how forwarding zones work to direct queries to alternative name servers.
- Cloud DNS Overview — General overview of Cloud DNS features including public, private, and peering zones.
- gcloud dns record-sets export — Documentation describing how to use the gcloud CLI to import record sets, specifically highlighting the usage of the --zone-file-format flag for BIND files.
Book TOC · Previous · Chapter 4 of 8 · Next
AwesomeGCP.com Learning
The approach taken is a question-led learning approach: you explore realistic project scenarios where you need to make decisions or take actions to achieve business goals within specific constraints. Instead of passive learning, you are challenged to think and work through the options to master the Professional Cloud Network Engineer (PCNE) certification!